Table of Contents >> Show >> Hide
- What Is a Circular Saw and What Is It Used For?
- Circular Saw Basics: Know the Parts Before You Pull the Trigger
- Circular Saw Safety Rules You Should Never Skip
- How to Set Up a Circular Saw Before the First Cut
- How To Use a Circular Saw Step by Step
- How to Make Common Circular Saw Cuts
- How to Cut Straighter and Cleaner
- Common Circular Saw Mistakes Beginners Make
- What the First Few Cuts Usually Teach You
- Final Thoughts
A circular saw is one of those tools that looks like it means business because, frankly, it does. It is fast, loud, efficient, and wildly useful for DIY projects, home repairs, woodworking, framing, shelving, decking, and breaking down big sheets of plywood without begging a table saw for help. But it also has a reputation for being a little intimidating. That is fair. A spinning blade tends to make people focus.
The good news is that learning how to use a circular saw is not complicated when you understand a few fundamentals: how to set the saw up correctly, how to support the material, how to make clean cuts, and how to avoid classic mistakes like binding, wandering off the line, and kickback. Once those pieces click, the circular saw becomes less “garage dragon” and more “reliable project sidekick.”
This complete guide walks through circular saw basics, safety rules, setup tips, and the step-by-step process for making straight cuts, crosscuts, rip cuts, bevel cuts, and more. Whether you are a beginner holding a saw for the first time or a DIYer who wants cleaner, safer results, this guide will help you cut with more confidence and fewer surprises.
What Is a Circular Saw and What Is It Used For?
A circular saw is a handheld power saw with a round blade that spins at high speed to cut through material. Most homeowners use it for wood, plywood, MDF, OSB, and framing lumber, but with the correct blade it can also cut some plastics, metal, masonry, and composite materials.
The most common uses for a circular saw include:
- Crosscutting boards to length
- Ripping boards or sheet goods along the grain
- Breaking down plywood for shelves, cabinets, or workbenches
- Making bevel cuts for trim or framing
- Cutting outdoor materials like decking and fence boards
There are two common saw styles: sidewinder and worm drive. A sidewinder is the most common option for DIYers. It is lighter, more compact, and easier to handle. A worm-drive saw is heavier, longer, and often preferred for demanding framing work because it delivers strong torque. Both can make excellent cuts. The best one is the one you can control safely and comfortably.
Circular Saw Basics: Know the Parts Before You Pull the Trigger
You do not need to memorize your saw like it is a final exam, but you should know the major parts:
Blade
This is the cutting wheel. Different blades are designed for different materials and cut quality. A general-purpose wood blade is fine for many tasks, but fine-finish plywood blades, framing blades, metal-cutting blades, and masonry blades all exist for a reason.
Shoe or Base Plate
This flat metal plate rides on the material as you cut. A steady shoe is a steady cut. If the shoe tips, lifts, or twists, the blade tends to follow along like an overconfident puppy.
Upper and Lower Blade Guard
The upper guard stays fixed over the top of the blade. The lower guard retracts as the saw enters the cut and should snap back into place when the blade leaves the workpiece. If the lower guard sticks, drags, or hangs open, stop and fix that issue before using the saw.
Depth Adjustment
This lets you control how far the blade extends below the material. Too deep and the cut becomes less efficient and less safe. Too shallow and you will wonder why the board still looks smugly uncut.
Bevel Adjustment
This tilts the blade for angled cuts, usually up to 45 or 51 degrees depending on the saw.
Trigger and Safety Switch
Most circular saws require you to press a safety lock before squeezing the trigger. That is a good thing, not a nuisance cooked up by tool designers who hate fun.
Circular Saw Safety Rules You Should Never Skip
Before learning cutting technique, learn circular saw safety. A clean cut is nice. Keeping your fingers exactly where nature intended is nicer.
- Wear eye protection every time.
- Use hearing protection; circular saws are not subtle tools.
- Wear a dust mask or respirator when cutting dusty materials.
- Avoid loose sleeves, jewelry, and anything that can snag.
- Inspect the blade for damage or dull teeth before starting.
- Make sure the lower blade guard moves freely and closes instantly.
- Unplug the saw or remove the battery before changing blades or making adjustments.
- Never hold the material in your lap, against your leg, or in one hand while cutting with the other.
- Stand slightly to the side of the saw, not directly behind it, to reduce risk if kickback occurs.
- Let the blade reach full speed before entering the cut.
- Let the blade stop spinning completely before setting the saw down.
Also, know the big danger word: kickback. Kickback happens when the blade gets pinched, twisted, or bound in the cut, causing the saw to jerk back toward the user. It is one of the main hazards with a circular saw, and most good setup habits are really just kickback prevention wearing a fake mustache.
How to Set Up a Circular Saw Before the First Cut
1. Choose the Right Blade
Match the blade to the material. A rough framing blade works well for fast construction cuts in lumber. A fine-tooth blade is better for plywood and cleaner finish work. Specialty materials such as metal, tile, or masonry require the proper blade and, in many cases, additional safety steps. If you are new to circular saw use, stick with wood projects first.
2. Set the Blade Depth Correctly
One of the most important circular saw tips is to avoid exposing too much blade. The blade should extend only about 1/4 inch below the material, or roughly less than a full tooth below the workpiece. This improves control, reduces binding, and lowers the chance of kickback.
3. Check That the Blade Is Square
For normal 90-degree cuts, make sure the blade is actually square to the shoe. If the bevel setting is slightly off, your cut may still look straight but will not be square, which is bad news for shelves, joints, and your mood.
4. Mark the Cut Line Clearly
Use a pencil, framing square, chalk line, speed square, or straightedge depending on the cut. Mark the waste side of the line so you know where the blade should go. The saw cannot read your intentions, only your lines.
5. Support the Workpiece Properly
Support matters more than many beginners realize. If the wood shifts, sags, or pinches the blade, the cut can go wrong fast. Use sawhorses, a sturdy workbench, sacrificial 2x4s, or rigid foam insulation under sheet goods. Keep both the workpiece and offcut supported, but make sure the kerf can open freely and the waste can fall away safely.
How To Use a Circular Saw Step by Step
Step 1: Secure the Material
Clamp the board or panel if possible. Stability improves both safety and accuracy. For large plywood sheets, support the sheet on sacrificial strips or foam so the blade can pass through without hitting your garage floor, driveway, or table.
Step 2: Position the Saw
Place the front edge of the shoe on the material before the blade touches the wood. Line up the blade with the waste side of your cut mark. Check that the blade is not touching the workpiece yet.
Step 3: Start the Saw
Press the safety switch, squeeze the trigger, and allow the blade to reach full speed. Starting the cut before the blade is up to speed is a great way to invite chatter, wandering, and regret.
Step 4: Make the Cut
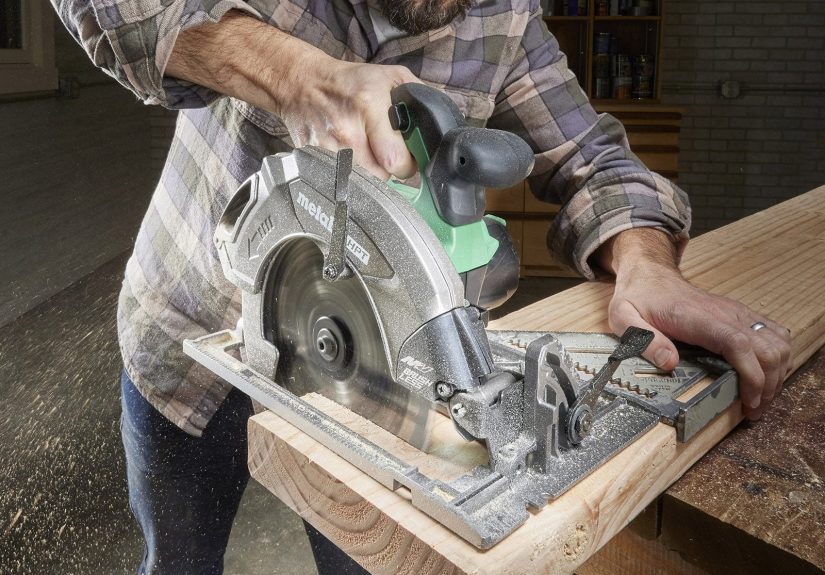
Guide the saw forward with steady, controlled pressure. Keep the shoe flat on the material. Do not force the saw. If the blade is sharp and the setup is right, the saw should cut smoothly. Forcing it can cause the blade to deflect, burn the wood, or bind in the kerf.
Step 5: Finish and Pause
Continue through the cut until the blade fully clears the material. Release the trigger, keep holding the saw firmly, and wait for the blade to stop completely before lifting it away or setting it down.
How to Make Common Circular Saw Cuts
How to Crosscut with a Circular Saw
A crosscut goes across the width of a board. This is one of the easiest circular saw cuts for beginners. Mark the cut with a speed square or framing square. For extra accuracy, use the square as a fence by running the saw’s shoe against it. Keep the cut line visible and let the waste piece fall away freely.
How to Rip Cut with a Circular Saw
A rip cut runs along the length of the board or sheet. These cuts are harder to keep straight freehand, especially on plywood. The easiest solution is a straightedge guide, track, or clamped board. If you are ripping sheet goods for cabinet parts, shelves, or a workbench top, a guide will save time and make you look much more talented than you feel.
For long rip cuts, reposition carefully if needed. Stop the saw fully before shifting your body or restarting in the kerf.
How to Make Bevel Cuts
Loosen the bevel adjustment, set the desired angle, then tighten it securely. Double-check the angle before cutting. Bevel cuts expose more blade and change how the saw rides on the material, so go slower and make sure the saw shoe stays fully supported. A test cut on scrap is always a smart move.
How to Make a Plunge Cut
A plunge cut begins in the middle of a panel instead of from the edge. This is more advanced and should be done carefully. Tilt the saw forward with the front of the shoe resting on the workpiece. Retract the lower guard if necessary, start the saw, and slowly pivot the blade down into the material. Once the cut is established, let the guard return to its normal position and continue forward.
Use extra caution with plunge cuts, especially in existing walls, floors, or blind areas where hidden wires, pipes, or fasteners may be present.
How to Cut Straighter and Cleaner
If your cuts look like they were negotiated rather than measured, these tips help:
- Use a straightedge guide for plywood and long rips.
- Mark clearly and cut on the waste side of the line.
- Use a sharp blade designed for the material.
- Set the blade depth correctly.
- Keep two hands on the saw whenever possible.
- Support large panels near the cut line and edges.
- Use painter’s tape or a scoring pass on plywood to reduce splintering.
- Let the saw do the work instead of shoving it forward.
For finished plywood, melamine, or veneered sheet goods, a fine-tooth blade and a shallow first scoring pass can dramatically reduce tear-out. It takes a little more time, but so does pretending chipped edges are “rustic.”
Common Circular Saw Mistakes Beginners Make
- Setting the blade too deep: more exposed blade means more risk and rougher cutting.
- Using a dull blade: this increases friction, burning, and binding.
- Cutting unsupported material: sagging panels love to pinch blades.
- Standing directly behind the saw: not ideal if kickback happens.
- Pulling the saw backward while the blade is spinning: a classic bad idea.
- Ignoring the cut line: the notch is helpful, but watch the blade path and shoe alignment too.
- Skipping practice cuts: scrap wood is cheaper than replacing project parts.
What the First Few Cuts Usually Teach You
The first real experience with a circular saw is often more emotional than technical. New users tend to expect one of two things: either the tool will be impossible to control, or it will glide through lumber like a movie montage. The truth is more ordinary and much more useful. The saw feels powerful, yes, but also predictable when the setup is right.
One common experience happens on the very first crosscut. The user marks a 2×4, lines up the saw, squeezes the trigger, and immediately notices three things: the saw is louder than expected, the blade reaches full speed faster than expected, and the cut goes better when the user stops trying to muscle the tool. That lesson matters. Circular saws reward control, not aggression. The moment a beginner relaxes the shoulders, keeps the shoe flat, and pushes steadily instead of forcefully, the cut usually improves.
Another common learning moment shows up when cutting plywood. At first, many people try to guide the saw freehand across a long sheet and are surprised when the cut drifts. It is not always poor skill. Large panels are awkward, and even a small twist in body position can send the blade off line. The experience that changes everything is using a straightedge guide for the first time. Suddenly the same saw feels more precise, the cut looks cleaner, and the job becomes far less stressful. That is when many DIYers realize the circular saw is not just a rough construction tool. With the right setup, it can be impressively accurate.
There is also the memorable experience of getting the blade depth wrong. Beginners often expose too much blade because it seems logical that “more blade” equals “better cutting.” In practice, the opposite is often true. The saw feels harsher, the cut can splinter more, and the blade is more likely to bind. Once users reset the depth so only a small portion of the blade extends below the board, the saw often feels smoother and more controlled. It is one of those small adjustments that creates a surprisingly big difference.
Many people also remember the first time they notice how important workpiece support is. A board that looks stable can pinch the blade near the end of the cut. A large sheet can sag under its own weight. An offcut can break away badly if it is not planned for. After one awkward cut, most users become believers in sawhorses, clamps, sacrificial supports, and thinking through where the waste piece will go before the trigger is pulled.
Finally, experience teaches respect without fear. After a few well-planned cuts, the circular saw stops feeling like a mystery and starts feeling like a system: correct blade, correct depth, stable support, clear line, steady pace. That confidence matters. It means the user is no longer guessing. And when you stop guessing with a circular saw, your projects get straighter, your cuts get cleaner, and your weekends get a lot more productive.
Final Thoughts
Learning how to use a circular saw safely is really about learning a repeatable routine. Inspect the saw. Choose the right blade. Set the blade depth properly. Support the material well. Mark clearly. Let the blade reach speed. Guide the saw steadily. Let the blade stop before setting it down. That routine works whether you are trimming a stud, ripping plywood for garage shelves, or making bevel cuts for a small woodworking project.
A circular saw is not a difficult tool to use, but it is a tool that rewards preparation. Respect the basics and it will give you fast, straight, useful cuts for years. Ignore the basics and it will hand you a crooked line, a scorched board, or a story that starts with, “So there I was, making one quick cut…” Best to avoid that version.