Table of Contents >> Show >> Hide
- What to Do Before You Even Press the Power Button
- How to Set Up Your Nintendo Switch 2 Step by Step
- How to Transfer Data From an Older Switch
- The First Settings You Should Change on Day One
- How to Start Using Your Nintendo Switch 2 Like You Actually Bought It to Have Fun
- Common Nintendo Switch 2 Setup Mistakes to Avoid
- Real-World Experiences: What It Feels Like to Start Using a New Nintendo Switch 2
- Conclusion
- SEO Tags
So, you finally got your hands on a Nintendo Switch 2. First of all: congratulations. Second of all: try not to tear open the box like a raccoon breaking into a snack cabinet. This console is easy to set up, but a smart first hour makes a huge difference. A few good decisions now can save you from annoying re-downloads, transfer hiccups, wrong storage purchases, and the classic “Why is my TV not doing the thing I paid for?” moment later.
If you are brand new to Nintendo, the Switch 2 is friendly right out of the box. If you are upgrading from the original Switch, it is even better because the system was clearly designed to make the move feel familiar. Either way, this guide walks you through how to set up your Nintendo Switch 2, how to transfer your old data if needed, which settings to change first, and how to actually start enjoying the thing instead of spending your entire evening in menus.
What to Do Before You Even Press the Power Button
Check what came in the box
Your Nintendo Switch 2 package should include the console, the Joy-Con 2 controllers, the dock, straps, a grip, and the AC adapter with charging cable. Before you start, place everything on a clean surface and make sure you are not missing anything important. This is also a good time to resist the urge to peel off anything that looks like a screen protector unless it is clearly packaging. The Switch 2 ships with a protective film layer on the display that is meant to stay there.
Decide whether you are starting fresh or transferring
This is the first big fork in the road. If your old Nintendo Switch is full of digital games, save data, screenshots, family accounts, and hard-earned chaos, use the official System Transfer option. If you are setting up your first Nintendo console or you simply want a clean slate, you can skip transfer during setup and sign in later.
Be honest with yourself here. If you have spent years building a game library, “I’ll just figure it out later” is the exact kind of sentence that turns into two hours of avoidable confusion.
Charge first, celebrate second
Yes, the system should power on when connected, but giving it a solid charge before you start transferring data or downloading games is the better move. Setup is smoother when the console is plugged in, especially if you are updating the system, signing into your Nintendo Account, downloading patches, and redownloading games all in one go.
How to Set Up Your Nintendo Switch 2 Step by Step
1. Connect the console to power
Plug the included Nintendo Switch 2 AC adapter into a wall outlet and connect the USB-C cable to the console. The system should power on. Attach the Joy-Con 2 controllers to the left and right sides of the console until they snap into place. The magnetic attachment is one of those tiny quality-of-life upgrades that makes you think, “Oh, right, this is nicer.”
2. Follow the on-screen setup prompts
You will be asked to select your language, region, and internet connection. Connect to Wi-Fi as early as possible. The console may begin downloading a system update during setup, and that is a good thing. Let it happen. Skipping updates on day one is like buying a sports car and refusing to put air in the tires.
3. Sign in with your Nintendo Account
This step matters more than many people realize. Your Nintendo Account is the key to your eShop purchases, online services, cloud-related features, and account identity across devices. If you already owned a Switch, sign in with the same Nintendo Account tied to your games and saves. If you are new, create an account and keep the login details somewhere safe. Not “somewhere in your brain where passwords go to die.” Somewhere actually safe.
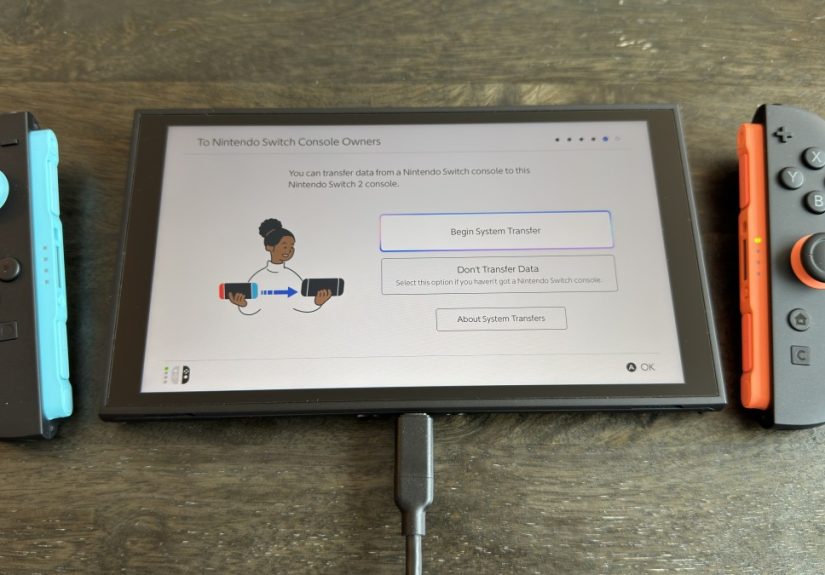
4. Choose whether to do a System Transfer
During initial setup, the Switch 2 asks whether you want to transfer data from an older Nintendo Switch. If you do, choose the transfer option right there. This is the cleanest, most straightforward path. If you skip it, you can still manage your account and downloads later, but the process becomes less graceful and more “organized by past mistakes.”
5. Add users and basic preferences
If more than one person will use the console, create separate user profiles from the start. This keeps save data organized and avoids the household argument of “Who started a new game over my progress?” You can also set your nickname, icon, time zone, and other personal preferences during the setup flow or shortly afterward.
How to Transfer Data From an Older Switch
If you are moving from the original Nintendo Switch to the Switch 2, Nintendo’s official transfer system is the right route. It can move digital purchases, save data, parental control settings, and other supported data. That said, not every little detail transfers automatically, so manage your expectations and read the prompts instead of speed-clicking through them like a caffeine-powered goblin.
Before you begin the transfer
- Charge both consoles and keep them plugged in if possible.
- Update the original Switch to the latest system software.
- Make sure each user you want to move is linked to a Nintendo Account.
- Have a stable Wi-Fi connection ready.
- Keep both systems close together.
What transfers
In general, your user information, digital purchases, save data, and many system settings can transfer. Nintendo also supports moving parental controls and other settings, though some features still need to be adjusted again on the new system. GameChat settings are one example you may need to revisit manually after the move.
What does not always transfer the way you expect
Bluetooth pairings and some network details may need to be set up again. Your old Wi-Fi passwords may not carry over cleanly. Some settings are better viewed as “close enough, not identical.” That is normal, and it is not a sign that your new console is haunted.
One very important storage note
The Nintendo Switch 2 uses microSD Express cards for expanded game storage. Older microSD cards from the original Switch are not the same thing. They may still be useful for copying screenshots and videos from an older system, but they are not the right answer if you want extra storage for Switch 2 games. This is one of the biggest early-owner gotchas, so avoid buying the wrong card just because the packaging says “microSD” in big friendly letters.
The First Settings You Should Change on Day One
Update the system software
Even if the console updated during setup, check again under System Settings to make sure you are current. Nintendo continues to tweak features, compatibility, and quality-of-life functions. Starting with the latest version gives you the best odds of a smooth launch experience.
Set up HDR correctly if you play on a compatible TV
The Switch 2 supports a much more modern display experience than the original system, including a larger 1080p screen in handheld mode, HDR support, and up to 4K output in docked play with compatible games and TVs. That is the good news. The less fun news is that HDR setup can be a little confusing if your television settings are not dialed in correctly. Spend a few minutes checking your TV’s game mode, HDR options, and calibration screens. It is one of those boring grown-up tasks that pays off the moment your game looks sharp instead of strangely washed out.
Turn on battery-friendly options
The official battery estimate for the Switch 2 is roughly 2 to 6.5 hours depending on the game and features in use, so smart battery habits matter. Lower the brightness a bit if you mostly play indoors, turn on auto-brightness, and consider enabling the “Stop Charging Around 90%” option if you dock the system often. That setting helps reduce long-term battery wear. It is not flashy, but Future You will appreciate it.
Set parental controls if kids will use the system
Nintendo’s parental controls remain one of the most practical family features on the platform. If this console is for a child, set that up early instead of after something awkward happens. On Switch 2, the parental tools are especially useful because they can help manage communication and GameChat-related permissions. Translation: a little setup now can prevent a lot of frantic parenting later.
Check controller and audio preferences
The Joy-Con 2 controllers support the familiar Nintendo control styles plus some new tricks, including mouse-like input in compatible games. Spend a few minutes testing handheld mode, tabletop mode, and docked play so you know what feels best. If you use headphones, pair them early. If you plan to use an older Pro Controller or compatible accessories from your original Switch, test those before settling in for a marathon session.
How to Start Using Your Nintendo Switch 2 Like You Actually Bought It to Have Fun
Redownload your digital games
Once your account is set up, head into the eShop and start pulling down your library. The Switch 2 includes 256GB of internal storage, which is a welcome upgrade, but modern game sizes can still eat through space faster than expected. Prioritize the games you plan to play now, then expand later with a proper microSD Express card if needed.
Try a mix of new and old games
One of the nicest things about the Switch 2 is that it does not make your old library feel obsolete. Compatible original Switch games can still shine here, and in many cases the experience feels smoother or more convenient simply because the hardware is better. That means your “starter pack” does not need to be all new releases. A good setup night might include one brand-new Switch 2 title, one old favorite, and one digital purchase you forgot you owned until suddenly it feels like free money.
Set up Nintendo Switch Online if you play online
If online multiplayer matters to you, this is the moment to get Nintendo Switch Online sorted. The service handles online play and other membership features, and on Switch 2 it also connects with GameChat. As of March 2026, GameChat is still free only through March 31, 2026; after that, Nintendo says a Nintendo Switch Online membership is required. So if voice chat and social features are part of your plan, keep that timeline in mind.
Try GameChat and social features
GameChat is one of the biggest “this is definitely the new model” features. You can start a chat with the C button, talk with friends, and use supported social features while playing. It gives the Switch 2 a more modern, connected feeling without losing that Nintendo flavor. If you play with friends regularly, set this up early. It is easier to enjoy a new console when you are not texting “Wait, how do I invite you?” every ten minutes.
Think about accessories after the basics
Once the core setup is done, then think about extras like a carrying case, controller upgrades, a camera for video chat, or extra storage. The important word there is after. Too many people buy accessories before they even know how they use the system. Figure out whether you are mostly docked, mostly handheld, or fully committed to playing Mario Kart in bed like a tiny speed-obsessed cave goblin. Your habits should decide your add-ons.
Common Nintendo Switch 2 Setup Mistakes to Avoid
- Buying the wrong memory card: For Switch 2 game storage, you want microSD Express, not just any old microSD card.
- Skipping the transfer prep: Update the old console, link accounts correctly, and plug both systems in.
- Ignoring TV settings: If your docked picture looks weird, the culprit might be HDR or TV mode settings.
- Forgetting family controls: Set parental controls before a child starts exploring online features.
- Downloading everything immediately: Start with the games you actually plan to play first.
- Removing the display film: Leave the protective film layer alone.
Real-World Experiences: What It Feels Like to Start Using a New Nintendo Switch 2
The first real experience of using the Nintendo Switch 2 is that it feels familiar in the best possible way. It does not demand that you learn a completely new gaming language. Instead, it behaves like a smarter, more polished version of something many players already love. The setup itself is not dramatic. It is quick, logical, and mostly gets out of your way. That matters because a new console should feel exciting, not like you are filing taxes with plastic controllers attached.
For returning Nintendo players, the emotional high point usually comes when your old library starts appearing on the new system. That moment lands harder than you might expect. It is not just about save files and purchases. It is the feeling that all those hours you already invested still matter. Your favorite games, your progress, your screenshots, your weird little user icon choice from three years agothey all help the new system feel instantly yours.
Then there is the hardware experience. The larger screen makes handheld play feel more premium without losing the pick-up-and-play charm that made the Switch line so successful. Attaching the Joy-Con 2 controllers has a satisfying snap that feels more refined than before. The whole device gives off the vibe of a sequel that listened carefully rather than one that tried to reinvent everything just to prove it could.
Docked play is where many new owners start doing their happy little “okay, now this is nice” nod. Games look cleaner, menus feel snappier, and the transition from handheld to TV still feels like Nintendo magic, even if you already know the trick. If your TV supports the newer display features and you spend a few minutes on calibration, the experience becomes noticeably more polished. It is not just about raw power. It is about convenience finally meeting better presentation.
There is also a practical side to the first few days. You start noticing that storage decisions matter more now. You realize you cannot just shove in a random old memory card and call it a day. You discover which games you want installed immediately and which ones can wait. You test your old accessories, pair your headphones again, maybe enable the 90% charging option, and gradually turn the console from “new device” into “my device.” That process is weirdly satisfying.
Social features add another layer to the experience. GameChat makes the system feel more current, especially for players who treat games as a hangout space as much as entertainment. Suddenly, the console is not just a box for solo sessions or couch multiplayer. It starts feeling like a more connected platform where chatting, sharing, and jumping into games with friends is part of the normal rhythm.
What really stands out, though, is how quickly the Switch 2 fades into the background once setup is done. That is a compliment. Great hardware disappears and leaves you alone with the fun. After the updates, transfers, and setting tweaks, what remains is the simple pleasure of playing. You settle into a game, forget about the menus, and realize the setup work was worth it. The best first experience with a new console is not one that feels technical. It is one that makes you forget the technology and just enjoy the ride.
Conclusion
Setting up the Nintendo Switch 2 is refreshingly simple, but the smartest owners know the first hour matters. Plug it in, connect to Wi-Fi, update the system, sign into the right Nintendo Account, and decide early whether you are transferring from an older Switch. After that, a few smart adjustmentsstorage planning, HDR setup, battery options, parental controls, and GameChat preferencesturn a good launch-night experience into a great one. In other words, do a little housekeeping first, and then get to the important business of racing, exploring, platforming, and shouting “One more round” at midnight.