
Table of Contents >> Show >> Hide
- Step 1: Start With the Box (Because Gravity Is a Harsh Critic)
- Step 2: Read the Sun (And the Weird Little Microclimate Around Your Window)
- Step 3: DrainageThe Unsexy Secret Behind Every Gorgeous Flower Box
- Step 4: SoilGive Roots a Penthouse, Not a Basement
- Step 5: Design Like a Pro With the Thriller–Filler–Spiller Formula
- Step 6: Choose Plants That Perform (Not Just Plants That Look Cute in the Store)
- Step 7: Planting DayThe “Looks Effortless” Method
- Step 8: Keep It Looking Professional (Instead of “We Tried”)
- Troubleshooting: Quick Fixes for Common Window-Box Problems
- Seasonal Pro Move: Refresh Instead of Rebuild
- Real-World Experience Notes ( of “What Seasoned Growers Learn the Hard Way”)
- Conclusion
Window boxes are basically curb appeal in a rectangle: a tiny stage where plants do jazz hands all season. But here’s the secret the pros knowgreat-looking window boxes aren’t “lucky.” They’re built (and planted) with a few boring-but-magic rules: smart drainage, the right soil, plants that actually agree with your sun, and a layout that looks effortless even though you definitely put thought into it.
This guide walks you through the whole processplanning, planting, and keeping your flower box gorgeous with practical examples, a little humor, and the kind of details that stop a window box from turning into either a dried-out salad or a swamp.
Step 1: Start With the Box (Because Gravity Is a Harsh Critic)
Pick a size that matches your windowand your schedule
A window box should look proportionate to the window it sits under. As a general visual rule, aim for a box that’s about the width of the window trim (or slightly narrower), so it looks intentional instead of like a planter trying to escape the scene.
- Depth matters: deeper boxes dry out more slowly and give roots more room.
- Weight matters: wet potting mix is heavy, and “heavy” gets heavier after a good rain.
- Access matters: if you can’t comfortably water it, you won’t. Choose a setup you’ll actually maintain.
Mount it like you mean it
If your window box is mounted, treat it like a small, beautiful piece of furniture… that could fall. Use brackets/hardware rated for the weight of a fully planted, fully soaked box, and use fasteners appropriate for your surface (wood, brick, siding). If you’re unsure, ask a hardware pro or contractoryour begonias are not worth a surprise gravity test.
Also: plan for water. If your box drains against siding, you’re inviting moisture problems. Ideally, your box should have a tiny gap behind it for airflow, and drainage should fall away from the house.
Step 2: Read the Sun (And the Weird Little Microclimate Around Your Window)
Light is the #1 reason window boxes succeed or fail. Before you buy plants, check how many hours of direct sun the spot gets in summer:
- Full sun: 6+ hours direct sun (south/west exposures often live here).
- Part sun/part shade: 3–6 hours.
- Shade: under 3 hours (north exposure, deep overhangs, or heavy tree cover).
Now add the “window box chaos factors”: reflective heat from glass, drying wind, and roof overhangs that block rain. A sunny window box can behave like a mini desert. A windy one can behave like a hair dryer. Choose plants accordingly, and plan to water more often than you would in the ground.
Step 3: DrainageThe Unsexy Secret Behind Every Gorgeous Flower Box
Rule #1: Drainage holes are non-negotiable
If your window box doesn’t have holes, add them (or use an inner pot/liner system that drains). The goal is simple: excess water must escape. Otherwise roots suffocate, rot moves in, and your “charming cottage look” becomes “sad compost.”
Skip the rocks at the bottom
Putting rocks in the bottom of containers is a classic gardening myth. It doesn’t improve drainage the way people think; it can actually reduce effective soil space and create conditions where the root zone stays too wet. The fix is better design: drainage holes + a quality potting mix.
Do this instead: cover holes so soil stays put
To keep potting mix from washing out, place something porous over the holes: landscape fabric scraps, mesh screen, a coffee filter, or a purpose-made drainage screen. You want water out, soil in.
Optional but helpful: protect wood and manage moisture
- Wood boxes: line the inside with plastic (with drainage holes aligned) to slow rot.
- Hot, fast-drying spots: consider a self-watering insert or a moisture-retentive potting mix.
- Apartment life: add a drip tray only if it won’t trap water against the basestanding water defeats the point.
Step 4: SoilGive Roots a Penthouse, Not a Basement
Use potting mix, not garden soil
Window boxes are containers, and containers need a light, well-aerated growing medium. Garden soil compacts in small spaces, drains poorly, and can become a brick with mood swings. A high-quality potting mix is engineered to hold moisture while still leaving air pockets for roots.
Level up your mix (without turning it into a science project)
You can plant straight into a good potting mix, but pros often “tune” it based on conditions:
- For blazing sun / fast drying: choose a mix labeled for containers that retains moisture well, and consider adding a bit of compost for water-holding (don’t overdo it).
- For rainy climates: prioritize drainage and structureavoid mixes that stay soggy.
- For heavy feeders (petunias, calibrachoa, veggies, herbs): plan on regular fertilizer.
Pre-moisten the potting mix like a grown-up
Here’s a pro move: lightly moisten potting mix before you fill the box. Dry potting mix can resist water at first, leading to weird dry pockets. The goal is evenly damp, not swampythink “wrung-out sponge,” not “wet concrete.”
Step 5: Design Like a Pro With the Thriller–Filler–Spiller Formula
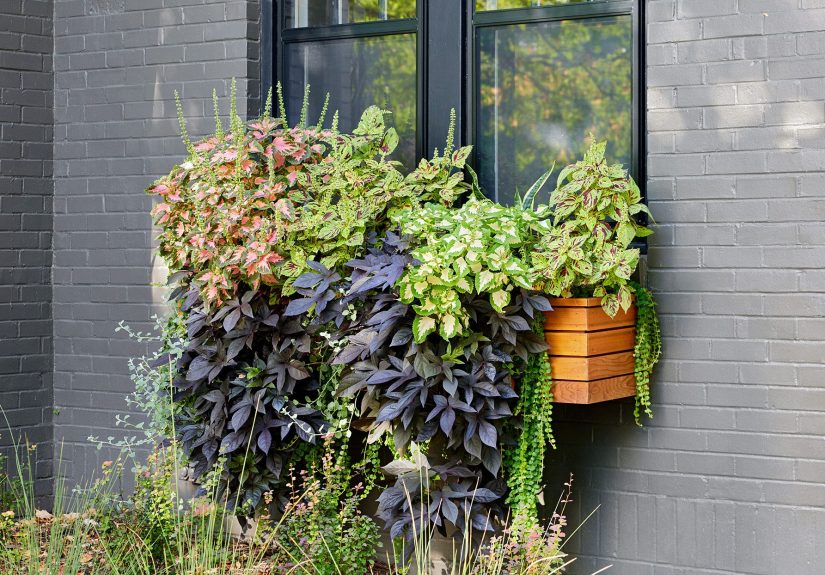
Pros make window boxes look layered and full by assigning plants a role:
- Thriller: the tallest or most dramatic plant (adds height and structure).
- Filler: the mounding, mid-height plants that create fullness.
- Spiller: the trailers that drape over the edge and soften the lines.
Because window boxes are usually viewed from the front, place taller plants toward the back (closest to the window), with fillers in the middle and spillers at the edge. That’s the basic architecture of “wow.”
Pro tip: pick plants that want the same lifestyle
Group plants with similar needs for sun and water. Mixing drought lovers with thirsty divas is how you end up watering like a maniac while half the box still complains.
Step 6: Choose Plants That Perform (Not Just Plants That Look Cute in the Store)
Full-sun window box picks (6+ hours)
Full sun is prime real estateperfect for bloom machines and heat lovers. Great options include:
- Fillers: geraniums, petunias, lantana, zinnias, verbena
- Thrillers: ornamental grasses, angelonia, salvia, snapdragons (cooler seasons)
- Spillers: calibrachoa, trailing verbena, sweet potato vine, nasturtium
Shade/part-shade picks (under 6 hours, especially morning-only or north-facing)
Shade boxes can be spectacularthink texture, foliage color, and blooms that don’t demand a sun tan:
- Fillers: begonias, coleus, impatiens (where appropriate), torenia
- Thrillers: upright coleus varieties, ferns, taller begonias
- Spillers: ivy, creeping jenny, trailing fuchsia, lamium
Edible window boxes (yes, you can snack from your siding)
Herbs and compact veggies can thrive in window boxes if they get enough light and consistent water. Try:
- Herbs: basil, thyme, parsley, chives, oregano
- Greens: lettuce mixes, arugula, spinach (cooler seasons)
- Fun extras: strawberries, compact peppers, trailing nasturtiums (edible flowers!)
Step 7: Planting DayThe “Looks Effortless” Method
What you’ll need
- Window box with drainage holes + mounting already secure
- Mesh/coffee filter/fabric to cover holes
- Quality potting mix
- Plants (thrillers, fillers, spillers)
- Slow-release fertilizer (optional but handy)
- Hand trowel, gloves, watering can
Step-by-step planting
- Cover drainage holes. Add your mesh/screen so soil stays put but water escapes freely.
- Add soil halfway. Fill the box roughly halfway, then gently level itdon’t pack it down like you’re building a patio.
- Dry-fit your plants first. Place plants (still in pots) in the box to test spacing, height, and color balance. Adjust until it looks right. This is the easiest moment to be a genius.
- Think spacing like a pro. Give plants room to grow, but if you want instant fullness, you can plant a bit closerjust know you’ll be pruning later.
- Plant in roles. Put thrillers toward the back, fillers in the middle, and spillers at the edges. Set plants at the same depth they were in their nursery pots.
- Backfill and finish. Add potting mix around plants, firm gently, and leave about 1–2 inches of space below the rim for watering.
- Water deeply. Water until you see it draining out the bottom. This settles soil around roots and removes air gaps.
Three “pro” planting recipes you can copy
Recipe 1: Full Sun, Classic Cottage
- Thriller: salvia or angelonia (back row)
- Filler: zonal geraniums + white petunias
- Spiller: calibrachoa + trailing sweet potato vine
Recipe 2: Shade, Bold Foliage + Soft Blooms
- Thriller: upright coleus variety
- Filler: begonias (colors of your choice)
- Spiller: ivy or trailing fuchsia
Recipe 3: Edible & Pretty (Kitchen Window MVP)
- Thriller: upright rosemary (if hardy for your region) or a compact pepper plant
- Filler: basil + curly parsley
- Spiller: nasturtium or strawberries
Step 8: Keep It Looking Professional (Instead of “We Tried”)
Watering: check often, water thoroughly
Containers dry out faster than garden beds, especially in sun and wind. The simplest test: stick a finger into the mixif it’s dry about an inch down, it’s time to water. When you water, do it thoroughlykeep watering until it runs out the drainage holes.
- Hot spells: you may need daily watering (sometimes twice daily in extreme heat).
- Morning is best: plants start the day hydrated, and foliage dries faster.
- Avoid “sips”: light surface watering encourages shallow roots and bigger drama later.
Fertilizing: window boxes are hungry
Potting mixes don’t hold nutrients foreverwater leaches fertilizer out over time. If you used a slow-release fertilizer, you’re ahead. If you didn’t, no panic. A general all-purpose fertilizer applied regularly can keep blooms and foliage strong. Many gardeners begin supplemental feeding a few weeks after planting, then continue on a schedule that matches plant vigor and label directions.
Grooming: tiny effort, huge payoff
- Deadhead: remove spent blooms to keep flowering plants producing.
- Pinch: pinch back leggy stems (especially petunias and coleus) to encourage bushiness.
- Rotate attention: if one side looks sparse, prune the bullies and give the shy plants a chance.
- Watch for pests: aphids and spider mites love stressed plants; a strong watering routine helps prevent issues.
Troubleshooting: Quick Fixes for Common Window-Box Problems
“My plants droop every afternoon.”
In strong sun, temporary midday wilting can happen even when soil is moist. Check the mix before watering. If the soil is dry an inch down, water deeply. If it’s moist, consider afternoon shade, a more moisture-retentive mix, or swapping in more heat-tolerant plants.
“The leaves are yellowing.”
Yellow leaves can signal overwatering, poor drainage, or nutrient issues. Confirm drainage holes are open and water is escaping. If drainage is good, consider feeding on a regular schedulecontainers can run out of nutrients quickly.
“Everything looks stringy and sad.”
That’s usually low light or overdue pruning. Shade plants in full sun scorch; sun plants in shade stretch. Match plants to light, and don’t be afraid to trim. A careful haircut is often the difference between “meh” and “magazine cover.”
“There’s crusty white stuff on the soil.”
That’s often mineral buildup from water or fertilizer salts. Scrape off the top inch of mix and replace with fresh potting mix, and occasionally water deeply enough to flush excess salts through the drainage holes.
Seasonal Pro Move: Refresh Instead of Rebuild
Pros don’t always replant from scratchthey refresh. That might mean swapping a few plants, trimming hard, and re-feeding. If you want year-round charm, consider seasonal rotations:
- Spring: pansies, violas, bulbs, cool-season greens
- Summer: petunias, geraniums, calibrachoa, coleus, begonias
- Fall: ornamental kale/cabbage, mums, asters, thyme, small grasses
- Winter (decor): evergreen boughs, pinecones, berries (as décor rather than living plantings in cold zones)
Real-World Experience Notes ( of “What Seasoned Growers Learn the Hard Way”)
Window boxes are the kind of project that makes you feel wildly competentright up until a heat wave arrives and your gorgeous arrangement starts looking like it applied for early retirement. So here are the most common “experience lessons” longtime window-box people pick up, distilled into practical advice (and a few laughs).
1) The Overstuffing Temptation Is Real
Everyone wants that instant, overflowing look on planting day. And yes, you can plant closer for immediate impact. But here’s what experienced growers do: they either (a) choose vigorous plants knowing they’ll prune, or (b) use a mix of fast fillers and slower growers so the box looks full now and still breathes later. If you cram in too many heavy feeders (hello, petunias and calibrachoa), they’ll fight over nutrients like siblings over the last slice of pizza. The “pro” move is planning for growththen trimming like you’re shaping a hedge, not apologizing to a plant.
2) Watering Is About Consistency, Not Panic
New window-box owners often water in emotional bursts: nothing for two days, then a dramatic flood at noon. Seasoned growers do quick daily checks and water early. They know shallow “sips” create shallow roots, and shallow roots create plants that faint the moment the weather gets spicy. If your box dries out so hard the soil pulls away from the sides, water can run straight down the gap and out the bottom without rehydrating the root ball. In that case, slow watering (or briefly bottom-soaking an inner pot if your setup allows) helps the mix absorb moisture evenly again.
3) Wind Is the Silent Plant Thief
People blame sun for drying out a window box, but wind can be even worseespecially on upper floors or exposed sides. Experienced growers pick tougher plants for windy spots (think sturdy, leafy performers) and avoid top-heavy thrillers that act like sails. They also mount boxes securely and re-check hardware during the season. A wobbly box doesn’t just look sketchy; it stresses roots and makes plants grow unevenly. The pro approach is boring and wonderful: solid brackets, correct anchors, and no “it’ll probably be fine” energy.
4) Fertilizer Is the Difference Between “Cute” and “Wow”
After a few weeks, many window boxes hit a slump: fewer blooms, pale leaves, slower growth. That’s usually not a personality issue. It’s nutrition. Experienced growers assume nutrients leach out and plan a feeding routineeither slow-release at planting plus occasional liquid feed, or regular fertilizing once plants are established. The key lesson: more is not better. Over-fertilizing can scorch roots or create lush leaves with fewer flowers. The pro move is “steady and labeled,” not “chaotic and hopeful.”
5) The Best Window Boxes Get Haircuts
This surprises people. Pros prune. A lot. Petunias get trimmed when they trail too long. Coleus gets pinched for bushiness. Spillers get shaped so they cascade evenly instead of forming one dramatic clump on the left side like a plant version of a side bang. If you want a box that looks professionally maintained, think of it like grooming: small, regular trims keep it lush, balanced, and flowering.
Bottom line: the “pro” look is not magic. It’s drainage, good soil, light-matched plants, consistent water, and confident pruning. Do those five things, and your window box will look like it has a stylist.
Conclusion
Planting window boxes like a pro is really about building a system that makes success easy: a secure box with real drainage, quality potting mix, plants chosen for your light, and a layout that uses thriller–filler–spiller to create instant structure. From there, it’s simple maintenancecheck moisture often, water deeply, feed regularly, and prune without fear.
Do it once with intention, and you’ll never look at a bare window the same way again. Suddenly every window becomes an opportunity. And yesthis is how the window-box obsession begins. You’ve been warned.






