Table of Contents >> Show >> Hide
- Before You Start: Important TENS Safety Basics
- How to Place Electrodes for a TENS Unit: 11 Steps
- Step 1: Identify the exact area of pain
- Step 2: Read your device instructions before placement
- Step 3: Wash and dry the skin
- Step 4: Check the pads and wires
- Step 5: Choose a simple placement pattern
- Step 6: Keep the electrodes spaced apart
- Step 7: Avoid bony points and highly sensitive areas
- Step 8: Match placement to the body part
- Step 9: Turn the unit on slowly
- Step 10: Reposition if the session feels wrong
- Step 11: Remove, store, and monitor your skin
- Common TENS Placement Mistakes to Avoid
- How to Know If Placement Is Working
- What Real-Life TENS Use Often Feels Like: Experience, Trial, and Tiny Victories
- Final Thoughts
If you have ever opened a TENS unit case, looked at the wires and sticky pads, and thought, “Excellent, I have purchased a tiny robot jellyfish,” you are not alone. Transcutaneous electrical nerve stimulation, better known as TENS, can be a useful non-drug tool for pain relief, but getting the electrode placement right matters. Good placement can make the difference between “That helped” and “Why is my elbow buzzing like a confused cellphone?”
This guide walks you through how to place electrodes for a TENS unit in 11 practical steps. It also covers where not to place the pads, how far apart they should sit, and what real-world users often learn the hard way. The goal is simple: safer placement, better comfort, and a smarter shot at pain relief.
Before You Start: Important TENS Safety Basics
Before you stick anything anywhere, remember this: a TENS unit is not a random sticker craft project. Electrode placement should always follow the instructions that came with your device or the directions from your clinician or physical therapist.
In general, do not place TENS electrodes:
- On the front of your neck
- Across your chest or in a way that sends current across your heart
- Across or through your head, or directly on your eyes or mouth
- Over broken, irritated, infected, or numb skin
- On skin covered with lotion or heavy oil
You should also talk with a healthcare professional before using TENS if you have a pacemaker, ICD, implanted stimulator, seizure disorder, pregnancy, or any condition where electrical stimulation may be unsafe. And no, this is not the moment to multitask while driving, showering, or operating anything with blades.
How to Place Electrodes for a TENS Unit: 11 Steps
Step 1: Identify the exact area of pain
Start by getting specific. Is the pain in the muscle, near a joint, or along a nerve path? TENS electrodes are usually placed around or near the painful area rather than directly on the most dramatic point of discomfort. If you can trace where the pain spreads, that often helps you create a better placement pattern.
For example, lower-back pain may call for pads on either side of the sore area, while knee pain may respond better to pads placed above and below or on each side of the joint.
Step 2: Read your device instructions before placement
Yes, really. Your specific TENS model may include placement diagrams, pad-size recommendations, and warnings that matter. Some devices are built for general pain relief, while others are cleared for very specific body regions. Using the manufacturer’s guidance first is the grown-up move, even if it is less exciting than winging it.
Step 3: Wash and dry the skin
Electrodes stick better and work more consistently on clean, dry, intact skin. Wash the area gently with soap and water, then dry it completely. Remove oil, sweat, and lotion before applying the pads. If the skin is damp or greasy, the stimulation can feel uneven, and the electrode may peel off halfway through the session like it has lost faith in the assignment.
Step 4: Check the pads and wires
Inspect the electrode pads before use. If they are dried out, curling at the edges, dirty, or no longer sticky, they may not make good contact. Also check the lead wires for loose connections or exposed metal. Worn pads can make a normal session feel surprisingly unpleasant.
Turn the unit off before you connect or move anything. That one tiny habit saves a lot of avoidable zaps.
Step 5: Choose a simple placement pattern
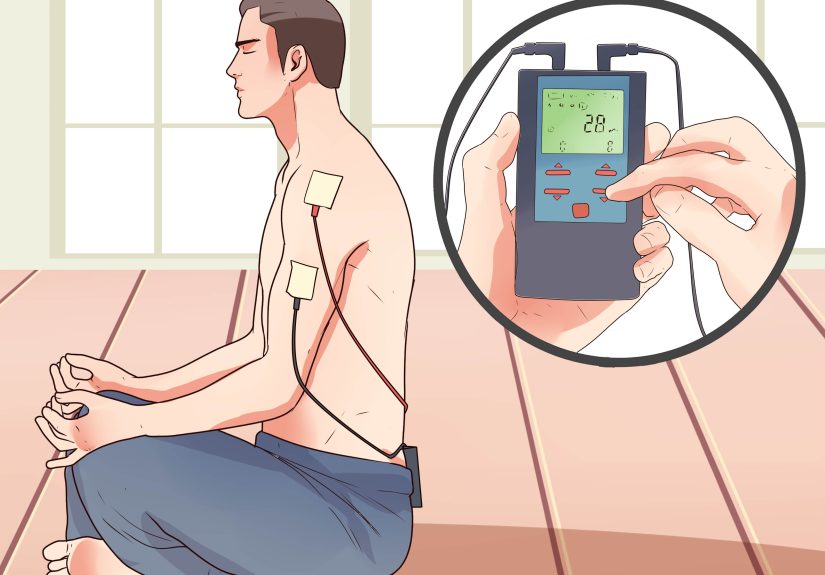
For many people, the easiest approach is to place the electrodes so the painful area sits between them. Common patterns include:
- Side-to-side: one pad on each side of the painful spot
- Above-and-below: one pad above and one below the painful spot
- Four-pad box: four electrodes framing a broader painful area
If your pain is broad or spreads out, a four-electrode rectangle often works better than crowding two pads into one tiny zone.
Step 6: Keep the electrodes spaced apart
The pads should not touch each other. A practical rule of thumb is to keep them at least about 2 inches apart, unless your clinician or device guide tells you otherwise. That spacing helps the current travel through the targeted area instead of taking the shortest possible route across the surface of the skin.
Think of it this way: if the pads are practically holding hands, the treatment field is too small.
Step 7: Avoid bony points and highly sensitive areas
Whenever possible, place the electrodes on soft tissue instead of directly over sharp bony spots. Pads usually feel better and adhere better when placed over muscle or the tissues surrounding a painful area. Also avoid areas where the skin is unusually fragile, freshly shaved, bruised, or irritated.
If you have reduced sensation in the area, be especially careful. You need to be able to tell whether the stimulation feels normal or too intense.
Step 8: Match placement to the body part
Different body regions call for slightly different strategies:
- Lower back: place pads on either side of the painful area, not directly over the spine itself if that feels uncomfortable
- Shoulder: place one pad in front and one behind the sore region, or frame the painful area with four pads if the pain is broad
- Knee: place pads above and below the knee or on the inner and outer sides of the joint, rather than right on top of the kneecap
- Elbow or wrist: place pads above and below the sore area, following the line of pain
- Calf or upper leg: place pads on the muscle around the pain, not on broken skin or areas with swelling you have not had evaluated
For neck, facial, pelvic, or nerve-specific placements, it is smarter to follow clinician guidance rather than improvise.
Step 9: Turn the unit on slowly
Once the electrodes are in place, turn the TENS unit on and raise the intensity gradually. You want a strong but comfortable tingling, buzzing, tapping, or pulsing sensation. You do not want sharp pain, burning, or an “absolutely not” response from your nervous system.
If the sensation feels too concentrated, uneven, or stingy, turn the unit off and adjust the pad placement rather than cranking the intensity like you are trying to win a contest.
Step 10: Reposition if the session feels wrong
Bad placement often feels bad right away. If the stimulation pinches, burns, or seems to skip around, the electrodes may be too close, poorly adhered, or placed in the wrong spot. Turn the unit off, then move the pads slightly and try again.
Sometimes shifting a pad by an inch makes the treatment feel dramatically better. TENS placement is part science, part fine-tuning, and part accepting that bodies are not all built from the same blueprint.
Step 11: Remove, store, and monitor your skin
When the session ends, turn the unit off before removing the electrodes. Peel them off gently, place them back on their liner, and store them as directed. Check your skin afterward. Mild temporary pinkness can happen, but ongoing redness, rash, itching, or irritation means the pads, placement, or session length may need to change.
If skin irritation keeps happening, stop using the electrodes until you sort it out with a clinician or try fresh pads recommended for your device.
Common TENS Placement Mistakes to Avoid
- Putting the pads too close together
- Placing them over dirty, oily, or damp skin
- Using worn-out electrodes that no longer stick well
- Putting pads where they should never go, like the front of the neck or across the chest
- Assuming higher intensity automatically means better relief
- Moving the pads while the unit is still on
- Ignoring skin irritation because “it will probably be fine”
How to Know If Placement Is Working
Good TENS electrode placement usually creates a comfortable, even sensation that covers the painful region without stinging. You may notice pain relief during the session, after the session, or both. Some people feel a clear benefit quickly. Others need a little trial and error with pad position, intensity, and timing.
What you are looking for is not superhero-level instant healing. You are looking for a noticeable reduction in pain, better tolerance for movement, or less muscle tension. If you never get that despite trying reasonable placements and correct use, it may be time to check with a healthcare professional instead of staging a rematch with the same setup every day.
What Real-Life TENS Use Often Feels Like: Experience, Trial, and Tiny Victories
Real-life experience with a TENS unit is usually less dramatic than advertisements make it look and more practical than most first-time users expect. For many people, the first session is mostly about figuring out what the sensation is supposed to feel like. The buzz can seem strange at first: not painful exactly, but unusual enough that your brain immediately files it under “new and slightly suspicious.” That reaction is normal. Once people learn what a comfortable setting feels like, they often get more confident about using the device.
One of the most common experiences is discovering that pad placement matters more than brute-force intensity. New users often assume that if a little stimulation helps, more must help more. Then they turn the setting up too high, place the electrodes too close together, and end up with a prickly, annoying session that teaches them a valuable lesson. Usually, the better approach is gentler: place the pads well, increase the intensity slowly, and adjust the position before adjusting the power.
Another very common experience is the “one-inch surprise.” A placement that feels ineffective in one spot may feel much better after shifting a pad slightly higher, lower, or farther to one side. That does not mean the device is random. It means the body has muscles, nerves, joints, and tender areas layered in ways that do not always match what we imagine from the outside. People often get their best results once they stop trying to place the pads exactly on the most painful dot and instead frame the area around it.
Many users also notice that TENS feels most helpful when paired with a practical goal. For example, someone with lower-back soreness may use it before light stretching. Someone with knee discomfort may use it after activity to calm things down. Someone with shoulder tension may use it during quiet rest instead of while trying to do six other things at once. In everyday use, TENS often works best as one tool in a routine, not as a magic wand.
Skin comfort is another real-world lesson. People quickly learn that fresh pads, clean skin, and proper storage are not fussy details; they are the difference between a smooth session and a sticky little rebellion. When electrodes get old, the stimulation often feels less even, and irritation becomes more likely. Experienced users tend to become unexpectedly protective of their pads, like tiny expensive pancakes that must be stored correctly at all costs.
Perhaps the most useful real-life insight is that successful TENS use usually comes from patience, not perfection. People who do well with it tend to observe what they feel, make small changes, and keep expectations realistic. The win may be less pain during a walk, easier movement in the morning, or being able to sit through work without constantly shifting around. Those are not flashy results, but they are meaningful. And in the world of pain management, meaningful beats flashy every time.
Final Thoughts
Learning how to place electrodes for a TENS unit is part safety, part technique, and part common sense. Start with clean skin, keep the pads spaced apart, frame the painful area instead of guessing wildly, and respect the no-go zones. Small placement changes can make a surprisingly big difference.
If your pain is severe, unusual, worsening, or tied to a complex condition, get personalized advice before using TENS on your own. A few minutes of guidance can save a lot of frustration and help you get far better results from the device you already have.