Table of Contents >> Show >> Hide
- What Does “Private” Mean on YouTube?
- Private vs. Unlisted vs. Public: Know the Difference Before You Click
- How to Make Your YouTube Video Private: 7 Steps
- Can You Make a YouTube Video Private on Mobile?
- What Happens After You Make a YouTube Video Private?
- When Should You Make a YouTube Video Private?
- Common Mistakes to Avoid
- Should You Make the Video Private Before Uploading or After?
- Real-World Experiences With Private YouTube Videos
- Final Thoughts
- SEO Tags
If you have a YouTube video that should not be wandering around the internet like it pays rent there, making it private is the move. Whether you uploaded a family video, a draft for client review, a training clip, or a video that was never meant for the whole world and its comment section, YouTube gives you a built-in way to lock it down.
The good news? You do not need to delete the video, start over, or sacrifice your sanity to a maze of settings. In most cases, you can change a video’s visibility in just a minute or two inside YouTube Studio. The better news? Once you understand the difference between private, unlisted, and public, you will stop accidentally choosing the wrong one and then panic-refreshing your channel like a caffeinated squirrel.
This guide explains exactly how to make your YouTube video private in 7 steps, what happens after you do it, when private is the best option, and when unlisted is actually the smarter choice. You will also get practical examples, common mistakes to avoid, and a longer real-world section on experiences creators have with private videos.
What Does “Private” Mean on YouTube?
A private YouTube video is visible only to you and, if you choose, specific people you invite. It does not show up in YouTube search, on your public channel page, or in recommendations. In other words, it is not lounging around the platform in sunglasses, hoping strangers click on it.
Private videos are useful when you want control over who can watch the content. That makes them ideal for internal business videos, private family uploads, classroom materials, early cuts for clients, or test uploads before a wider release.
However, private does come with trade-offs. The biggest one is simple: private is restrictive by design. People generally cannot watch a private video just because they have a link. If you want easy link sharing, private is usually not the right fit.
Private vs. Unlisted vs. Public: Know the Difference Before You Click
Private
Only you and the specific people you approve can watch the video. It is hidden from search, your channel homepage, and recommendations. This is the most locked-down option.
Unlisted
Anyone with the link can watch the video, but it will not appear in public search results or on your channel’s video tab in the normal way. This is best when you want a video to stay low-profile without requiring viewer invitations.
Public
Anyone can watch the video. It may appear in search results, recommendations, your channel, and related video feeds.
Here is the easy shortcut: if your goal is “I want only certain people to see it”, choose private. If your goal is “I do not want it searchable, but I do want simple link sharing”, choose unlisted.
How to Make Your YouTube Video Private: 7 Steps
These steps apply to changing the visibility of an existing video in YouTube Studio on desktop, which is the clearest and most reliable workflow for most creators.
-
Sign In to YouTube Studio
Go to YouTube and sign in to the Google account that owns the video. Then open YouTube Studio. This is the dashboard where you manage your channel, content, comments, analytics, and privacy settings.
-
Click the Content Tab
In the left-hand menu, select Content. This opens the list of videos on your channel, including long-form videos, Shorts, and sometimes live uploads depending on how your account is organized.
-
Find the Video You Want to Hide
Scroll through your uploads or use search and filters if you have a lot of content. Once you locate the video, click on it or hover over it to access editing options. If your channel has hundreds of uploads, this is where your past self may deserve either gratitude or a stern talking-to for not naming files better.
-
Open the Visibility Setting
Inside the video details area, look for the Visibility option. On many accounts, you can also click directly from the content list where the visibility label appears. This is where YouTube lets you choose between Public, Private, and Unlisted.
-
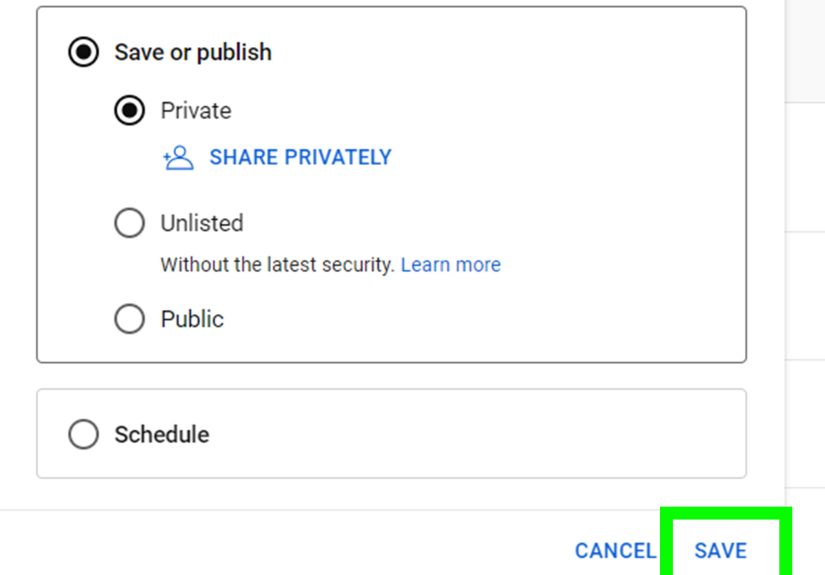
Select “Private”
Choose Private from the visibility options. This immediately changes the video from general access to restricted access. Once private is selected, the video will no longer be publicly discoverable.
-
Use “Share Privately” if You Want Specific People to Watch
If you still want selected viewers to access the video, use YouTube’s private sharing feature. Enter the email addresses of the people you want to invite. This is useful for client approvals, team reviews, teacher-to-student sharing, or sending a draft to family members without posting it publicly.
Important detail: a private video is not like a normal shareable public link. The invited viewers typically need to be signed in with the correct Google or YouTube account. So if Aunt Linda says, “The link is broken,” there is a solid chance the link is fine and Aunt Linda is signed into the wrong account.
-
Save Your Changes and Confirm the Status
Click Save if prompted. Then double-check that the video now shows Private under visibility. That is it. Your video is no longer public. If you invited viewers, you may also want to test the access flow or remind recipients to sign in with the right email address.
Can You Make a YouTube Video Private on Mobile?
Yes. If you are using the YouTube app, you can usually open your profile, go to Your videos, find the video, tap the menu or edit option, change Visibility to Private, and save.
If you use the YouTube Studio app, the path is also straightforward: open the app, go to Content, select the video, tap edit, change the visibility, and save. Mobile is handy for quick changes, but desktop is often better when you also want to adjust titles, descriptions, thumbnails, audience settings, or private sharing invitations.
What Happens After You Make a YouTube Video Private?
Changing visibility affects more than just who can click play. Here is what typically changes:
The Video Stops Being Publicly Discoverable
Your video will not appear in public search results, your public channel display, or normal recommendation surfaces. That is the main point, of course, but it is worth saying twice because this is the feature most people actually want.
Comments Are Not Available
If you need comments on a video that should not be public, unlisted is often the better choice. Private videos are not ideal for open feedback in the comment section.
Link Sharing Becomes Restricted
Private videos are not meant for broad link-based sharing. If you previously dropped the link into a document, a website, or a group chat, do not assume that still works for everyone after the switch. Private mode is built for restricted viewing, not casual forwarding.
It Can Still Be a Smart Workspace Tool
Even though private limits exposure, it does not make the video useless. Plenty of creators and teams use private uploads to check processing quality, subtitles, thumbnail choices, and overall presentation before making a video public later.
When Should You Make a YouTube Video Private?
Before a Video Is Ready for Prime Time
Maybe your thumbnail is wrong, your description is a mess, or you accidentally uploaded the version where your dog barks through the first 20 seconds like a volunteer alarm system. Setting a video to private buys you time to fix everything.
For Client, Team, or Internal Review
Private videos work well when only a few approved people need access. This is common for agencies, freelance editors, internal communications teams, and companies sharing training materials.
For Family or Personal Archives
YouTube is not just for creators chasing views. Some people use it to store and share home videos with relatives. If the content is personal, private keeps it controlled.
For Classrooms or Limited Distribution
Teachers, coaches, and trainers sometimes want a video online without opening it to the entire internet. Private can work for a small invited group, while unlisted may work better for easier access.
Common Mistakes to Avoid
Choosing Private When You Actually Need Unlisted
This is the big one. If your viewers need a simple link and you do not want to manage invitations, use unlisted. Private is stricter, which sounds great until nobody can open the video and your inbox turns into a help desk.
Forgetting About Upload Defaults
If you often upload videos that should start out hidden, consider changing your upload defaults in YouTube Studio. That way, your videos can begin life as private instead of accidentally debuting to the world before breakfast.
Assuming Private Means “Invisible to YouTube Policies”
Private videos are still on YouTube’s platform. They are not exempt from copyright checks, policy rules, or account-level standards. Private changes visibility, not the universe.
Not Testing Viewer Access
If the video matters, test access with one intended viewer before sending it to a group. That helps you catch account mismatches, access confusion, or the classic “I shared it to the wrong email” problem.
Should You Make the Video Private Before Uploading or After?
Either works. If you already know a video should not go public yet, setting it to private during upload is the cleanest option. That prevents accidental visibility and gives you breathing room to finish details like title, description, thumbnails, subtitles, cards, and end screens.
If the video is already live, you can still switch it to private afterward. This is useful when you need to temporarily hide content while making updates, responding to an issue, or pausing visibility for business or legal reasons.
Real-World Experiences With Private YouTube Videos
One of the most common experiences creators talk about is using private videos as a kind of digital staging area. A small business owner uploads a product demo, marks it private, watches it on multiple devices, and catches a typo in the first ten seconds that somehow survived three rounds of editing. A freelancer sends a private cut to a client, gets approval, then makes the final version public once the thumbnail and description are polished. A teacher records lesson videos, keeps them private at first, and invites only the students who need early access. In all of these cases, private mode acts like a waiting room, not a dead end.
Another very real experience is the moment people realize private is more restrictive than they expected. Someone shares the link with a family group, then gets five messages that all say some version of, “It says I can’t watch this.” That does not necessarily mean YouTube is broken. Usually it means the viewers were not invited correctly or were signed into a different Google account. This is where many users discover that private and unlisted are not interchangeable. If simple link sharing is the priority, unlisted is usually the smoother experience.
There is also the emotional side of it. Making a video private can be a relief. Maybe a creator posted something too early, noticed an editing error, or changed their mind about sharing a personal clip. The private setting gives people room to pull content back without deleting it outright. That matters more than many guides admit. Not every upload is a forever upload, and not every video needs an audience on day one.
For businesses, private videos often become part of a workflow. Marketing teams use them for review chains. Coaches use them for client training libraries. Agencies use them for approvals. Editors use them for version checks. In those situations, private is less about secrecy and more about control. The video is online, accessible, and easy to manage, but only for the right people at the right time.
Then there is the archive crowd, and honestly, they are onto something. Some people quietly use YouTube as a personal vault for family recordings, event footage, and old digital memories. They are not chasing views. They just want a familiar platform, reliable playback, and selective sharing. For them, private videos are practical. They can organize content, revisit it later, and avoid broadcasting baby videos, holiday footage, or shaky vacation clips to complete strangers who definitely do not need that much access to their lives.
The biggest lesson from all these experiences is simple: the best privacy setting depends on the goal. Private is great when access needs to be tightly controlled. Unlisted is better when sharing needs to be easy but low-profile. Public is for content you actually want discovered. Once creators understand that trio, YouTube gets a whole lot less confusing and a whole lot more useful.
Final Thoughts
If you have been wondering how to make your YouTube video private, the process is refreshingly simple: open YouTube Studio, find the video, change Visibility to Private, and save. The smarter part is knowing why you are choosing private and whether it fits your actual goal.
Use private when you want tight control over who can watch. Use unlisted when you want the video hidden from search but easy to share by link. And if you upload often, set your defaults so you do not accidentally publish a half-finished video to the internet before your coffee cools down.
In short, private videos are not just a hide button. They are a workflow tool, a safety net, and sometimes the difference between “smooth launch” and “why is my draft video already public?”