
Table of Contents >> Show >> Hide
- Why Scrap-Wood Ghosts Work So Well Outdoors
- Pick Your Ghost Style
- Materials and Tools
- Step-by-Step: Build a DIY Outdoor Wooden Ghost
- Painting and Weatherproofing for Outdoor Survival
- How to Stake and Display Your Ghosts Outside
- Important Safety Notes (Because Splinters Are Scarier Than Ghosts)
- Troubleshooting: Quick Fixes for Common Problems
- Final Thoughts
- Extra: of Real-World Experience (So You Don’t Repeat My Mistakes)
Halloween yard decor has two types of people: the “I put a pumpkin on the porch” crowd, and the “my house has a fog machine budget” crowd.
Scrap-wood ghosts are the rare decoration that makes both camps happycheap, sturdy, charmingly spooky, and (best part) they don’t deflate
like a sad inflatable by October 12.
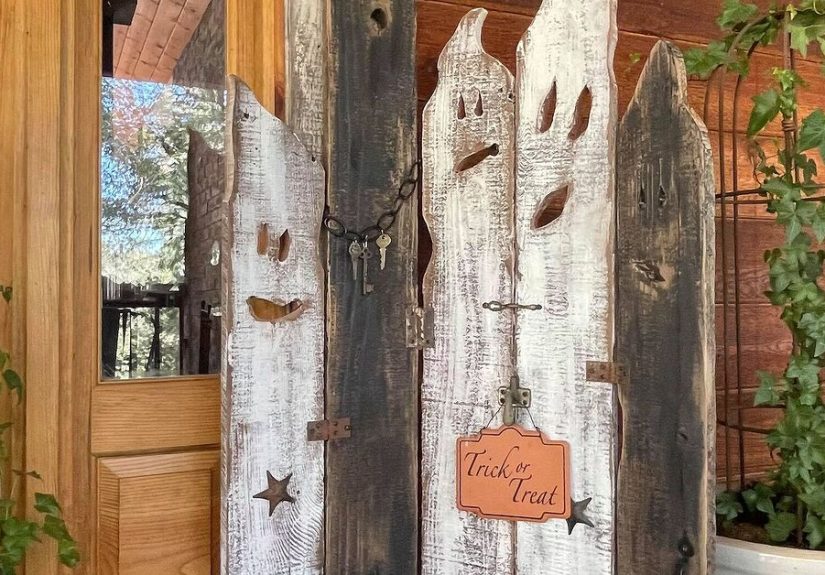
In this guide, you’ll learn how to turn leftover boardsfence pickets, pallet slats, plywood strips, or that mystery lumber you’ve been “saving”
since 2019into outdoor wooden ghost decorations that survive wind, drizzle, and neighborhood kids who treat your yard like an obstacle course.
We’ll cover design options, a simple step-by-step build, painting and weatherproofing, and a few “I learned this the hard way” tips so your ghosts
look intentionally eerie (not accidentally wonky).
Why Scrap-Wood Ghosts Work So Well Outdoors
- They’re budget-friendly: You’re mostly using leftoversyour scariest expense is usually paint.
- They’re wind-resistant: A flat cutout with a stake laughs in the face of breezes that bully inflatables.
- They’re customizable: Cute ghosts, creepy ghosts, “my ghost needs coffee” ghostsyour call.
- They store easily: Stack them in a garage corner like spooky pancakes.
Pick Your Ghost Style
Before you cut anything, choose a build style that fits your scrap pile and your patience level.
Option A: The Single-Plank Ghost (Fastest)
Use one wide board (fence picket, 1×6, or glued-up scraps) and cut a ghost silhouette. This is the quickest path to “yard haunted.”
Option B: The Built-Up Scrap Ghost (Most Scrap-Friendly)
Nail or screw shorter strips across a vertical “spine” to create a wide panel, then draw and cut the shape. Perfect when you have random
offcuts but no wide boards.
Option C: The Pallet-Slat Ghost (Rustic)
Pallet wood gives a weathered look automaticallyjust be picky about which pallet boards you use (more on that in the safety section).
Materials and Tools
Scrap Wood Options
- Fence pickets: Cheap and the right vibe (usually 5/8″ thick).
- 1×4 or 1×6 boards: Great for clean silhouettes.
- Plywood strips: Easy to cut, especially for smaller ghosts.
- Pallet slats: Rustic, but inspect carefully for damage and treatment markings.
Fasteners and Adhesives
- Exterior-rated screws or brad nails + wood glue (faster build)
- Optional: exterior wood filler for knots/cracks
- Optional: outdoor-rated construction adhesive for extra-strength joints
Tools
- Jigsaw (best all-around) or a bandsaw/scroll saw for detailed curves
- Drill/driver
- Sandpaper (80/120/220 grit) or a sander
- Clamps (helpful, not mandatory)
- Paint supplies: primer, exterior paint or spray paint, brushes/rollers
Finishing and Weatherproofing
- Exterior primer (especially for bare or porous wood)
- Exterior paint (latex/exterior acrylic is easiest)
- Clear outdoor topcoat (spar urethane / exterior clear sealer) for durability
Step-by-Step: Build a DIY Outdoor Wooden Ghost
This walkthrough uses the built-up scrap ghost method because it works with almost any leftovers. If you’re using a single wide board,
just skip the panel-building step and start with the template.
Step 1: Decide Size (and Don’t Overthink It)
A great yard size is 24–36 inches tall. Smaller ghosts read as “cute.” Taller ghosts read as “I own a fog machine.”
If you’re making a set, vary heights for a layered look.
Example set: 24″ (small), 30″ (medium), 36″ (tall). Place the tall one in back like the ghost is the manager.
Step 2: Build a Panel from Scraps (If Needed)
- Cut a vertical “spine” board: about 2–3″ wide and your chosen height.
- Cut several short strips for crosspieces (the “ribs”). Mix widths if that’s what you have.
- Lay ribs across the spine, leaving a little overhang on both sides to create a wider ghost body.
- Glue + nail/screw each rib to the spine. Keep it flat while it dries.
Tip: If your wood is warped, flip alternating pieces so the curves fight each other. Woodworking is basically polite arguing with lumber.
Step 3: Draw Your Ghost Shape
Once your panel is solid, sketch your ghost silhouette. A simple design looks best outdoors:
rounded head, tapered sides, and a wavy “sheet” bottom.
- Beginner-friendly silhouette: like a rounded teardrop with a scalloped hem.
- Spookier silhouette: add a pointy, wispy top and sharper waves at the bottom.
If you want multiples that match, make a quick template from cardboard (or trace the first finished ghost onto the next board).
Step 4: Cut It Out
- Clamp the board securely.
- Use a jigsaw to cut the outline slowlyespecially on curves.
- For tight corners, drill a small starter hole and turn the blade gently.
Safety note: Wear eye protection, and keep hands well away from the blade path. A ghost decoration is cute; a “thumb-less Halloween”
theme is less cute.
Step 5: Sand for Paint That Actually Sticks
Outdoor decor fails fast when paint can’t grip. Sanding is the unglamorous secret sauce:
- Start with 80–120 grit to remove splinters and level edges.
- Finish with 220 grit for smoother paint results.
- Wipe off dust (a tack cloth, microfiber cloth, or a slightly damp rag works).
Step 6: Add Faces (Cute, Creepy, or Comedic)
The face is what makes people stop and smile (or nervously speed-walk). Keep it bold and simple so it reads from the sidewalk.
- Classic friendly: oval eyes + small “O” mouth.
- Spooky minimalist: tall eyes + long mouth, slightly tilted.
- Goofy: one raised eyebrow and a crooked grin (the ghost is judging everyone’s candy choices).
You can paint faces on, use a stencil, or even cut eye/mouth holes (cool effect with a light behind it).
Painting and Weatherproofing for Outdoor Survival
Step 7: Prime (Especially If the Wood Is Bare)
Primer helps paint adhere and keeps knots/tannins from bleeding through. For bare wood, apply one solid coat of exterior primer.
Let it dry fully before paint.
Step 8: Paint Your Ghost
You’ve got two great looks:
Look #1: Solid White (Clean + Bold)
- Apply 2 light coats instead of one heavy coat (less dripping, better finish).
- Use exterior acrylic paint or exterior spray paint.
Look #2: “Wispy” Dry-Spray (Rustic + Moody)
Instead of full coverage, spray quickly and lightly so wood grain shows through in places. It reads like an old bedsheet ghostand forgives
imperfect boards.
Pro move: Paint the back, too. It helps reduce moisture absorption and warping outdoors.
Step 9: Seal It (Optional, but Highly Recommended)
If you want your ghosts to last beyond one season, add a protective clear coat. An outdoor-rated spar urethane or exterior clear sealer helps protect
paint from moisture and sun.
- Apply thin, even coats.
- Let coats dry fully and lightly sand between coats if the finish feels rough.
- Choose a finish sheen you like (matte looks spooky; satin looks polished).
Weather Tips So Your Paint Doesn’t Throw a Tantrum
- Avoid painting in heavy humidity or right before rain.
- Skip early morning dew and harsh midday sun; mid-morning or late afternoon is often better.
- Follow the temperature range on your paint can for best curing.
How to Stake and Display Your Ghosts Outside
Easy Staking Methods
-
Pointed bottom: Cut the bottom into a simple stake shape so it pushes into soil.
Works best in softer ground. -
Add a separate stake: Screw a thin strip of wood to the back, extending 8–12″ below the ghost.
Stronger hold, easier replacement. -
Metal support (windy areas): Attach the ghost to a garden stake or rebar using exterior screws and washers,
or secure with heavy-duty zip ties through drilled holes.
Placement Ideas That Look “Styled,” Not “Random Boards in a Yard”
- Peekers: tuck ghosts into bushes so they look like they’re sneaking up on visitors.
- Gaggle near the walkway: cluster 3–7 ghosts together at staggered heights.
- Porch lineup: place two by the steps like bouncers at the candy club.
- Night glow: add a low spotlight or solar stake light aimed upward.
Important Safety Notes (Because Splinters Are Scarier Than Ghosts)
Be Careful with Old Painted Wood
If your scrap wood is from an older home project, it may have old paint. If the wood is from a structure built before 1978, treat old paint dust
seriouslyavoid aggressive dry sanding, wear a properly rated mask/respirator, and clean up dust carefully.
Choose Outdoor-Friendly Fasteners
Outdoor moisture can rust cheap screws and stain your paint. Use exterior-rated or corrosion-resistant fasteners. If you suspect your scrap is
preservative-treated, stick with the fastener types recommended for treated lumber.
Pallet Caution
Not all pallets are equal. Avoid boards that are oily, chemically spilled-on, or deeply cracked. When in doubt, use fence pickets or clean construction
offcuts instead.
Troubleshooting: Quick Fixes for Common Problems
My ghost is wobbling in the ground
Add a longer back stake, or drive a metal garden stake behind it and screw the ghost to it.
Paint is peeling after a rainy week
Usually a prep issue. Sand the peeling area, prime bare spots, repaint, and seal with an outdoor clear coat.
The board warped
Thin boards + uneven moisture exposure can warp. Paint/seal both sides, and consider adding a stiffener strip on the back.
Final Thoughts
DIY outdoor wooden ghosts hit the sweet spot: they’re thrifty, sturdy, and weirdly charming. Make one and you’ll probably make three more,
because that’s how scrap projects gofirst it’s “one little decoration,” and then you’re naming them and giving them backstories.
Keep the shapes bold, the faces readable, and the finish weather-ready. Do that, and your ghosts will haunt your yard in the best wayquietly,
cheerfully, and without ever needing to be re-inflated.
Extra: of Real-World Experience (So You Don’t Repeat My Mistakes)
The first time I made scrap-wood ghosts, I was fueled by pure October optimism: “This will take 30 minutes,” I said, which is the official motto
of people who are about to spend an hour looking for a pencil. I started with a pile of leftover fence boardssome straight, some shaped like
they’d been stored under a stack of bowling balls. My original plan was a neat lineup of matching ghosts. My wood had other plans.
Here’s what worked: building a simple panel from smaller strips was a lifesaver. Wide boards are great, but scraps are reality. Once I screwed
a few pieces across a vertical spine, I suddenly had a “canvas” big enough to draw a ghost that didn’t look like a refrigerator. Cutting the
silhouette with a jigsaw was easyuntil I got impatient and tried to take a curve too fast. That’s how you end up with a ghost that looks like
it’s melting… which, honestly, can be a vibe. I learned to slow down, let the blade do the work, and sand the edges until they felt safe enough
that a kid could brush past without donating skin.
Painting taught me the biggest lesson: outdoor wood doesn’t forgive sloppy prep. One ghost got only a quick dust-off before paint, and that one
peeled first after a damp week. The ghosts that lasted were the ones I actually sanded, primed, and painted in light coats. I also started painting
the backsbecause the back is where moisture sneaks in like a tiny villain. Once I sealed them with an outdoor clear coat, they stopped looking
“weathered” in a sad way and started looking “weathered” in an intentional, rustic way (huge difference).
Wind was the next boss battle. My first stake method was… optimistic. I cut a point at the bottom and shoved it into the soil like a flag.
It worked until the first gust, when one ghost leaned forward dramaticallylike it was about to confess its feelings in a romantic comedy.
The fix was simple: I screwed a longer back stake to each ghost and, in the windiest corner of the yard, I paired that with a metal garden stake
for backup. After that, the ghosts stayed upright even when the weather tried to audition for a disaster movie.
The best surprise? Placement. A ghost standing alone can look like a board. A ghost peeking out of a bush looks like a character. Clustering three
at different heights created instant “scene” energy, especially with a cheap spotlight aimed upward. By the end, neighbors were smiling, kids were
pointing, and I was already planning the next upgrade: maybe cut-out faces with light behind them, or glow paint accents for nighttime.
That’s the real spooky partscrap-wood ghosts are addictive. You don’t just make decor. You start building a cast.






