Table of Contents >> Show >> Hide
- Before You Start: Plan the Project Like a Pro
- Tools and Materials Checklist
- Step-by-Step: How to Install Pavers for a Patio or Walkway
- 1) Mark the layout and get it square
- 2) Set the slope (your future self will thank you)
- 3) Excavate to the correct depth
- 4) Compact the subgrade (the ground beneath the base)
- 5) Add the crushed stone base in lifts and compact each layer
- 6) Screed the bedding sand (smooth, even, and only about an inch)
- 7) Lay the pavers in your chosen pattern
- 8) Cut pavers cleanly (without turning your yard into a dust festival)
- 9) Install edge restraints (the “seatbelt” for your pavers)
- 10) Compact the surface, then fill and lock the joints
- Optional: Seal pavers (when it makes sense)
- Common Mistakes (and How to Avoid Them)
- Specific Example: Estimating Materials for a 12' x 16' Paver Patio
- Maintenance Tips: Keep Pavers Looking Sharp
- Real-World Lessons From Installing Pavers (Experiences + What I’d Do Differently Next Time)
- Conclusion
Installing pavers is one of those DIY projects that looks like “just set the bricks down” right up until you realize
your yard is not, in fact, a tabletop. The good news: you don’t need a contractor’s license or a mystical connection
to the gravel gods. You do need a plan, a solid base, and the patience to compact things like you’re settling an argument.
This guide walks you through how to install pavers for a patio or walkwaystep by stepwith the kind of real-world
details that keep your finished surface from turning into a wavy funhouse floor. We’ll cover layout, excavation,
base prep, bedding sand, patterns, edge restraints, and joint filling (including polymeric sand). Let’s build something
you’ll actually want to show off.
Before You Start: Plan the Project Like a Pro
Pick the right pavers for the job
Pavers come in concrete, clay brick, and natural stone. For most DIY patios and walkways, concrete pavers are the
sweet spot: consistent sizing, lots of styles, and typically easier on the budget. Natural stone is gorgeous but can
vary in thicknesstranslation: more leveling work and more cutting drama.
If your project will handle vehicles (driveway, parking pad), you’ll want pavers rated for that load and a thicker,
more engineered base. For patios and walkways, you have more flexibility in shape and pattern.
Call before you dig, check local rules, and think about drainage
Even if you’re “only going down a few inches,” call your utility locating service (in the U.S., this is commonly done
via 811) before digging. Also check local requirements for setbacks, runoff rules, or permitsespecially for large
patios, changes near property lines, or anything that affects drainage.
Drainage is non-negotiable. Your paver surface should slope away from your house so water doesn’t pool near the
foundation. A practical target is a gentle pitch that’s noticeable to rainwater but invisible to bare feet.
Decide on the layout and pattern (and why it matters)
A paver pattern isn’t just aestheticsit affects strength. For walkways and patios, popular patterns include running
bond, basket weave, and herringbone. If you’re building a driveway or any surface that sees turning tires, herringbone
is a common “workhorse” choice because it resists shifting under lateral forces.
Pro tip: start your layout with the straightest, most visible edge (often the house side or the longest sightline).
That way, any tiny cuts or “creative geometry” land where your guests aren’t staring.
Tools and Materials Checklist
You don’t need every tool in the universe, but you do need the right ones. Here’s a realistic list for most DIY
paver patio or walkway installs.
- Measuring tape, stakes, string line, line level, and/or laser level
- Square (or the 3-4-5 triangle method) for layout
- Shovel, rake, wheelbarrow
- Hand tamper or plate compactor (renting is usually worth it)
- Landscape fabric (optional but helpful in some soils)
- Crushed stone base (often called paver base, road base, or crusher run)
- Bedding sand (coarse concrete sand; not play sand)
- Pavers
- Edge restraints + spikes (or another edging system)
- Rubber mallet, broom
- Cutting tool: wet saw or angle grinder with a diamond blade (plus eye/ear protection)
- Joint sand or polymeric sand
- Garden hose with a gentle spray nozzle
Step-by-Step: How to Install Pavers for a Patio or Walkway
1) Mark the layout and get it square
Mark the perimeter using stakes and string. For a rectangle, check squareness by measuring diagonalswhen both
diagonals match, your layout is square. If you’re doing curves, a garden hose makes a great “shape sketch” before
you commit.
Decide your finished height. Many patios look best when the pavers sit slightly above surrounding grade (so soil and
mulch don’t wash onto them), but not so high you’ve created a toe-stubbing curb.
2) Set the slope (your future self will thank you)
Plan your slope away from the house. A common guideline is about 1/4 inch drop per foot of run. For example, over a
10-foot patio depth, that’s roughly a 2.5-inch drop. Use string lines at the planned finished height, then measure
down to guide excavation and base prep.
3) Excavate to the correct depth
Excavation depth is the #1 place DIY installs go sidewayssometimes literally. The depth you dig depends on:
paver thickness + bedding sand (typically about 1 inch) + compacted base thickness.
Typical starting points:
- Patios and walkways: often 4–6 inches of compacted base (more in weak soils or freeze-thaw climates)
- Driveways/vehicle areas: typically thicker bases, commonly 6–12 inches depending on soil and load
Remove sod, roots, and soft organic soil. If you leave “squishy” material behind, it will compress laterand your
pavers will follow it like a loyal (and annoying) pet.
4) Compact the subgrade (the ground beneath the base)
Once excavated, compact the exposed soil. If the soil is very loose or you’re working in clay that holds water,
you may benefit from a layer of landscape fabric to help separate soil from base material. It’s not magic, but it can
reduce base contamination and improve long-term stability in challenging conditions.
5) Add the crushed stone base in lifts and compact each layer
Your base is the real “structure.” The pavers are just the floor tiles on top. Spread crushed stone base in
layers (often 2–3 inches at a time), then compact thoroughly before adding the next lift. This helps you reach a
dense, stable base instead of a fluffy gravel cake that settles later.
Maintain your slope as you build the base. Check frequently with a long straight board and a level (or a laser level).
Take your time herebase work is where “looks fine today” becomes “why is there a dip there?” in six months.
6) Screed the bedding sand (smooth, even, and only about an inch)
Bedding sand is a thin leveling layer, not a substitute for base thickness. Spread coarse sand and screed it to an
even layercommonly around 1 inch thick. A simple way: place two parallel screed rails (pipes or straight boards),
dump sand between them, and pull a straight 2×4 across the rails like you’re frosting a cake that must be exactly one
inch tall.
Important: don’t walk all over your screeded sand. Lay pavers from the edge and “work forward” on top of the pavers,
not in the sand.
7) Lay the pavers in your chosen pattern
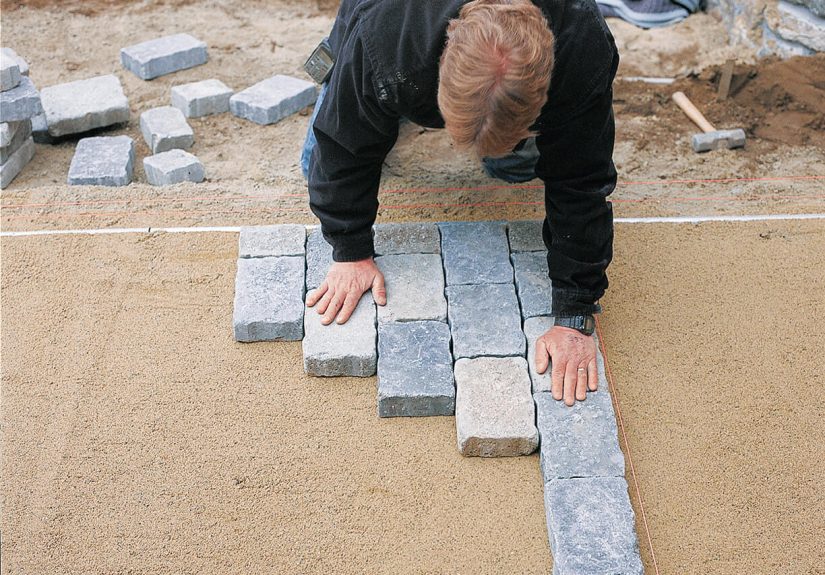
Start from a straight corner or edge and lay pavers tightly together. Check alignment every few rows using a string
line or straight edge. Small gaps and slight variations happenyour goal is consistent joints and straight lines that
don’t drift.
If a paver sits high, lift it, remove a bit of sand, and reset it. If it sits low, add a little sand and try again.
Use a rubber mallet to tap pavers into position without chipping edges.
8) Cut pavers cleanly (without turning your yard into a dust festival)
You’ll almost always need cuts at edges, curves, and around posts or steps. For the cleanest cuts, a wet saw is a
great rental. An angle grinder with a diamond blade works toojust wear eye protection, hearing protection, and a
dust mask, and be mindful of where the dust goes.
Pro tip: make cuts in batches. Mark them all, then cut them all. It’s faster and keeps your workflow from feeling
like a reality show challenge.
9) Install edge restraints (the “seatbelt” for your pavers)
Edge restraints keep pavers from creeping outward over time. Install edging anywhere your pavers don’t butt against a
rigid structure (like a concrete slab, curb, or solid wall). Many systems are designed to be spiked into the
compacted base along the perimeter.
A common method is to pull back bedding sand at the perimeter, set the edge restraint against the pavers, and fasten
it into the compacted base with spikes at the spacing recommended by the manufacturer.
10) Compact the surface, then fill and lock the joints
Once all pavers are in and edging is installed, run a plate compactor over the surface (often with a protective mat,
depending on paver type). This seats the pavers into the bedding sand and helps even out tiny height differences.
Next, fill the joints:
- Regular joint sand: sweep into joints, compact, and repeat until joints stay full.
- Polymeric sand: sweep into joints, compact, remove all residue from the surface, then activate with a fine water mist per product instructions.
If you use polymeric sand, choose a stretch of dry weather. Rain too soon can wash out joints or cause a sticky film
on the pavers. Also: clean the surface thoroughly before activatingleftover dust is how you get “mysterious haze”
that makes your new patio look like it’s been through a chalk festival.
Optional: Seal pavers (when it makes sense)
Sealing can enhance color and help resist staining, but it’s not required for every project. Some pavers come with
manufacturer guidance on whether/when to seal. If you seal, wait until everything has settled, joints are properly
filled, and the surface is clean and dry.
Common Mistakes (and How to Avoid Them)
-
Using sand to “fix” a bad base: If your bedding sand is thicker than about an inch in spots, the base likely isn’t graded correctly.
Fix the base; don’t build a sand mattress. - Skipping compaction: Uncompacted base settles. Settling creates low spots. Low spots collect water. Water invites freeze-thaw drama.
- No slope: Flat patios are great in theory and swampy in practice. Give water a way to leave politely.
- Weak edging: Without edge restraints, pavers can spread and joints open. Then weeds move in like they pay rent.
- Activating polymeric sand too aggressively: “Flood it!” is rarely the right move. Follow product directions for misting.
Specific Example: Estimating Materials for a 12′ x 16′ Paver Patio
Let’s say you’re building a 12′ x 16′ patio (192 sq ft) with 2 3/8″ thick pavers, 1″ bedding sand, and 5″ compacted base.
(Adjust base thickness for your soil and climate.)
- Base volume: 192 sq ft × (5/12 ft) ≈ 80 cubic feet ≈ 3.0 cubic yards (add ~10% for waste/compaction)
- Bedding sand: 192 sq ft × (1/12 ft) ≈ 16 cubic feet ≈ 0.6 cubic yards (add a little extra)
- Pavers: depends on paver size; add 5–10% extra for cuts and future replacements
- Edge restraint: measure the perimeter (12+16+12+16 = 56 linear feet), add extra for curves/overlap
- Jointing sand: varies by joint width and paver type; buy per manufacturer coverage guidance
If math isn’t your love language, remember this: you’d rather return extra base material than discover you’re short
when the excavation is open and your weekend is already committed.
Maintenance Tips: Keep Pavers Looking Sharp
- Regular sweeping: helps prevent debris from breaking down into soil that supports weeds.
- Rinse as needed: mild detergent and a gentle rinse handle most grime; be cautious with high-pressure washing around joints.
- Refill joints: if you used regular sand, you may need occasional top-ups. Polymeric sand typically lasts longer when installed correctly.
- Address settling early: if a small area dips, lift pavers, fix the base, and resetsmall repairs beat big redo projects.
Real-World Lessons From Installing Pavers (Experiences + What I’d Do Differently Next Time)
The first time you install pavers, you learn a magical truth: your yard has a personality. It might be “helpful and cooperative,”
but it might also be “secretly a sponge” or “mostly clay with commitment issues.” Either way, the project teaches you fast.
Lesson one is that excavation feels like it takes foreveruntil you under-dig and realize you’ve built a patio that sits
proudly above grade like a miniature stage. That looks fine… right up until rain splashes soil onto the pavers and turns your
crisp pattern into “muddy polka dots.” Now I aim for a finished surface that’s just slightly proud of the surrounding grade and
I plan edging and landscaping transitions early, not as an afterthought when I’m tired and bargaining with my wheelbarrow.
Lesson two: compaction is not optional, and “good enough” compaction is a lie you tell yourself when it’s hot outside.
The base needs to be built in lifts and compacted thoroughly, even when it feels repetitive. The difference shows up later:
a properly compacted base stays flat; a rushed base settles into little dips that collect water exactly where you step first.
The worst part is that the patio still looks “mostly fine,” which means you’ll notice the one annoying low spot forever.
(Human brains are great at ignoring taxes and terrible at ignoring one crooked paver.)
Lesson three is about bedding sand: it’s a precision layer, not a forgiveness layer. If you find yourself thinking,
“I’ll just add more sand here to level it,” that’s your sign the base is wrong. Extra-thick sand can shift and create rocking
pavers later. When I started treating bedding sand like a thin, carefully screeded setting bedrather than a magic carpet that
solves all problemsmy installs got dramatically better.
Lesson four: edge restraints deserve more respect. Early on, it’s tempting to say, “The pavers are heavy; they’ll stay.”
They might… until seasons change, soil moves, or you drag a grill across the surface. Without solid edge restraint, the field
can spread and joints can widen. Installing edging felt like the boring part of the projectuntil I saw how much it mattered
for long-term tight joints and straight borders.
Finally, polymeric sand is amazing, but it’s picky. The surface must be clean, the joints must be full, and the activation water
should be a mistnot a pressure-washer impression. The first time someone gets a haze, they assume pavers are high-maintenance.
The truth is simpler: clean thoroughly, follow the directions, and choose weather that won’t sabotage you. These days, I treat
polymeric sand like baking: measure, don’t rush, and don’t improvise mid-recipe unless you enjoy surprises.
If you take anything from these experiences, let it be this: pavers aren’t difficultthey’re honest. If the base is right, they’ll
reward you for years. If the base is wrong, they’ll tell on you every time it rains.
Conclusion
Learning how to install pavers is really learning how to build a stable foundation, set proper drainage, and finish the surface
in a way that locks everything together. Do the base work carefully, keep your slope consistent, use edge restraints, and fill joints
correctlyand you’ll end up with a patio or walkway that looks great and stays put through weather, seasons, and backyard life.