
Table of Contents >> Show >> Hide
- Luffa Basics: What You’re Actually Growing
- Plan First: Site, Soil, and Support (a.k.a. The Luffa Lifestyle)
- Starting Luffa from Seed (Where Most People Win or Lose)
- How to Care for Luffa All Season
- Harvesting Luffa: Eat It or Sponge It
- How to Turn a Gourd into a Sponge (Without Regrets)
- Common Luffa Problems (and How to Fix Them)
- Growing Luffa in Containers and Small Spaces
- Saving Seeds for Next Year
- of Real-World Experience: What Growing Luffa Feels Like
- Conclusion
If you’ve ever held a loofah sponge and thought, “Neatwhat ocean creature is this?” surprise: it’s a vegetable with commitment issues.
Luffa (often spelled “loofah”) is a warm-season climbing gourd that can be harvested young like a tender squash, or left to mature into the
famous fibrous sponge that upgrades your shower routine from “soap and hope” to “exfoliation with purpose.”
The trick to growing luffa isn’t secret fertilizer or a pep talk (although plants do seem to enjoy praise). It’s timing, heat, and support.
Give it a long, warm season, steady moisture, and a sturdy trellis, and luffa will happily try to take over your yard like it pays rent.
This guide walks you through seed-starting, planting, care, troubleshooting, and harvestingwhether you want dinner, sponges, or both.
Luffa Basics: What You’re Actually Growing
Luffa vs. Loofah: Same plant, different spelling
“Luffa” is the botanical spelling you’ll see on seed packets and extension resources. “Loofah” is the common name most of us use because it
sounds like something you’d name a fluffy dog. Either way, you’re growing a member of the cucurbit family (cucumbers, squash, melons).
Two common types you’ll see in gardens
- Smooth luffa (often listed as Luffa aegyptiaca or Luffa cylindrica): the classic sponge type with smoother skin.
- Ridged/angled luffa (Luffa acutangula): has pronounced ridges and is often grown as a vegetable (sometimes called “Chinese okra”).
Both can be eaten young and both can become fibrous when mature, but smooth luffa is the usual pick if your end goal is the prettiest, most
evenly textured bath sponge.
Is your climate luffa-friendly?
Luffa loves heat and a long growing season. In many parts of the U.S., gardeners get the best results by starting seeds indoors and transplanting
after the danger of frost has passed. In warm regions, you can direct-sow once soil is truly warm. If you’re in a shorter-summer area, you can
still succeedbut you’ll need to play the season like a strategy game: start early, maximize warmth, and harvest before frost.
Plan First: Site, Soil, and Support (a.k.a. The Luffa Lifestyle)
Sun and space
Luffa wants full sun and plenty of room. Vines can easily exceed 20 feet in ideal conditions, and some gardeners report even longer.
More sun generally means better flowering and fruit set; too much shade can mean lots of leaves and fewer fruits.
Soil that grows vines, not drama
Aim for well-draining soil enriched with compost or aged manure. Luffa is a heavy, fast grower, so it appreciates fertile soil with
steady moisture. If your soil is compacted or clay-heavy, amend generously and consider raised beds to improve drainage. A slightly acidic to
neutral range is commonly recommended, but luffa is fairly adaptable as long as drainage is good.
The trellis is not optional
Luffa vines climb with enthusiasm and tendrils. If you let them sprawl on the ground, fruits can rot, curve, and invite disease.
A trellis keeps vines healthier, improves air flow, and helps gourds grow straighter.
Sturdy support ideas:
- Cattle panel arch (great for long vines; also looks like a garden tunnel you’ll brag about)
- Fence + horizontal wires (simple, effective, and easy to train)
- A-frame trellis (good for smaller spaces, easy harvesting)
- Pergola or strong arbor (luffa makes living shadejust be prepared for the takeover)
Build for weight: mature gourds plus vigorous vines are not lightweight. If you wouldn’t trust it to hold a sleepy toddler or a large watermelon,
reinforce it.
Starting Luffa from Seed (Where Most People Win or Lose)
When to start
In many regions, start seeds indoors about 4–6 weeks before your last expected frost, then transplant after nights are reliably warm.
In warmer climates, direct-sow outdoors once soil temperatures are comfortably warm and frost risk is gone.
Germination tips that actually help
- Warmth matters: Luffa seeds germinate best in warm soil. A heat mat can be helpful if your indoor setup runs cool.
- Consider soaking: Many gardeners soak seeds to speed germination. Some also lightly scuff the seed coat (scarification) to help water penetrate.
- Plant depth: About 1 inch deep is a common rule of thumb for outdoor sowing; indoors, follow your seed packet guidance and keep the mix evenly moist.
- Use larger starter pots: Luffa doesn’t love root disturbance. Starting in deeper pots (or biodegradable pots you can plant directly) can reduce transplant shock.
Hardening off and transplanting
Don’t take a cozy indoor seedling and toss it straight into full sun and wind like it’s a character-building exercise. Harden off for about a week:
gradually increase outdoor time and sun exposure. Transplant on a warm day, water in well, and mulch to stabilize moisture.
How to Care for Luffa All Season
Watering: steady beats heroic
Luffa grows best with consistent moisture, especially during flowering and fruit development. Water deeply at the base rather than
overhead to reduce leaf disease risk. Mulch helps hold moisture, keeps roots cooler in heat, and reduces weed competition.
Feeding: start leafy, finish fruity
Luffa likes fertility, but the timing matters. Early on, nitrogen supports vine and leaf growth. Once flowering ramps up, many growers shift toward
a more balanced or bloom-supporting approach (more phosphorus/potassium) to encourage fruiting.
- Early season: compost, aged manure, or a nitrogen-forward fertilizer in moderation
- Mid/late season: switch to a more balanced feed, and don’t overdo nitrogen (too much can mean “all vine, no sponge”)
Training vines (and preventing a backyard coup)
When vines are young, gently guide them onto the trellis and loosely tie if needed. Once tendrils grab on, the plant will do the rest. Training
helps keep fruit visible (and harvestable) and prevents vines from smothering neighboring plants.
Pruning and fruit load (bigger isn’t always better)
If your goal is sponges, you may get better quality by limiting how many fruits mature fully on one plant. Some guides suggest pruning or thinning
to focus energy on fewer gourds, especially in shorter seasons. If your plant is setting a forest of fruits late in the year, consider keeping the
earliest and removing very late baby fruits that won’t have time to mature before frost.
Pollination: the “why did my baby luffa fall off?” mystery
Luffa has separate male and female flowers on the same plant. Male flowers usually show up first; female flowers have a tiny swelling (a mini gourd)
behind the bloom. If female flowers drop without setting fruit, insufficient pollination is a common cause.
Quick fix: hand-pollinate
- Pick a freshly opened male flower in the morning.
- Remove petals to expose the pollen-covered center.
- Gently dab pollen onto the center of an open female flower.
- Mark the pollinated flower (a twist tie on the stem works) so you can track success.
Harvesting Luffa: Eat It or Sponge It
Harvesting for eating (tender stage)
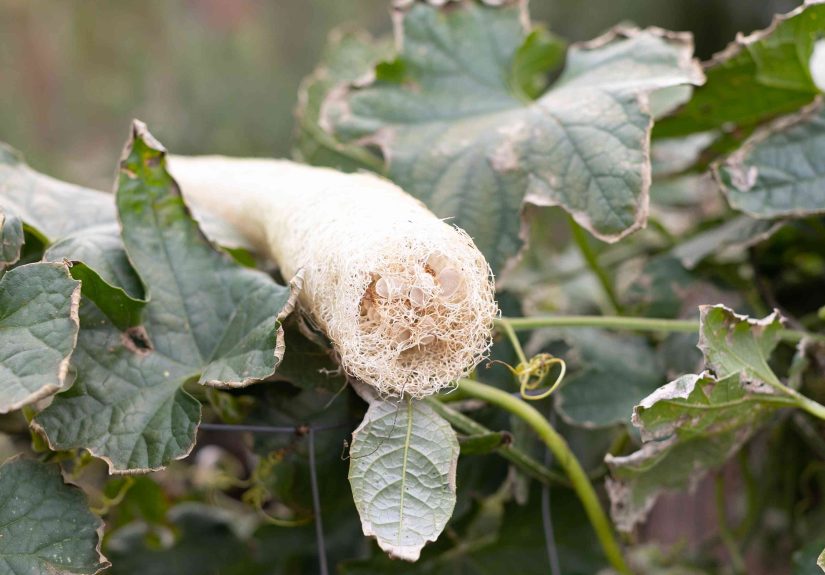
Pick luffa younggenerally when it’s still small, green, and tenderbefore the interior becomes fibrous. Many growers treat it like zucchini:
slice, sauté, stir-fry, add to soups, or eat raw in salads if it’s truly tender. If it’s getting tough, your plant is already switching gears toward sponge mode.
Harvesting for sponges (mature stage)
For sponges, patience is the secret ingredient. You want the fiber network to fully develop.
Look for these signs:
- Skin shifting from green to yellow/tan/brown (or loosening from the fibers inside)
- The gourd feels lighter as it dries and moisture leaves the fruit
- You can hear seeds rattling when you shake it (a very satisfying maraca moment)
- The skin becomes more brittle and easier to peel
In humid or rainy climates, leaving fruits to dry completely on the vine can invite mold. In that case, harvest when mature but not fully dried,
then finish curing indoors with good airflow. Always harvest before a hard frostcold can damage vines and ruin fruits that were close to finishing.
How to Turn a Gourd into a Sponge (Without Regrets)
Method A: Fully dried gourd (classic home-gardener approach)
- Trim the ends: Snip off one end to make an opening.
- Peel: If the skin is stubborn, soak the gourd in water to loosen it, then peel away the outer rind.
- Remove seeds: Shake them out into a bucket. Save the best-looking mature seeds for next year.
- Rinse thoroughly: Flush out pulp and sap until water runs clear.
- Optional whitening/sanitizing: If you want a lighter color, a brief soak in a diluted household bleach solution is sometimes recommended by gardening resourcesrinse very well afterward.
- Dry completely: Airflow is everything. Dry on racks, rotate, and ensure it’s bone-dry before storage to prevent mildew.
Method B: “Fresh peel” processing (faster, but requires timing)
Commercial-style guidance notes that if you harvest at just the right mature stage, the sponge can “pop out,” and thorough rinsing plus complete drying
may be enoughno soaking or bleaching required. This approach usually means checking fruits often as they mature, so you harvest at peak peel-ability.
Cutting and storage
- Cut into discs for soap molds, pads for dishes, or long pieces for shower use.
- Store in a dry, breathable container or bag in a low-humidity area.
- If a sponge ever smells musty, rewash and dry thoroughly (sun + airflow helps). Replace when it starts breaking down.
Common Luffa Problems (and How to Fix Them)
Problem: “My plant is huge, but I’m not getting fruits.”
- Check sun: Less than full sun can reduce flowering and fruit set.
- Check fertilizer: Too much nitrogen can create a leafy jungle with fewer female flowers.
- Check pollination: If female flowers drop, try hand-pollinating.
Problem: Powdery mildew and leaf diseases
Luffa can develop common cucurbit diseases like powdery mildew, especially late in the season. Prevention is your best friend:
- Grow vertically for airflow.
- Water at the base; avoid overhead watering.
- Space plants appropriately so leaves dry faster.
- Remove heavily infected leaves and clean up vines at season’s end.
- Rotate crops: don’t plant cucurbits in the same spot every year.
If you use any spray product (organic or conventional), follow label directions carefully and consider local extension recommendations for your region.
Problem: Pests (the usual cucurbit suspects)
Depending on your region, you may see cucumber beetles, squash bugs, aphids, or spider mites. Integrated pest management usually works best:
- Scout early: look under leaves for eggs and nymphs.
- Remove by hand: squash bug eggs can be scraped off; adults can be hand-picked.
- Row cover early: covers can help until flowering begins (then remove for pollinators).
- Keep plants vigorous: stressed plants attract more trouble.
Problem: Fruits are curved, damaged, or rotting
- Curved fruits: often happen when fruits rest on the ground or are crowded. A trellis helps gourds hang straight.
- Rot: increase airflow, keep fruits off wet soil, and avoid overhead watering late in the day.
- Cracking/splitting: can be linked to uneven wateringaim for consistent moisture.
Growing Luffa in Containers and Small Spaces
Yes, you can grow luffa in a containerjust don’t underestimate its ambition. Use a large container (the bigger the better), high-quality potting mix
amended with compost, and a trellis that’s anchored like it means it. Container plants dry out faster, so check moisture often during heat waves.
The payoff is the same: flowers, fruit, and bragging rights.
Saving Seeds for Next Year
Seed saving is one of the most satisfying parts of growing luffa. When fruits are mature and drying, seeds loosen and shake out more easily.
Choose seeds from your best sponges, dry them well, label them, and store in a cool, dry, dark place. Next season, you’ll be planting “free sponges,”
which is the kind of math everyone enjoys.
of Real-World Experience: What Growing Luffa Feels Like
Growing luffa has a funny way of teaching patience, humility, and trellis engineeringoften in that order. Many gardeners describe the early weeks as
deceptively calm: seedlings look like any other cucurbit, and you start thinking, “I’ve got this.” Then the heat arrives and the vine shifts into
overdrive. One week you’re admiring a few polite leaves; the next week it’s climbing like it’s training for a botanical Olympics and asking your fence
about its long-term plans.
A common experience is realizingslightly too latethat “sturdy trellis” is not the same thing as “that cute little tomato cage I had in the shed.”
Luffa will use a flimsy support as an excuse to flop dramatically, and then fruits will rest in damp spots, curve, or develop blemishes. Gardeners who
upgrade to cattle panels, arbors, or reinforced fencing often report an immediate improvement in plant health and sponge quality, mostly because vines
dry faster after rain and fruits stay cleaner.
Another classic luffa moment: the first flush of male flowers. They appear early, they’re plentiful, and they’ll have you thinking you’re about to be
buried under gourds. Then… nothing. Or rather, a long pause while you wait for female flowers. This is where many gardeners learn to avoid panic-fertilizing.
Dumping extra nitrogen because “it needs help” often produces more leaves and more male flowersaka more green wallpaper and fewer sponges. The gardeners
who do best tend to keep feeding moderate, water consistent, and let the plant mature into its fruiting stage.
If you’re growing in a shorter season, the emotional arc can include a late-summer countdown: “Will these mature before frost?” Gardeners often respond
by thinning late fruits, directing vines to maximize sun, and moving the most promising gourds into prime hanging positions so they stay dry and develop
evenly. In humid areas, many gardeners discover that “dry on the vine” is more of a suggestion than a guarantee; bringing mature gourds indoors to finish
curing with a fan or good airflow can prevent mold and preserve the fiber structure.
Harvest day itself is usually equal parts delight and mild chaos. When a gourd finally rattles like a maraca, it feels like a tiny graduation ceremony.
Then comes processing. Some gardeners swear by soaking to loosen the skin; others prefer harvesting at a perfect stage where the peel comes off with less
fuss. Either way, the first time you pull away the rind and reveal that clean, fibrous network inside is a genuine “I grew a bathroom tool” moment.
And once you’ve used a homegrown luffa for dishes or soap molds, it’s hard not to look at store-bought sponges and think, “Plastic? In this economy?”
Conclusion
Luffa is one of those rare garden crops that’s equal parts practical, weird, and wonderful. Start seeds early if your season is short, give the vine heat,
sun, and a serious trellis, and stay consistent with water and balanced feeding. Hand-pollinate if fruit set is spotty, watch for common cucurbit pests
and powdery mildew, and harvest with your end goal in mindtender vegetables now, or sponges later. Grow it once and you may never look at a loofah the
same way again.





