
Table of Contents >> Show >> Hide
- The Better-Than-Bar Wing Checklist
- Wing Fundamentals: The Small Stuff That Makes a Big Difference
- Method #1 (Most Reliable): Crispy Oven Wings That “Fake Fry” Like Pros
- Method #2 (Fast + Clean): Air Fryer Wings With Extra-Crispy Skin
- Method #3 (Unfairly Good): Deep-Fried or Twice-Fried Wings
- Sauce and Rubs That Taste Like You Know a Guy at the Bar
- The Toss, the Rest, and the Serve (Where Most Home Wings Lose)
- Common Wing Mistakes (And the Fix)
- Make-Ahead Strategy for Game Night (So You’re Not Stuck Frying During the 4th Quarter)
- Game-Night Wing Lessons You Only Learn by Doing (Experience Section)
- Final Take
Sports bars have big TVs, bigger pitchers, and wings that are usually gooduntil you remember you just paid
“stadium prices” for something that arrived lukewarm and suspiciously soggy. The good news: you can beat your local
sports bar at its own game with a few chef-level tricks that are shockingly un-fancy. No secret handshake, no deep fryer
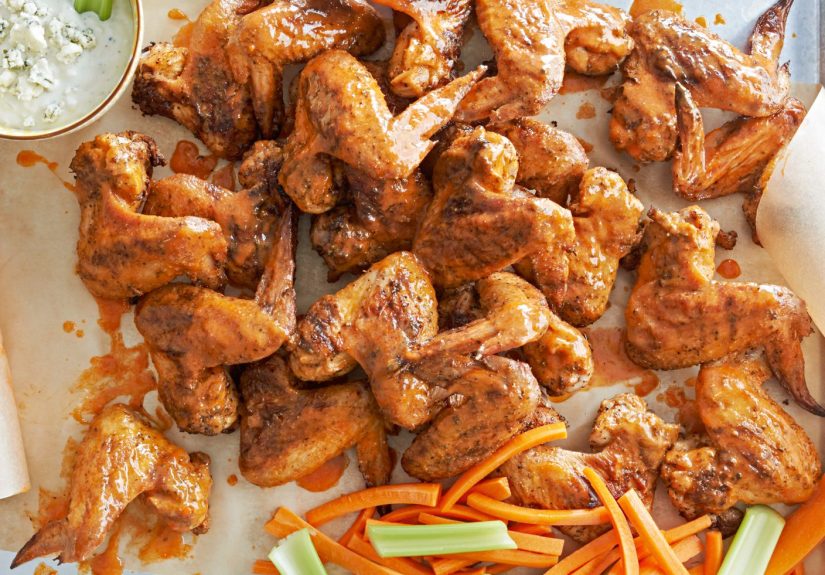
shrine, no “special wing guy.” Just crisp skin, juicy meat, and sauce that actually sticks.
This guide gives you three reliable paths (oven, air fryer, deep fry), plus sauce formulas, dry rub ideas, party logistics,
and the tiny details that separate “pretty good wings” from “wait… you made these?!”
The Better-Than-Bar Wing Checklist
1) Skin that crackles (not rubber-bands)
Crispiness is mostly a moisture problem. Wings get soggy when the skin holds water or when steam gets trapped underneath
(like when they’re crowded on a pan or sauced too early). Your job is to dry the skin, render the fat, and finish hot.
2) Meat that stays juicy
Wings are forgiving, but they’re not invincible. Cook them through, but don’t turn them into edible shoelaces. A thermometer
is the easiest way to win every timeaim for safe doneness, then let carryover heat do a little polishing.
3) Sauce that clings like it pays rent
Great wings aren’t “dipped,” they’re coated. The trick is tossing hot wings in warm sauce (or warm butter-based emulsion),
in a bowl that isn’t ice-cold, then serving immediatelyor keeping them crisp with smart staging.
Wing Fundamentals: The Small Stuff That Makes a Big Difference
Start with the right wings
- Whole wings are cheaper; split them into drumettes and flats for even cooking and easier eating.
- Already split “party wings” save time and cook evenlyperfect for game night.
Dry the wings like you mean it
Pat wings very dry with paper towels. Then, if you have time, place them on a rack over a sheet pan and refrigerate
uncovered for 4–24 hours. This air-drying step is the cheat code for crisp skinespecially for oven and air fryer methods.
Baking powder vs. baking soda (don’t mix them up)
For oven-style “fried” wings, aluminum-free baking powder helps the skin brown and crisp by changing surface
chemistry and encouraging blistering. Baking soda can also increase browning, but it’s powerful and can taste off if you use
too much. If you’re new to this, baking powder is the safer, more forgiving option.
Salt strategy: flavor + texture
Salt doesn’t just seasonit pulls a little moisture to the surface, which can help dryness (good) but can also slow crisping
if the surface stays wet (bad). The fix is simple: salt earlier (so it has time to redistribute) and keep the wings uncovered
on a rack so the surface dries again.
Method #1 (Most Reliable): Crispy Oven Wings That “Fake Fry” Like Pros
If you want wings that beat a sports bar without turning your kitchen into an oil-scented candle, this is your move.
The key is rack + heat + dry skin, plus a tiny amount of baking powder for extra crisp.
Oven Crispy Wing Blueprint
-
Prep: Heat oven to 425°F–450°F. Set a wire rack inside a rimmed sheet pan (line pan with foil
for easy cleanup). - Dry: Pat wings extremely dry. If you can, air-dry on a rack in the fridge uncovered (4–24 hours).
-
Toss: For every 2 pounds of wings, mix:
- 1–1½ tsp kosher salt (adjust if using fine salt)
- 1½–2 tsp aluminum-free baking powder
- Optional: ½ tsp garlic powder + ½ tsp smoked paprika + black pepper
Toss until evenly coatedno clumps.
- Arrange: Place wings on the rack with a little space between them. Crowding is the enemy of crisp.
- Bake: Cook 40–55 minutes, flipping once halfway, until deeply browned and crisp. (Bigger wings take longer.)
- Finish hot: If you want “sports bar crunch,” hit them with a 2–3 minute broil at the endwatch closely.
- Sauce after: Toss immediately in warm sauce (or serve sauce on the side for maximum crunch).
Why this works
Dry skin + high heat = rendered fat and crisp surface. The baking powder gently boosts browning and texture, helping
the skin blister and crunch more like a fried wing.
Method #2 (Fast + Clean): Air Fryer Wings With Extra-Crispy Skin
Air fryers are basically tiny convection ovens that wake up and choose crisp. The rule is the same: keep wings dry,
don’t overcrowd, and finish hot.
Air Fryer Wing Blueprint
- Dry: Pat wings very dry. (Air-dry in the fridge uncovered if you can.)
-
Season: Salt + pepper + a little garlic powder is enough to start. Want extra crisp? Add a light dusting
of baking powder (same idea as the oven method, but keep it modest). -
Cook in stages: Try 360°F for about 12 minutes, flip, 12 minutes more, then increase heat
to 390°F for a final 5–7 minutes until very crisp. (Times vary by air fryer size and wing thickness.) - Sauce last: Toss in warm sauce right before serving.
Pro tip: If you’re cooking multiple batches, keep finished wings on a rack in a 200°F–225°F oven
while you air fry the rest. Do not stack them in a bowl unless your goal is “steam sauna wings.”
Method #3 (Unfairly Good): Deep-Fried or Twice-Fried Wings
Fried wings are the sports bar’s home field advantageuntil you take control of oil temperature and batching. The big mistake
at home is overcrowding (oil temp drops, wings soak up oil, crunch disappears). The fix: fry in batches and use a thermometer.
Classic Single-Fry Wings (Simple and Excellent)
- Heat oil: Bring frying oil to 350°F–375°F in a heavy pot.
- Fry in batches: Add wings without crowding. Maintain temperature as best you can.
- Cook: Fry until golden and cooked through (often 8–12 minutes depending on size).
- Drain: Rest on a rack (not paper towels if you want max crunch).
Twice-Fried Wings (The “How Is This So Crisp?” Method)
Twice-frying gives you a juicy interior and a shatter-crisp exterior. The basic concept: a gentler first fry to cook the wing,
then a hotter second fry to crisp the skin.
- First fry: Fry around 300°F–325°F until wings are cooked through but not deeply browned.
- Rest: Let wings cool on a rack 10–20 minutes (or refrigerate to tighten the skin).
- Second fry: Increase oil to 350°F–375°F and fry again until deeply crisp.
- Sauce last: Toss and serve immediately.
Safety note: Always cook poultry to a safe internal temperature. A thermometer is your best friend, especially
if you’re doing a lower-temp first fry.
Sauce and Rubs That Taste Like You Know a Guy at the Bar
Classic Buffalo Sauce (The Core Formula)
Buffalo sauce is a simple emulsion: hot sauce + butter. You can tweak it for heat, tang, or cling.
- Balanced “classic”: 1/2 cup hot sauce + 1/3 cup melted butter
- Richer/milder: 1/2 cup hot sauce + 1/2 cup melted butter
- Sharper: add 1–2 tsp vinegar + a pinch of garlic powder
Warm the sauce gently (don’t boil aggressively), then toss wings while both wings and sauce are hot.
Honey-Garlic (Sticky Without Being Candy)
- 1/3 cup honey
- 2 tbsp soy sauce
- 2 tbsp rice vinegar (or apple cider vinegar)
- 2–3 cloves grated garlic
- Optional: chili flakes or a spoon of chili crisp
Simmer 2–3 minutes to thicken slightly. Toss wings right before serving. If you want extra stickiness, return sauced wings
to a hot oven for 3–5 minutes to set the glaze.
Dry Rub Wings (Crispness’s Best Friend)
Dry rub wings stay crisp longer because there’s no wet sauce steaming the skin. A few crowd favorites:
- Lemon pepper: black pepper + lemon zest + garlic powder + a little sugar
- BBQ-ish rub: smoked paprika + brown sugar + chili powder + cumin + salt
- “Stadium” rub: garlic powder + onion powder + paprika + cayenne + celery salt
If your rub has sugar, apply it near the end (or cook at slightly lower heat) so it doesn’t burn before the wings are done.
The Toss, the Rest, and the Serve (Where Most Home Wings Lose)
Use a warm bowl
Tossing hot wings in a cold bowl cools the wings and thickens butter-based sauces in a sad way. Warm the mixing bowl with
hot water, dry it, then sauce.
Sauce in two moves
For wings that stay crisp: serve some wings dry with sauce on the side, and sauce the rest. Or lightly sauce, then offer extra
sauce for dipping. This keeps the crunch while still delivering flavor.
Serve like a pro
- Put wings on a rack set over a sheet pan if they need to wait (even 5–10 minutes).
- Don’t cover with foil unless you want steam (and you don’t).
- Keep dips cold and wings hotcontrast makes everything taste better.
Common Wing Mistakes (And the Fix)
-
Mistake: “I rinsed the wings.”
Fix: Skip it. Just pat dry and cook to a safe temperature. -
Mistake: Crowding the pan/basket.
Fix: Give wings space so moisture can escape. Cook in batches. -
Mistake: Saucing too early.
Fix: Crisp first, sauce last. Always. -
Mistake: “I eyeballed the oil temp.”
Fix: Use a thermometer. Stable oil temperature = crisp wings, not greasy ones. -
Mistake: Too much baking soda/powder.
Fix: Measure. A little helps; too much tastes weird.
Make-Ahead Strategy for Game Night (So You’re Not Stuck Frying During the 4th Quarter)
If you’re feeding a crowd, the goal is “hot and crisp at kickoff,” not “I missed the entire game but the wings were spiritual.”
Best make-ahead approach
- Cook wings fully (oven or air fryer is easiest for this).
- Cool on a rack, then refrigerate uncovered if possible.
- Re-crisp on a rack in a 450°F oven for 8–12 minutes (or air fry 3–6 minutes) until hot and crisp again.
- Sauce right before serving.
This is how you serve multiple batches that still crunchwithout deep-frying all night.
Game-Night Wing Lessons You Only Learn by Doing (Experience Section)
The first time you try to beat your local sports bar, you’ll probably do what most people do: you’ll focus on the sauce.
That’s understandable. Sauce is flashy. Sauce is the headline. Sauce gets all the creditlike the quarterback of the wing world.
But after a few wing nights, you realize crispiness is the offensive line. If the line collapses, the whole play falls apart.
One of the most common “aha” moments happens when you make two batches on different days. The first batch gets cooked right after
you open the package. You pat the wings dry, sure, but they still feel a little damp. They come out tasty, but the skin is more
“polite crunch” than “snap.” Then you try the exact same method after leaving wings uncovered on a rack in the fridge overnight.
Suddenly the skin browns deeper, the texture gets blistery, and you start looking around your kitchen like you just found a cheat code.
That air-dry step feels almost too easy for how much it changes the result.
Another real-world lesson: sugar is a liar. The moment you start making sticky glazeshoney garlic, teriyaki-style, anything
with brown sugaryour wings can go from gorgeous to “why is my pan smoking like a dragon?” in a hurry. The move that saves you is
separating cooking from glazing. Get the wings crisp first, then toss in sauce. If you want the glaze to set, put
the sauced wings back in the oven for just a few minutes. That way the sugar caramelizes on the surface instead of burning while the
wings are still trying to cook through.
You’ll also learn that batch size is basically wing destiny. A crowded air fryer basket or a sheet pan jammed with wings doesn’t just
slow cookingit changes the texture. Wings release moisture and fat as they cook, and if there’s no space for airflow, you’re effectively
steaming them. The result is the classic heartbreak: “They look brown, but why are they soft?” Cooking in batches feels annoying until you
taste the difference, and then it feels like the price of admission to Crunch City.
Sauce technique is its own rite of passage. The first time you toss wings, you might drizzle sauce on top like you’re dressing a salad.
After a few rounds, you’ll become a proper wing tosser: you warm the sauce, warm the bowl, and toss aggressively so every wing gets coated.
You’ll probably also discover the joy of a two-lane system: some wings dry-rubbed and ultra-crisp, some sauced and glossy, with extra sauce
on the side for dipping. It keeps everyone happyespecially the people who want crunch and sauce without choosing sides.
Finally, you’ll develop your personal “better-than-bar” signature. Maybe it’s a lemon-pepper rub with a quick broil finish. Maybe it’s
a classic Buffalo sauce that’s a little more buttery than the bar’s version. Maybe it’s the confidence to use a thermometer, pull wings at
the right moment, and serve them hot instead of letting them sit around getting sad. The biggest experience-based truth is this:
once you control dryness, heat, and timing, wings stop being a gamble. They become a repeatable winand your local sports bar suddenly feels
a lot less intimidating.
Final Take
Better-than-sports-bar chicken wings aren’t about fancy ingredientsthey’re about dry skin, hot airflow or hot oil, proper spacing,
and saucing at the right time. Pick your method, use the small tricks that keep wings crisp, and you’ll serve wings that arrive hotter,
crunchier, and more flavorful than anything that got boxed up and driven across town.
Now go forth and become the person whose friends “randomly stop by” on game day. (Totally random. Definitely not for wings.)





