Table of Contents >> Show >> Hide
- Why Clone Your Steam Deck SSD Instead of Reinstalling SteamOS?
- What SSD Does the Steam Deck Use?
- Tools and Parts You Need
- Before You Clone: Back Up Important Data
- Step 1: Prepare the New SSD in an External Enclosure
- Step 2: Create a Clonezilla Boot Drive
- Step 3: Boot the Steam Deck Into Clonezilla
- Step 4: Clone the Internal SSD to the New SSD
- Step 5: Prepare the Steam Deck for Disassembly
- Step 6: Open the Steam Deck
- Step 7: Disconnect the Battery and Access the SSD
- Step 8: Install the Cloned SSD
- Step 9: First Boot After the SSD Upgrade
- What If the Steam Deck Does Not Boot?
- Clonezilla vs. Fresh SteamOS Install
- Common Mistakes to Avoid
- Performance Expectations After the Upgrade
- Troubleshooting After a Successful Boot
- Real-World Experience: What the Steam Deck SSD Cloning Process Feels Like
- Conclusion
Upgrading a Steam Deck SSD is one of those projects that sounds terrifying until you realize the scariest part is keeping track of tiny screws that seem personally committed to rolling under furniture. Whether you own the original LCD Steam Deck or the newer Steam Deck OLED, cloning the internal SSD lets you move your games, settings, save data, shader cache, desktop apps, and SteamOS setup to a larger drive without starting over from scratch.
This guide explains how to clone your Steam Deck’s internal SSD and install it safely, with a practical focus on real-world mistakes people make: forgetting to remove the microSD card, cloning the wrong direction, buying the wrong SSD size, ignoring battery precautions, or panicking when the Deck takes longer than usual to boot after the swap. We will cover the tools you need, the best cloning methods, the physical SSD installation process, troubleshooting, and a longer hands-on experience section at the end.
Before you begin, remember this is a hardware repair. It is not impossible, but it does require patience, a clean workspace, and the ability to follow steps carefully. If you are not comfortable opening electronics, ask someone experienced to help. Your Steam Deck is a gaming handheld, not a grilled cheese sandwich; opening it with brute force is not the vibe.
Why Clone Your Steam Deck SSD Instead of Reinstalling SteamOS?
You have two main choices when upgrading the internal SSD: clone the old drive or install SteamOS fresh. A clean install is simpler if you want a brand-new setup. Valve provides a SteamOS recovery image that can re-image the drive and reinstall the operating system. However, cloning is ideal when you want your current Steam Deck environment to follow you to the new SSD.
Cloning copies the entire internal drive, including SteamOS partitions, user data, installed games, desktop-mode files, emulator folders, compatibility data, artwork, configuration files, and other customizations. If you have spent months perfecting controller profiles, installing launchers, setting up Heroic Games Launcher, managing emulation folders, or organizing a massive library, cloning saves time.
The biggest reason to clone is convenience. Instead of reinstalling every game and rebuilding your setup, you copy the existing SSD to the new one, physically install the new drive, then boot as if your Steam Deck simply woke up with a larger backpack. The main catch is that cloning must be done carefully, because the destination drive will be overwritten.
What SSD Does the Steam Deck Use?
The Steam Deck uses a compact M.2 2230 NVMe SSD. The number 2230 refers to the physical size: 22 mm wide and 30 mm long. This matters because many common NVMe SSDs are M.2 2280 drives, which are far longer and will not fit properly inside the Steam Deck.
For a safe upgrade, choose a single-sided M.2 2230 NVMe SSD. Single-sided means the storage chips are on one side of the board, helping the drive fit correctly under the Steam Deck’s internal shielding. Many popular upgrade sizes are 1TB and 2TB. A 512GB upgrade can also make sense if you started with a 64GB or 256GB model and want a budget-friendly improvement.
PCIe 4.0 2230 SSDs can work in the Steam Deck, but the handheld itself does not need extreme desktop-level speeds. In real gaming use, thermals, efficiency, and reliability matter more than chasing the biggest benchmark number. A cool, efficient drive is often a better Steam Deck SSD upgrade than a tiny rocket that tries to heat the shell like a pocket toaster.
Tools and Parts You Need
Prepare everything before opening the Steam Deck. You do not want to be halfway through the repair and realize your screwdriver is the wrong size while the Deck is lying open like a patient in a very nerdy operating room.
Recommended Hardware
- A compatible single-sided M.2 2230 NVMe SSD
- An NVMe USB enclosure or adapter for the new SSD
- A USB-C hub or USB-C adapter
- A USB flash drive or microSD card for Clonezilla or SteamOS recovery
- A small Phillips screwdriver for LCD Steam Deck models
- A T6 Torx driver for Steam Deck OLED models
- A plastic opening pick or spudger
- Tweezers, preferably non-metal or ESD-safe
- An anti-static wrist strap or anti-static workspace
- A clean tray or magnetic mat for screws
Recommended Software
- Clonezilla Live for disk-to-disk cloning
- Balena Etcher or Rufus to create a bootable USB drive
- Valve’s SteamOS recovery image as a backup plan
- Optional: KDE Partition Manager or GParted if you need to expand partitions manually
Before You Clone: Back Up Important Data
Even if cloning usually works well, back up anything you cannot afford to lose. Steam Cloud covers many saves, but not all games support it. Non-Steam games, emulator saves, screenshots, mods, desktop files, custom scripts, and local configuration folders may live only on your device.
Check Steam Cloud status for your most important games. For non-Steam content, copy files to a microSD card, external drive, cloud storage service, or another computer. If you use EmuDeck, RetroDECK, Heroic, Lutris, or other desktop-mode tools, confirm where your save folders are located before wiping or replacing anything.
Also update SteamOS before cloning. A fully updated system is less likely to surprise you after migration. Restart the Steam Deck after updates, launch a few games, and confirm everything behaves normally. Cloning a messy system can work, but cloning a stable system is smarter.
Step 1: Prepare the New SSD in an External Enclosure
Place the new M.2 2230 NVMe SSD into a USB NVMe enclosure. Make sure the enclosure supports NVMe, not just SATA M.2 drives. The two look similar enough to trick people, which is deeply rude of technology.
Connect the enclosure to your Steam Deck through USB-C. You can use a USB-C hub, especially if you also need a keyboard, mouse, and bootable USB drive connected at the same time. A powered hub is helpful because cloning can take a while, and you do not want the process interrupted by a flaky adapter.
The new SSD does not need to be formatted first. In fact, Clonezilla will overwrite the destination drive during the cloning process. If the drive has existing data, assume that data will be erased.
Step 2: Create a Clonezilla Boot Drive
Download Clonezilla Live and flash it to a USB drive or microSD card using an imaging tool such as Balena Etcher or Rufus. Etcher is popular because the workflow is simple: select the image, select the target drive, and flash. Rufus is also widely used on Windows.
After creating the boot media, shut down the Steam Deck completely. Do not use sleep mode. Connect the Clonezilla boot drive and the new SSD enclosure to your Steam Deck. If you are using a hub, connect everything before powering on.
Step 3: Boot the Steam Deck Into Clonezilla
With the Steam Deck powered off, hold the Volume Down button and press the Power button. Release the buttons after you hear the startup chime. The boot manager should appear. Select your USB drive or microSD card containing Clonezilla.
Clonezilla may look old-school, because it is. The interface is text-based and not exactly dressed for a modern app store beauty contest, but it is powerful and reliable when used correctly. You can navigate with the D-pad, keyboard, or connected controls, depending on your setup.
Step 4: Clone the Internal SSD to the New SSD
In Clonezilla, choose disk-to-disk cloning. Your source disk is the Steam Deck’s internal SSD. Your destination disk is the new SSD in the external enclosure. This is the most important part of the entire process. If you reverse the source and destination, you can overwrite your original drive with a blank or wrong disk.
Look carefully at drive sizes and names. For example, if your internal SSD is 256GB and your new external SSD is 1TB, the 256GB drive should be the source and the 1TB drive should be the destination. Read the confirmation screens slowly. Clonezilla asks for confirmation because it is about to perform a serious operation, not because it enjoys dramatic suspense.
Use beginner mode unless you have a specific reason to choose advanced options. Select the option to clone the local disk to another local disk. When prompted, allow Clonezilla to copy the bootloader and partition table. The process may take anywhere from several minutes to more than an hour depending on SSD size, amount of data, enclosure speed, hub quality, and USB connection.
When cloning finishes, shut down the Steam Deck. Do not immediately remove the original SSD from the enclosure or wipe anything. Keep the original drive untouched until you confirm the upgraded Deck boots correctly and your data appears intact.
Step 5: Prepare the Steam Deck for Disassembly
Before opening the Steam Deck, reduce the battery below 25 percent if possible. A lower battery charge reduces risk during internal repairs. Power the device off fully and unplug all cables.
Remove the microSD card. This step deserves its own sentence because it is one of the easiest mistakes to make. If you leave the microSD card inserted while removing the back shell, it can snap. That is a very expensive way to learn object permanence.
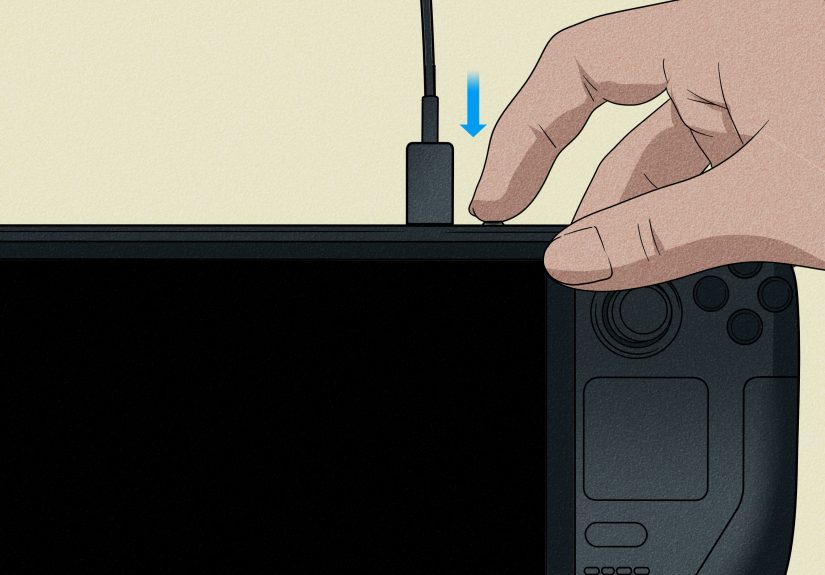
For extra safety, enable battery storage mode in the BIOS. To enter BIOS, power off the Steam Deck, hold Volume Up, and press Power. In the BIOS menu, navigate to the power settings and enable battery storage mode. The Deck will power down, and it will not respond to the power button again until you connect the charger.
Step 6: Open the Steam Deck
Place the Steam Deck face down in its case or on a clean soft surface. This protects the thumbsticks and keeps the device stable. Remove the back cover screws. On the original LCD Steam Deck, the screws include different lengths and thread types, so keep them organized. On Steam Deck OLED models, the back cover screws are Torx screws, so use the correct T6 driver.
After removing the screws, use a plastic opening pick to release the back cover clips. Work slowly around the edges. Do not jam a metal tool into the seam. Plastic tools are safer because they reduce the chance of scratching, gouging, or shorting something inside.
Once the clips release, lift the back cover away. If it resists, stop and check for a missed screw. The cover should not require heroic force. This is a repair, not a boss fight.
Step 7: Disconnect the Battery and Access the SSD
Inside the Steam Deck, you need to access the SSD area. The exact layout differs between LCD and OLED models, but the general idea is the same: remove or move the shielding carefully, disconnect the battery, and expose the SSD.
Disconnect the battery using the pull tab or a plastic tool. Avoid pulling on the wires. Grip the connector area or tab and move it straight out of the socket. This step is important because it reduces the chance of accidental power while you are working near the motherboard.
On some models, the SSD is covered by shielding. Remove the SSD screw, and the drive should lift at a shallow angle. Pull it gently out of the M.2 connector. Do not bend it. Slide the shielding off the original SSD and transfer it to the replacement SSD if the shielding is reusable.
Step 8: Install the Cloned SSD
Insert the cloned new SSD into the M.2 slot at a shallow angle. Once it is seated, press it down gently and secure it with the SSD screw. The drive should sit flat and aligned. If it feels crooked, remove it and try again rather than forcing the screw.
Reconnect the battery. Reinstall the motherboard shield or internal covers exactly as they were. Pay attention to cable routing, especially on OLED models where internal cables and adhesive areas can make the repair feel more delicate. A pinched cable can create problems that are far more annoying than the SSD swap itself.
Reattach the back cover by aligning it and pressing around the edges until the clips snap into place. Reinstall the screws in their original positions. Do not overtighten them. Small screws can strip, and stripped screws have a talent for turning a normal afternoon project into a tiny metal soap opera.
Step 9: First Boot After the SSD Upgrade
If you enabled battery storage mode, connect the Steam Deck charger to wake the device. Press Power and wait. The first boot after an SSD clone can take longer than usual. Give it time before assuming something went wrong.
If cloning succeeded, SteamOS should boot with your familiar library, settings, and installed content. Check Settings > Storage to confirm the new drive capacity appears. Launch a few games. Test Wi-Fi, controls, sleep mode, desktop mode, and any non-Steam apps you care about.
If the system boots but shows the old capacity, the clone worked but the partition may not be using the full drive. In many cases, SteamOS may handle storage expansion, but if it does not, you may need to use a partition tool carefully. This is where experience matters: do not randomly delete partitions because a forum comment sounded confident at 2:00 a.m.
What If the Steam Deck Does Not Boot?
If the Steam Deck does not boot, stay calm. First, check the simple things. Is the battery reconnected? Is the SSD fully seated? Did you install the cloned drive, not the original blank destination by accident? Is the charger connected if battery storage mode was used?
If the device reaches a boot menu or recovery environment but SteamOS fails to load, your clone may be incomplete or the partition layout may need repair. You can reinstall the original SSD to confirm the Deck itself still works. If the original SSD boots normally, the issue is likely with the clone or new SSD installation.
Valve’s SteamOS recovery image is your fallback. Create a recovery USB drive, boot from it, and choose the appropriate recovery option. Re-imaging will erase the drive, while repair or reinstall options may preserve some user data depending on the situation. Read the recovery screen carefully before choosing.
Clonezilla vs. Fresh SteamOS Install
Clonezilla is best when you want continuity. It copies your existing setup and saves hours of reinstalling, especially if you have a large library, custom desktop apps, or emulator configurations. The trade-off is that cloning adds complexity. You need an enclosure, boot media, and careful attention to source and destination drives.
A fresh SteamOS install is cleaner. It is a good choice if your current setup is messy, unstable, overloaded with experiments, or full of old files you no longer need. You can install the new SSD first, boot from Valve’s recovery image, re-image the drive, and then download your games again. It takes more time afterward, but the installation process can feel simpler.
For most people upgrading from 64GB, 256GB, or 512GB to 1TB or 2TB, cloning is worth it if the current system works well. If your Steam Deck already has strange boot problems, random file errors, or broken desktop packages, a fresh install may be the better long-term move.
Common Mistakes to Avoid
Buying the Wrong SSD
Do not buy a full-length M.2 2280 SSD. The Steam Deck needs an M.2 2230 NVMe drive. Also avoid unknown drives with poor thermal behavior. A handheld has tighter thermal limits than a desktop PC.
Forgetting the MicroSD Card
Always remove the microSD card before opening the shell. This is a small step with big consequences. A snapped microSD card is not a fun collectible.
Skipping Battery Precautions
Do not work inside the device while it is powered on or plugged in. Discharge the battery, use battery storage mode when possible, and disconnect the battery before removing the SSD.
Cloning in the Wrong Direction
Source means the drive you are copying from. Destination means the drive being overwritten. Repeat that out loud before confirming the Clonezilla operation. Your future self will appreciate the drama-free outcome.
Losing the SSD Shielding
The original SSD shielding helps with electrical and thermal protection. Transfer it carefully to the new SSD if possible. If it is damaged, consider using replacement shielding designed for Steam Deck repairs.
Performance Expectations After the Upgrade
A larger SSD improves storage capacity more than raw gaming speed. Games that were already on an NVMe SSD may not suddenly load twice as fast. However, upgrading from a 64GB eMMC model to an NVMe SSD can make the system feel noticeably more flexible, especially when shader caches, updates, and large games stop fighting for breathing room.
The biggest quality-of-life improvement is freedom. You can keep more games installed, avoid constant uninstalling, and leave space for updates. Modern PC games are not shy about storage. Some behave as if your SSD is a walk-in closet and they brought every jacket they have ever owned.
Troubleshooting After a Successful Boot
If SteamOS boots but something feels off, start with updates. Go to system settings, check for SteamOS updates, install them, and restart. Then test controller input, Wi-Fi, Bluetooth, game launches, desktop mode, and sleep/wake behavior.
If non-Steam games are missing, check whether their folders were stored on the internal SSD or microSD card. If emulator artwork or saves are missing, verify the original file paths. Some tools expect storage to be mounted in a specific location, so cloned data may be present but not detected until paths are corrected.
If storage capacity looks wrong, use SteamOS storage settings first. If that does not resolve it, research partition expansion carefully before changing anything. The Steam Deck uses multiple partitions, and deleting the wrong one can break the operating system.
Real-World Experience: What the Steam Deck SSD Cloning Process Feels Like
The most surprising part of cloning and installing a Steam Deck SSD is not the software. It is the emotional journey of handling tiny parts while pretending to be calmer than you are. The first time you open the back cover, every plastic clip sounds expensive. In reality, the Steam Deck is reasonably repairable when approached slowly, but it rewards patience and punishes rushing.
A good experience starts with the workspace. A bright desk, a small screw tray, and a soft cloth under the Deck make the job easier. Putting screws in labeled groups is not overkill; it is wisdom. On the LCD model especially, screws are not all identical, and putting the wrong screw in the wrong place can damage the shell or threads. A magnetic project mat is excellent, but even a sheet of paper with circles labeled “back cover,” “shield,” and “SSD screw” can save you from confusion.
Cloning with Clonezilla feels intimidating at first because the interface looks like something from a server room, not a gaming handheld. But the process is logical once you slow down. The key is identifying the drives correctly. The internal SSD and external SSD may have names that look similar, so capacity becomes your best friend. A 256GB source and a 1TB destination are easy to distinguish. A 1TB source and a 1TB destination require more caution. If both drives are the same size, unplug unnecessary storage devices and double-check every prompt.
The external NVMe enclosure can also influence the experience. Cheap enclosures sometimes get warm or disconnect under sustained load. If the clone fails halfway through, the cause may not be Clonezilla at all. It may be the enclosure, cable, hub, or power delivery. Using a reliable USB-C hub and keeping the Deck plugged in can prevent a lot of weirdness.
Physically swapping the SSD is usually faster than preparing for it. Once the back cover is off and the battery is disconnected, the SSD itself is held by a single small screw. The drive lifts, slides out, and the new one slides in. The delicate part is the shielding. It may cling to the old SSD, and peeling it off requires care. Do not crush it into a foil burrito. Slide it onto the new SSD neatly so it sits similarly to the original.
The first boot is where many people get nervous. The Steam Deck may sit longer than expected, show a logo, reboot, or appear quiet for a moment. Give it time. After a successful clone, seeing your familiar library appear on the larger drive is deeply satisfying. It feels less like installing hardware and more like your Steam Deck just got a bigger apartment and moved in without losing the couch.
The best practical lesson is to keep the original SSD untouched for a while. Do not wipe it immediately. Use the upgraded Steam Deck for a few days, launch your important games, confirm saves, test desktop-mode apps, and check storage behavior. Once you are confident everything works, the original SSD can become an emergency backup or be placed in an enclosure for storage.
Overall, cloning your Steam Deck’s internal SSD is a manageable project for careful users. It combines a software task with a hardware repair, so it demands more attention than simply inserting a microSD card. But the payoff is huge: more internal storage, fewer download marathons, less library juggling, and a handheld that feels ready for modern game sizes. The process is not magic. It is preparation, patience, and refusing to let tiny screws win.
Conclusion
Cloning and installing a Steam Deck SSD is one of the most useful upgrades you can make if your internal storage is constantly full. The safest path is to choose a compatible single-sided M.2 2230 NVMe SSD, back up important data, clone the old drive carefully, follow battery and disassembly precautions, transfer the SSD shielding, and test the system before wiping your original drive.
For users who want to preserve their current SteamOS setup, Clonezilla disk-to-disk cloning is a powerful solution. For users who want a cleaner start, Valve’s SteamOS recovery image remains the best fallback. Either way, the upgrade can make your Steam Deck feel less cramped and more ready for a modern game library. Treat the process with respect, keep track of every screw, and your Deck should reward you with more room for games instead of more reasons to uninstall them.