
Table of Contents >> Show >> Hide
- Why Nissan Key Fob Batteries Go Bad
- What You Need Before You Start
- How to Change the Battery in a Nissan Key Fob in 6 Easy Steps
- What to Do If Your Nissan Key Fob Battery Is Completely Dead
- Troubleshooting If the New Battery Does Not Fix the Problem
- Mistakes to Avoid During a Nissan Key Fob Battery Replacement
- Real-World Experiences and Lessons Learned
- Final Thoughts
If your Nissan key fob has started acting like a moody roommateworking only when it feels like it, refusing to unlock the car from normal range, or flashing a “Key Battery Low” warningthere is good news: this is usually one of the easiest DIY fixes you can do at home. You do not need a full toolbox, a mechanic’s certification, or a dramatic soundtrack. In most cases, you just need the right coin battery, a small flathead screwdriver, and five calm minutes.
Whether you drive an Altima, Rogue, Sentra, Pathfinder, Versa, Murano, Maxima, Kicks, or another Nissan model, the overall process is very similar. The exact battery size may vary by model year and fob design, but the logic is the same: open the fob carefully, swap the battery, close it back up, and test it before you celebrate like you just rebuilt an engine. This guide walks you through the job in a clear, beginner-friendly way, plus a few real-world lessons that can save you from turning a two-minute project into a 30-minute scavenger hunt.
Why Nissan Key Fob Batteries Go Bad
A Nissan key fob is a compact electronic transmitter. Every time you lock, unlock, remote start, or pop the trunk, the fob sends a signal to the vehicle. Over time, the small coin-cell battery inside loses power. That is normal. It does not mean the fob is broken, and it does not mean your car is developing a dramatic personality.
Common signs your Nissan key fob battery is dying include reduced range, inconsistent button response, needing to press buttons more than once, or seeing a dashboard warning related to the key battery. Sometimes the fob still works, but only if you are standing suspiciously close to the driver’s door. That is your cue to replace the battery before the fob quits at the worst possible momentlike during rain, grocery loading, or that one day you are already late.
What You Need Before You Start
Before opening the fob, gather these items:
- A replacement coin battery that matches your current one
- A small flathead screwdriver or slim pry tool
- A soft cloth to protect the case from scratches
- Clean hands and a well-lit surface
Many Nissan Intelligent Key fobs use a CR2032 battery, while some other Nissan remotes use CR2025 or CR1620. The safest move is to confirm the battery type in your owner’s manual or check the number printed on the battery already inside the fob. Guessing is fun only when pizza toppings are involved.
How to Change the Battery in a Nissan Key Fob in 6 Easy Steps
Step 1: Confirm the Correct Battery Type
Start by making sure you have the right replacement battery. If you already bought one, do not install it blindly and hope for the best. Nissan key fobs are not all identical, and battery size can vary depending on the model and year. Your owner’s manual is the best source. If you do not have it handy, open the fob first and check the code stamped on the old battery before running to the store.
This step matters because the wrong battery may not fit properly, may shift inside the compartment, or may fail to power the fob consistently. A battery that is “close enough” is usually not close enough.
Step 2: Remove the Hidden Mechanical Key
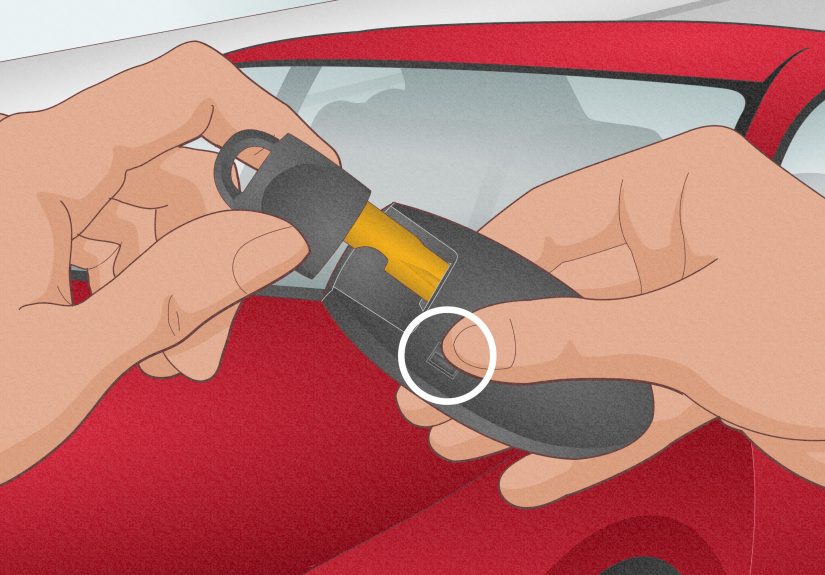
Flip the Nissan key fob over and look for the small release latch on the back. Press it and slide out the hidden mechanical key. This backup key is built into the fob so you can still unlock the driver’s door if the battery dies completely.
Do not skip this step. On most Nissan fob designs, removing the emergency key exposes the seam or access point you need to open the case correctly. It also prevents you from wrestling with the housing while a metal key sticks out awkwardly like a tiny spear.
Step 3: Open the Fob Carefully at the Seam
Locate the small notch or slit along the edge or corner of the fob. Insert a small flathead screwdriver into that opening and twist gently. The goal is to separate the two halves of the fob housing without cracking the plastic. If you want to avoid scratches, place a soft cloth between the tool and the case.
Be patient here. This is not a strength contest. Too much force can damage the casing, bend the clips, or create a gap that never closes cleanly again. A gentle twist is usually all it takes to pop the shell apart.
Step 4: Remove the Old Battery and Note Its Position
Once the fob is open, locate the round coin battery. Lift it out carefully with your fingernail or a small tool. Before you remove it completely, take a good look at how it sits in the compartment. Battery orientation matters. The new battery must go in the same way as the old one.
This is one of the most common mistakes people make. They get excited, yank out the old battery, toss it aside, then stare at the empty compartment like it is asking a philosophy question. Save yourself the confusion and note the position before removal.
Step 5: Install the New Battery the Same Way
Insert the new battery in the same orientation as the old one. Press it gently into place so it sits flat and secure. Try to handle the battery by its edges instead of touching both flat faces for too long. That helps keep the contact surfaces clean and avoids unnecessary transfer of oils from your fingers.
Also, be careful around the internal terminals and small electronic parts. You are doing a battery swap, not open-heart surgery, but a little care goes a long way. If the battery seems loose, double-check that it is the correct size and fully seated.
Step 6: Snap the Fob Back Together and Test It
Align the two halves of the fob housing and press them together until they snap closed. Reinsert the mechanical key. Then stand near the vehicle and test the main functions: lock, unlock, trunk release, and remote start if equipped.
If the fob works right away, congratulationsyou have completed one of the most satisfying tiny repairs in modern life. If it does not work, do not panic. The most likely causes are simple: the battery is upside down, the battery type is wrong, the case is not fully closed, or the terminals are not making proper contact.
What to Do If Your Nissan Key Fob Battery Is Completely Dead
If the key fob battery dies before you replace it, you can still get into your Nissan and, in many models, still start it. First, remove the hidden mechanical key and use it to unlock the door. Then get inside the vehicle. If your Nissan uses push-button start, many models allow you to start the engine by holding or touching the fob against the START/STOP button and then pressing the brake and ignition button as directed by the owner’s manual.
This backup method is extremely useful when the fob battery is discharged but the fob itself is still recognized at very close range. In other words, a dead battery is annoying, not necessarily a full lockout disaster.
Troubleshooting If the New Battery Does Not Fix the Problem
Sometimes the battery replacement goes smoothly and the fob still does not respond. Before assuming the fob is damaged, run through a few simple checks:
- Make sure the new battery is the exact correct type
- Confirm the battery is installed in the same orientation as the old one
- Check that the case is snapped fully closed
- Inspect the battery contacts for bending, dirt, or corrosion
- Try the spare key fob, if you have one
If neither key fob works, the problem might not be the fob at all. It could involve the vehicle battery, receiver, or another electrical issue. If the fob was dropped hard, exposed to moisture, or stepped on by a heroic but overly enthusiastic boot, internal damage is possible. At that point, dealer or locksmith help makes sense.
Mistakes to Avoid During a Nissan Key Fob Battery Replacement
The job is simple, but a few small errors can create big frustration. First, do not force the fob open from the wrong spot. Look for the seam or notch and work there. Second, do not toss the old battery immediately; keep it nearby until the new one is installed correctly. Third, do not assume every Nissan fob uses the same battery. Fourth, do not touch or bend the internal contacts more than necessary.
One more smart habit: replace the battery at the first sign of weakness. Waiting until the fob is fully dead usually means the problem shows up at the least convenient time possible. Key fob batteries seem to enjoy bad timing the way printers enjoy paper jams.
Real-World Experiences and Lessons Learned
Here is where the topic gets more relatable. On paper, changing the battery in a Nissan key fob is almost laughably easy. In real life, it usually becomes memorable because of when people end up doing it. One driver notices the unlock button has become unreliable for a week, ignores it, and then gets stuck outside the car in a dark parking lot. Another driver buys the right battery, leaves it in the kitchen drawer for two months, and finally installs it only after the fob quits during a school pickup line. The battery replacement itself takes five minutes. The procrastination phase takes considerably longer.
A very common experience is buying the wrong battery the first time. Many owners assume every coin battery is basically the same. Then they get home, open the package, open the fob, and realize the new battery is just slightly different in thickness or diameter. That tiny difference is enough to stop the repair cold. The best lesson here is simple: verify the number before you shop. It saves time, money, and the deeply unnecessary emotion of arguing with a coin battery.
Another frequent lesson comes from opening the fob too aggressively. People see the seam, grab a screwdriver, and go full pirate. The result is often a scratched case, a bent clip, or a plastic edge that never sits perfectly again. Owners who take a slower approachusing a cloth, gentle pressure, and the correct opening pointalmost always have a cleaner result. This is one of those repairs where patience is not just a virtue; it is basically the whole strategy.
Then there is the classic “I changed the battery and it still does not work” moment. In a surprising number of cases, the issue is battery orientation. The old battery came out one way, the new battery went in another, and now the fob is giving absolutely nothing. The fix is usually embarrassingly simple: reopen the fob, flip the battery to match the original position, snap it shut, and pretend the first attempt never happened. We respect that approach.
Some Nissan owners also learn an important backup trick only after the battery dies: the hidden mechanical key. Once they discover it, the whole situation feels less stressful. Instead of thinking the car is locked forever, they realize Nissan built in a plan B. The same goes for the push-button start backup method. Many people do not know about it until they need it, but once they do, they stop seeing a dead key fob battery as a full-scale emergency.
The biggest practical takeaway from real-world experience is this: the job is easy when you do it early. It becomes annoying only when you wait too long, use the wrong battery, rush the opening step, or forget to check orientation. Replace the battery when the symptoms first show up, keep a spare coin cell at home, and your future self will thank youprobably from a dry, well-lit parking spot.
Final Thoughts
Changing the battery in a Nissan key fob is one of those rare car tasks that is actually as simple as people say it is. Once you know the right battery type and where to pry the case open, the whole job becomes routine. Follow the six steps above, keep the battery orientation exactly the same as the original, and test the fob before calling it done.
Best of all, learning this small repair gives you one less reason to make a service appointment for something you can handle yourself. It is quick, inexpensive, and oddly satisfying. Not every automotive win has to involve grease, jack stands, and a three-hour YouTube rabbit hole.





