Table of Contents >> Show >> Hide
- Quick Safety & Setup (Do This Before You Twist Anything)
- Part 1: Adjusting Rain Bird Rotors (Gear-Drive / Rotor Heads)
- Part 2: Adjusting Rain Bird Non-Rotor Heads (Pop-Up Spray Heads & Nozzles)
- Don’t Mix Rotors and Spray Heads in the Same Zone (Here’s Why)
- Dialing In Coverage: The “Head-to-Head” Rule (AKA: Overlap Is Not Waste)
- Pressure: The Invisible Hand That Can Ruin Everything
- Test, Tune, Repeat: A Simple “Wet Check” Routine
- Fast Reference: What to Adjust on Each Type
- Conclusion: Your Lawn Wants Water, Not Your Sidewalk
- Extra: Real-World Experiences & Lessons from a Sprinkler Tune-Up Weekend (500+ Words)
If your lawn is greener on the driveway than on the grass, your sprinklers aren’t “extra hydrated”
they’re misbehaving. The good news: adjusting most Rain Bird heads is a lot easier than assembling
patio furniture without the instructions. (You’ll still get a little wet, but at least it’s on purpose.)
In this guide, you’ll learn how to adjust Rain Bird rotor sprinklers (the ones that rotate a stream)
and non-rotor heads (classic pop-up spray heads with replaceable nozzles). We’ll cover arc, radius,
direction, nozzle choices, and the common “why is this thing hissing at me?” troubleshooting scenarios.
Quick Safety & Setup (Do This Before You Twist Anything)
- Identify the head type: Rotor (turning stream) vs. spray head (fixed fan spray).
- Run a short test: Turn on the zone for 1–3 minutes so you can see what’s wrong in real time.
- Mark the problem: A small flag, golf tee, or “that rock you’ll definitely remember” works.
- Watch the turf line: If grass is swallowing the head, you’ll chase “bad coverage” forever.
Tools That Make This 10x Easier
- Flat-head screwdriver (the universal language of sprinkler adjustment)
- Rain Bird rotor adjustment tool / multi-tool (nice-to-have, not always required)
- Pull-up tool (helps lift pop-up stems without shredding your fingernails)
- Needle-nose pliers (for filter screens and small debris)
- Shop towel (because your “dry” hand is a myth)
Part 1: Adjusting Rain Bird Rotors (Gear-Drive / Rotor Heads)
Rotors are built for medium to large areas. Instead of spraying a fan over everything at once,
they throw a moving stream across an arc. Your key adjustments are:
direction (where it starts), arc (how wide it swings), and radius (how far it throws).
Step 1: Set the “Start” Direction (Edge of the Arc)
- Find the left stop: With the zone off, gently rotate the turret until it stops.
- Aim that stop: Turn the turret so that stop points to where watering should begin (e.g., the left edge of the lawn area).
- Don’t force it like a jar lid: Firm, controlled movement. If you feel you’re wrestling it, pause and reassess.
Why this matters: If your start point is wrong, you can “fix” the arc all day and still water the sidewalk like it’s a prized bonsai.
Step 2: Adjust the Arc (How Wide It Sweeps)
Most Rain Bird residential rotors (like 5000-series part-circle styles and popular gear-drive models) adjust
roughly in the 40°–360° range using a top arc screw (often marked with + and –).
- Turn the zone on (yes, you may get sprayedconsider it sprinkler baptism).
- Locate the arc adjustment screw on top of the rotor.
- Insert a flat-head screwdriver (or rotor key).
- Turn toward “+” to increase arc and toward “–” to decrease arc.
- Make small changes, then let it rotate to confirm the new endpoints.
Pro tip: Many rotors “ratchet” or resist when you hit minimum/maximum arc. When it complains, stop adjustingthis is not a motivational speaker moment.
Step 3: Adjust the Radius (Distance of Throw)
Rotors usually have a radius reduction screw near the nozzle. On many Rain Bird rotors, you can reduce
throw by about up to 25% with that screw. That’s perfect for “just a little shorter,” not for turning a 40-foot rotor into a 10-foot sprinkler.
- With the zone running, find the radius screw (often aligned with the stream direction).
- Clockwise typically reduces radius; counterclockwise increases (up to the nozzle’s designed range).
- If you need a big distance change, swap the nozzle instead of cranking the screw to oblivion.
Example: Fixing a Rotor That Blasts the Driveway
Let’s say your corner rotor is supposed to water a 90° lawn corner, but it’s currently doing a generous 140° and soaking concrete.
- Start direction: Aim the “left stop” so the stream begins exactly at the turf edge.
- Arc: Decrease the arc until the stream stops at the other turf edge.
- Radius: If it still overshoots the lawn line by a couple feet, reduce radius slightly (or choose a shorter nozzle if overshoot is big).
Rotor Troubleshooting (The “Why Is It Doing That?” Checklist)
| Symptom | Likely Cause | Fix |
|---|---|---|
| Misty “fog” around spray | Pressure too high | Consider pressure regulation; verify supply pressure; check for pressure-regulated bodies/heads |
| Short throw / dry spots between heads | Low pressure, clogged nozzle, or wrong nozzle size | Clean/replace nozzle, confirm correct nozzle, check leaks and pressure losses |
| Head won’t pop up fully | Low pressure, dirt in seal, turf overgrowth | Clear grass/soil, “exercise” head, check system pressure and leaks |
| Uneven coverage / brown “donut” around head | Poor distribution, low pressure, incorrect spacing | Correct head-to-head coverage, check pressure, realign vertical and height |
| Arc won’t change | Full-circle rotor (non-adjustable arc) or adjustment at limit | Confirm model type; avoid forcing beyond limits |
Part 2: Adjusting Rain Bird Non-Rotor Heads (Pop-Up Spray Heads & Nozzles)
Non-rotor heads (spray heads) pop up and spray a fan-shaped pattern all at once. The nozzle
usually determines the pattern (quarter/half/full) and distance. If you want a different shape, you often change the nozzlenot the body.
Know Your Nozzle: Fixed Arc vs. VAN (Variable Arc) vs. Specialty
- Fixed arc nozzles: Pre-set pattern (e.g., 90°, 180°). Best for consistency.
- VAN (Variable Arc Nozzles): Adjustable arc (often 0°–360° depending on size) by twisting the collar.
- Specialty nozzles: Strips, corners, rectanglesgreat for tight spaces and sidewalk strips.
Step 1: Adjust Spray Direction (Aim the Pattern)
- Turn on the zone so the head pops up.
- Gently rotate the nozzle or the top assembly to point the fan where it belongs (on plants, not pedestrians).
- Keep the head verticaltilted heads distort coverage and cause dry/wet patches.
Step 2: Adjust Radius (Distance)
Many adjustable spray nozzles include a small stainless steel adjustment screw that tweaks flow and radius.
Turning the screw generally reduces the distance; backing it out restores max throw.
- Locate the tiny screw at the top center of the nozzle.
- Turn clockwise to reduce distance (use small turns).
- If you need a major distance change, swap to a nozzle designed for that radius.
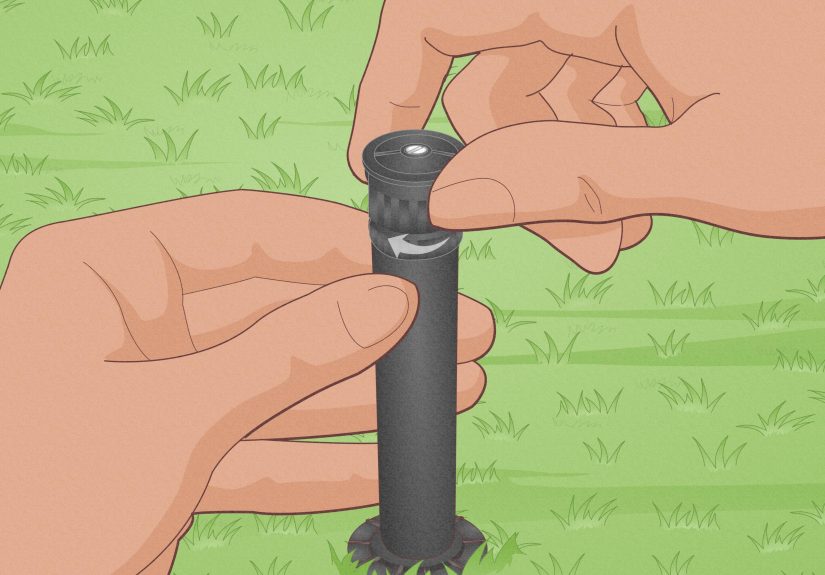
Step 3: Adjust Arc on VAN Nozzles (The “Twist Collar” Move)
With Rain Bird-style VAN nozzles, you typically adjust arc by twisting the center collarwider for more coverage,
narrower to keep water off hardscape. Many also include a filter screen to help prevent clogging.
- While the head is up (zone on), grip the collar gently.
- Twist to increase/decrease the arc until the fan edge lines up with your landscape boundary.
- Re-check radius after changing arcpattern changes can alter edge performance.
Spray Head Troubleshooting
- Weak spray or weird gaps: Remove and rinse the filter screen; clear debris from nozzle openings.
- Overspray onto pavement: Re-aim direction, reduce arc, and swap to a corner/strip nozzle if needed.
- Head stuck down: Turf overgrowth or grit in the wiper sealclean area, “exercise” the pop-up, replace if worn.
Don’t Mix Rotors and Spray Heads in the Same Zone (Here’s Why)
Rotors and spray heads usually apply water at very different rates. Put them together on one valve/zone, and you’ll either:
flood the spray area or underwater the rotor areasometimes both, because irrigation likes irony.
If you find mixed head types in the same zone, the best fix is usually to separate zones (or retrofit thoughtfully),
rather than trying to “adjust” your way out of a precipitation-rate mismatch.
Dialing In Coverage: The “Head-to-Head” Rule (AKA: Overlap Is Not Waste)
If your sprinklers don’t reach each other, coverage will be patchy. A common best practice is head-to-head coverage:
the spray from one head should reach the next head. Overlap is how you get uniform wateringespecially in wind.
Pressure: The Invisible Hand That Can Ruin Everything
Pressure problems create classic symptoms:
- Too high: Fine mist, drift, overspray, faster-than-expected output, and sometimes hardware stress.
- Too low: Heads don’t pop up, streams fall short, uneven distribution, dry rings around heads.
A practical takeaway: Your household supply pressure might be “normal” (often cited around 40–60 psi), but many residential sprinkler
components are designed to operate efficiently at lower, regulated pressures at the head.
If misting or short throw is persistent, pressure regulation (or diagnosing system pressure loss) can be the real solutionnot more arc tweaking.
Test, Tune, Repeat: A Simple “Wet Check” Routine
Monthly Mini-Check (5–10 minutes)
- Run each zone briefly.
- Look for overspray, leaks, tilted heads, clogged nozzles, and stuck pop-ups.
- Fix obvious alignment issues immediatelysmall problems become big water bills.
Seasonal Tune-Up (Spring/Summer/Fall)
- Adjust controller runtimes for weather changes (hotter season ≠ same schedule).
- Use cycle-and-soak if pooling/runoff happens (split runtime into shorter cycles with breaks).
- Verify head-to-head coverage and correct any new landscaping obstructions.
The Tuna Can Test (Yes, Really)
If you want a quick real-world calibration, place a few empty tuna cans around the zone and time how long it takes to collect about
a half inch of water. It’s simple, cheap, and surprisingly effective for understanding how fast your zone applies water.
Fast Reference: What to Adjust on Each Type
| Head Type | Arc Adjustment | Radius Adjustment | Best “Big Change” Fix |
|---|---|---|---|
| Rotor (part-circle) | Top arc screw (+ / –) | Radius screw (small reduction) | Swap nozzle size; correct spacing |
| Rotor (full-circle) | Usually fixed 360° | Radius screw (limited) | Swap nozzle; verify pressure |
| Spray head (fixed nozzle) | Replace nozzle for new pattern | Top screw (minor), nozzle choice (major) | Install correct fixed pattern nozzle |
| Spray head (VAN nozzle) | Twist collar for arc | Top screw for radius/flow | Choose better nozzle (corner/strip/MPR) |
Conclusion: Your Lawn Wants Water, Not Your Sidewalk
Adjusting Rain Bird sprinklers comes down to three wins: aim it right, match the pattern,
and deliver the correct amount. Rotors handle big spaces with arc and radius screws. Spray heads rely heavily on the nozzle
(fixed or VAN) for pattern and distance. And if you remember only one thing: a quick monthly check catches the “small” issues before they become
geysers, dead patches, or neighborhood comedy.
Extra: Real-World Experiences & Lessons from a Sprinkler Tune-Up Weekend (500+ Words)
Here’s what a “normal” Saturday sprinkler tune-up often looks like for homeownersequal parts practical, educational, and mildly damp.
First, there’s the confident start: you turn on Zone 1 and think, “Okay, this doesn’t look too bad.” Then you notice it: one rotor is
painting a perfect rainbow across the driveway like it’s auditioning for a carwash commercial.
The first lesson is emotional: adjustments are easier when you accept you will get sprayed. Many people try to stay dry by
darting in during pauses, but rotors have a sixth sense for timing. The moment you crouch down, the head swings back and tags you right on the
shin. Once you lean into the splash zone (old shoes, quick-dry shorts, towel nearby), you work faster and make better decisions because you can
actually see where the water is landing.
The second lesson is mechanical: small turns matter. A quarter-turn on an arc screw can move the stopping point more than you
expectespecially when you’re standing too close and judging with “eyeballs only.” One handy habit is to pick a reference point: a fence post,
a corner of the patio, a brick seam. Adjust, let the rotor sweep, and watch where it stops compared to that reference. This turns “guessing”
into a repeatable process.
The third lesson is strategic: don’t fight the nozzle. When someone tries to reduce rotor distance a lot using the radius screw,
the stream often gets weaker and coverage can become uneven. The better experience is swapping the nozzle to match the distance you truly need,
then using the screw only for fine-tuning. The same goes for spray heads: if you keep trying to twist and choke a nozzle into covering a weird
curb strip, you’ll end up with overspray and frustration. The “aha” moment is realizing there’s usually a nozzle pattern designed for that exact
shape (corner, side strip, end strip, rectangle). Changing the nozzle can feel like cheatingin the best way.
The fourth lesson is about “invisible problems”: pressure and clogging show up as weird symptoms. Many homeowners report that
once they correct obvious aiming issues, they suddenly notice misting (high pressure) or short throw (low pressure or clogging). Cleaning a
tiny filter screen can restore a spray head from “sad drizzle” to “proper fan pattern” in under a minute. And if multiple heads in a zone look
weak, that’s often a sign to look beyond a single head: leaks, broken fittings, or pressure loss can be the real villain.
The fifth lesson is surprisingly satisfying: measuring beats guessing. The first time you try a simple catch-can approach
(yes, tuna cans are famous for a reason), you learn how quickly your zone applies water. People often discover they were over-watering by habit,
not by need. Once you know the application rate, adjusting runtimes feels less like superstition and more like stewardshiphealthier turf,
fewer puddles, and less water wasted on pavement.
By the end of the weekend, most DIYers report the same funny outcome: the lawn looks better, the system is quieter (fewer leaks and geysers),
and you develop a new reflex where you can’t walk past a sprinkler spraying a sidewalk without wanting to “fix it real quick.” Congratulations.
You have become the unofficial Irrigation Whisperer of your block.