
Table of Contents >> Show >> Hide
- Why Proper Forearm Crutch Adjustment Matters
- Step 1: Put On Your Usual Walking Shoes and Stand Naturally
- Step 2: Adjust the Handgrips to Wrist Level
- Step 3: Make Sure Your Elbows Have a Slight Bend
- Step 4: Position the Forearm Cuffs About 1 to 2 Inches Below the Elbow
- Step 5: Take a Short Test Walk and Check Your Posture
- Step 6: Fine-Tune for Symmetry, Comfort, and Your Specific Needs
- Step 7: Check the Tips, Grips, and Locking Mechanisms Every Day
- Common Mistakes When Adjusting Forearm Crutches
- Comfort and Safety Tips for Daily Use
- Conclusion
- Real-World Experiences With Adjusting Forearm Crutches
- SEO Tags
Forearm crutches look simple enough: two sticks, two cuffs, one mission. But if they are adjusted wrong, they can turn a helpful mobility aid into a daily annoyance machine. Too high, and your shoulders start creeping toward your ears like nervous turtles. Too low, and your wrists, elbows, and back may file a formal complaint by lunchtime.
The good news is that learning how to adjust forearm crutches is not complicated. It just takes a careful setup, a few trial steps, and a willingness to admit that “close enough” is not the same as “comfortable and safe.” Whether you use forearm crutches after surgery, for a lower-leg injury, or as part of long-term mobility support, proper adjustment can help you move with better balance, better posture, and a lot less frustration.
Forearm crutches are also called elbow crutches or Lofstrand crutches. Unlike underarm crutches, they use a handgrip and a cuff around the forearm to help support your body weight. Many people like them because they feel more mobile, less bulky, and easier to manage in tighter spaces. Still, the best crutch in the world becomes a bad roommate when it is set to the wrong height.
This guide walks you through how to adjust forearm crutches in 7 clear steps, plus the most common mistakes to avoid, comfort tips, and real-world experiences that make the learning curve feel a lot more human.
Why Proper Forearm Crutch Adjustment Matters
Before jumping into the steps, it helps to know why fit matters so much. Properly adjusted forearm crutches help distribute weight through your hands and arms while allowing you to stay upright and move more naturally. When the fit is off, your body starts making expensive trade-offs. Wrists can ache. Elbows can lock. Shoulders can tense up. Your lower back may end up doing extra work it never volunteered for.
A good setup also helps with safety. The right height makes it easier to keep the crutch tips planted, clear your feet during swing-through, and avoid awkward stumbles when turning, standing up, or sitting down. In other words, good adjustment is not just about comfort. It is part of preventing falls and making daily movement less exhausting.
One more thing: your exact setup may depend on your doctor’s or physical therapist’s weight-bearing instructions. If you have been told to avoid full weight on one leg, follow that guidance first. The crutches serve your rehab plan, not the other way around.
Step 1: Put On Your Usual Walking Shoes and Stand Naturally
Start with the shoes you actually wear when using the crutches. This matters more than people think. Sneakers, orthopedic shoes, and supportive sandals can change your height enough to affect the fit. If you size your crutches barefoot and then walk around in cushioned trainers later, the measurements may be slightly off.
Stand on a flat surface with your shoulders relaxed and your arms hanging comfortably at your sides. Do not stand at military attention unless that is your usual style. You want your natural posture, not your “someone just said posture check” posture.
This first step gives you a neutral starting point. Your body should feel tall but relaxed, with your head up and your elbows soft. If you tend to lean to one side because of pain or weakness, try to get as centered as possible before measuring. If you cannot do that safely on your own, have someone assist you.
Step 2: Adjust the Handgrips to Wrist Level
The handgrips are the heart of the setup. When your arms hang at your sides, the handgrips should line up around the crease of your wrists. Another easy check is this: when you place your hands on the grips, the height should let your arms fall into a natural, comfortable position instead of forcing your shoulders up or dragging you downward.
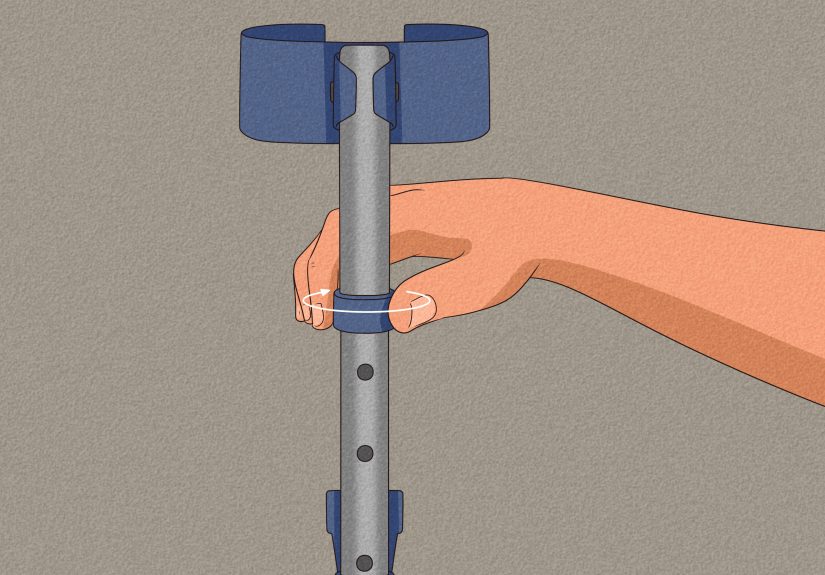
Most forearm crutches have push-button or pin-style adjustments on the shaft. Unlock the mechanism, slide the lower section up or down, and lock it firmly into place. Do this on both crutches, and double-check that both sides are set evenly unless a clinician has told you otherwise.
If the grips are too low, you may hunch forward or feel like you are dropping into the crutches. If the grips are too high, you may shrug your shoulders and overbend your elbows. Neither setup is a winner. Wrist-level positioning gives you a better foundation for weight transfer and smoother gait mechanics.
Step 3: Make Sure Your Elbows Have a Slight Bend
Once the handgrips are adjusted, hold the crutches as if you are ready to walk. Your elbows should be slightly bent, not ramrod straight and not deeply flexed. That small bend matters because it helps absorb force, improves control, and keeps your upper body from feeling stiff and overloaded.
Think of it this way: locked elbows make you move like a folding chair. Excessively bent elbows make every step feel cramped and tiring. A slight bend creates a more stable, responsive position.
This is also the moment to notice what your shoulders are doing. They should stay level and relaxed. If they are creeping upward, the grips are likely too high. If you feel collapsed through your chest or rounded through your back, the grips may be too low. The right adjustment usually feels quietly boring, which is exactly what you want from mobility equipment.
Step 4: Position the Forearm Cuffs About 1 to 2 Inches Below the Elbow
Now move to the cuffs. On properly adjusted forearm crutches, the cuff should sit about 1 to 2 inches below the bend of your elbow. That spacing gives your elbow enough room to move freely without the cuff jamming into the joint every time you flex or extend your arm.
If the cuff rides too high, it can rub near the elbow crease, feel restrictive, and make the crutch awkward to swing. If it sits too low, it may feel loose, unstable, or less supportive than it should. The cuff is there to help guide the crutch and keep it connected to your forearm, not to squeeze your arm like it is trying out for a compression sleeve commercial.
Some models allow cuff-height adjustment separately from total crutch height, while others use a fixed relationship between the cuff and handle. If yours is adjustable, make the changes gradually and test each side. The goal is a secure but comfortable position that lets you move the crutch naturally.
Step 5: Take a Short Test Walk and Check Your Posture
Once the basic measurements are set, walk a few steps on a safe, flat surface. Keep your eyes forward instead of staring at your feet. Let your hands bear your weight on the grips. The crutch tips should land securely on the floor without wobbling or slipping, and your body should move through the crutches in a controlled, balanced way.
During the test walk, pay attention to three things: posture, comfort, and rhythm. Are you standing upright, or are you leaning too far forward? Do your wrists and shoulders feel reasonable, or do they complain immediately? Does the walking pattern feel smooth, or does one crutch seem late to the party every step?
This is where little problems reveal themselves. A setup that looks perfect while standing still may feel completely wrong once you start moving. That is normal. Crutch adjustment is often part measurement, part fine-tuning. Expect to make small corrections after the first short walk.
Step 6: Fine-Tune for Symmetry, Comfort, and Your Specific Needs
After your test walk, fine-tune the fit. Both crutches should usually match in height, and your body should feel level from side to side. If one handle is even a little off, you may notice one shoulder hiking up, one wrist taking more pressure, or one side of your back working overtime.
Fine-tuning also means paying attention to your real-life use. For example, if you use forearm crutches indoors on smooth floors and outdoors on uneven sidewalks, your body may notice problems quickly. If the cuffs rub your forearms, you may need a different cuff setting or better sleeve coverage. If your palms get sore, ergonomic grips or padded covers may help.
This step is also where you respect the rehab plan. Someone using forearm crutches for temporary recovery after ankle surgery may need a different walking pattern than someone using them long term for balance, weakness, or neurological conditions. The adjustment can be similar, but the way you use the crutches may differ. That is why a physical therapist’s input is worth its weight in gold, or at least in very expensive foam padding.
Step 7: Check the Tips, Grips, and Locking Mechanisms Every Day
The final step is the one people skip right before they regret skipping it. Before daily use, inspect the crutches. Look at the rubber tips for wear, cracks, or smooth spots. Check that the grips are secure and not twisting. Make sure the adjustment buttons or locking pins are fully engaged. If your cuffs are cracked or loose, do not ignore that either.
Forearm crutches only work well when the parts touching the ground and your body are in good shape. Worn tips can reduce traction. Loose locks can change the height unexpectedly. A shifting handgrip can make even a short walk feel unstable.
Maintenance is not glamorous, but neither is sliding across a grocery store aisle because a crutch tip gave up on life. A 30-second safety check can save you from a bad day.
Common Mistakes When Adjusting Forearm Crutches
Setting the handgrips too high
This usually causes shoulder shrugging, neck tension, and bent wrists. If you feel like you are carrying your shoulders as earrings, lower the grips a little and retest.
Setting the handgrips too low
This can make you lean forward and collapse through your trunk. It often shows up as hand pain, wrist fatigue, or a “why does my back suddenly hate me?” feeling after a short walk.
Ignoring cuff placement
People often focus only on overall crutch height and forget the cuff. But a cuff that is too high or too low can make the whole setup feel clumsy, even if the grip height is technically correct.
Walking without checking weight-bearing instructions
Properly adjusted crutches still need to match your medical instructions. Non-weight-bearing, toe-touch, partial weight-bearing, and weight-bearing-as-tolerated are not interchangeable terms. They change how you move.
Using worn tips or loose parts
This is the maintenance version of “I’ll deal with it later,” and later tends to arrive at the worst possible time. Replace worn parts early.
Comfort and Safety Tips for Daily Use
Forearm crutches are easier to live with when you build a few smart habits. Keep floors clear of cords and loose rugs. Wear shoes with decent traction. Use a backpack or crossbody bag instead of trying to carry everything in your hands. When sitting down, back up carefully until you feel the chair behind your legs before lowering yourself.
If you notice persistent hand numbness, tingling, unusual wrist pain, forearm bruising, or increasing shoulder strain, do not just “push through it.” Those signs can mean the fit is wrong, your technique needs correcting, or the device is not the best match for your body. Getting rechecked early is much easier than recovering from an avoidable overuse problem later.
And yes, it is okay if using forearm crutches feels awkward at first. Most people are not born with advanced crutch charisma. Skill comes with repetition and good setup.
Conclusion
Learning how to adjust forearm crutches comes down to getting the basics right: stand naturally, set the handgrips at wrist level, keep a slight elbow bend, place the cuffs about 1 to 2 inches below the elbow, test the fit while walking, fine-tune for symmetry, and inspect the parts regularly. Those seven steps can make the difference between moving with confidence and spending your day negotiating with sore shoulders and irritated wrists.
If the fit still feels off after adjustment, or if your medical condition changes, ask a clinician or physical therapist to reassess the setup. That is not overthinking it. That is smart mobility. The goal is not just to get from point A to point B. The goal is to do it safely, comfortably, and with as little drama as possible.
Real-World Experiences With Adjusting Forearm Crutches
Many people discover the truth about forearm crutches the same way: the first adjustment feels “good enough” for about six minutes. Then the shoulders start talking, the palms get sore, and the user realizes the crutches may be technically assembled but not actually fitted. That is a common experience, especially for first-time users after surgery or injury. On day one, people often focus only on getting moving. By day two, they start noticing whether the crutches are helping them move or quietly making every hallway feel longer.
A frequent experience is surprise at how much better properly adjusted forearm crutches feel compared with a rushed setup from a clinic, supply closet, or well-meaning family member. Someone may begin with the cuffs too high and assume elbow pressure is just part of the deal. After a small adjustment downward, suddenly the arms swing more naturally and the crutches stop bumping into the elbows on every step. Another person may lower the handgrips slightly and realize that the weird neck tension they blamed on stress was actually coming from elevated shoulders all along.
People who use forearm crutches for longer periods often describe a learning phase that is less about strength and more about rhythm. At first, it can feel mechanical and overly deliberate: plant, step, think, repeat. Then, once the fit is right, the movement gets quieter and smoother. The crutches start to feel less like foreign objects and more like tools that are cooperating. That shift matters emotionally as much as physically. When your equipment fits well, you spend less brainpower fighting it.
There is also a strong comfort factor in everyday life. Users often report that properly adjusted crutches make ordinary tasks easier: turning in a hallway, standing at the sink, opening a door, or crossing a parking lot without feeling off-balance. Small improvements add up. A quarter-inch adjustment can be the difference between “I can manage this” and “Why is getting coffee now an upper-body event?”
Another common experience is realizing that fit changes over time. Swelling goes down. Shoes change. Strength improves. Weight-bearing status advances. Someone who needed a very guarded setup during the first week after surgery may need a small recheck two weeks later. Long-term users also learn that wear and tear changes the experience. New rubber tips can make the crutches feel surprisingly more secure, while worn grips can make them feel sloppy even if the height is still correct.
Many people also mention the confidence boost that comes from having a clinician confirm the setup. It is reassuring to hear, “Yes, that cuff height is right,” or, “No, you should not be leaning that much.” Good feedback removes guesswork. It also helps people stop blaming themselves for discomfort that is really a fit issue.
In the end, the shared experience is simple: forearm crutches work best when they are adjusted with care, checked in motion, and updated when your body or situation changes. The right fit does not turn recovery into a vacation, but it can make daily movement feel steadier, safer, and a whole lot less irritating. That is a win worth measuring.





