Table of Contents >> Show >> Hide
- Why This Matters More Than You Think
- How to Add a Picture to a Folder on Mac in 7 Steps
- Step 1: Open Finder and locate the picture
- Step 2: Create or open the destination folder
- Step 3: Set up Finder so the move is easy
- Step 4: Drag the picture into the folder
- Step 5: Decide whether you want to move or copy the picture
- Step 6: Check that the picture landed in the right folder
- Step 7: Organize the folder so future-you says thanks
- What to Do If Drag and Drop Is Not Working
- Bonus Tip: If You Meant Adding a Picture to the Folder Icon
- Common Mistakes to Avoid
- Real-World Experiences: What This Looks Like in Everyday Use
- Conclusion
- SEO Tags
Adding a picture to a folder on a Mac sounds almost too easy to deserve a tutorial. Then real life shows up. The photo is on the Desktop, the folder is buried somewhere in Documents, Finder is in the wrong view, and suddenly a “quick move” turns into a tiny scavenger hunt with attitude. The good news is that macOS makes this job simple once you know the cleanest path.
In this guide, you’ll learn exactly how to add a picture to a folder on Mac in seven straightforward steps, plus a few practical tricks that make the whole process faster. We’ll cover how to move or copy an image, how to check that it landed in the right folder, what to do if drag-and-drop acts dramatic, and even a bonus tip in case you actually meant putting a picture on the folder as a custom icon. Yes, Finder has layers.
Whether you’re organizing screenshots, saving vacation photos, cleaning up a cluttered Downloads folder, or helping a family member who still calls every image “that little file thing,” this walkthrough will help you do it neatly and confidently.
Why This Matters More Than You Think
Folders are the backbone of file organization on a Mac. When you know how to move a picture into the right folder, you make it easier to find later, easier to back up, easier to share, and much less likely to disappear into the digital wilderness. A photo sitting on the Desktop may feel visible now, but after a week of screenshots, PDFs, and mystery downloads, it becomes one more lost tourist.
A smart folder system also saves time. If you routinely place pictures into folders such as Work Images, Receipts, Family Photos, or Screenshots to Keep, your Mac becomes less of a junk drawer and more of a filing cabinet that actually deserves respect.
How to Add a Picture to a Folder on Mac in 7 Steps
Step 1: Open Finder and locate the picture
Click the Finder icon in your Dock. It’s the smiling blue face that quietly runs half your digital life. Once Finder opens, go to the location where your picture currently lives. Common spots include the Desktop, Downloads, Documents, or a folder you created earlier.
If you are not sure where the image is, use the Finder search bar in the top-right corner and type the file name, part of the file name, or even a file type such as PNG or JPG. If you know it is a recent screenshot, search for “Screenshot” and let Finder do the detective work.
Example: Let’s say your picture is called Beach-Sunset.jpg and it is sitting on your Desktop like it pays rent. Finder will help you track it down in seconds.
Step 2: Create or open the destination folder
Now find the folder where you want the picture to go. If the folder already exists, open it in Finder or make sure it is visible in another Finder window. If it does not exist yet, create one by clicking File > New Folder or using the keyboard shortcut Shift + Command + N.
Give the folder a clear name. Not “Stuff.” Not “Random.” Not “Final Final New Real Final.” Choose something useful, like Client Headshots, Spring Break Photos, or Products for Website.
If you move pictures often, place your most-used folders in the Finder sidebar so they are always one click away. That little move can save you a surprising amount of time.
Step 3: Set up Finder so the move is easy
You do not have to work harder than Finder. Use a layout that helps you see what you’re doing. If your window feels crowded, switch views using the Finder toolbar. List view and Column view are especially helpful when you need to move files between folders without getting lost.
If you want to double-check the image before moving it, select the file and tap the Space bar to open Quick Look. This lets you preview the picture without opening a separate app. It is perfect when you have ten nearly identical files named something like IMG_4821, IMG_4822, and IMG_4822-actual-final.
Organizing pictures is much easier when you can actually see the one you want. Revolutionary concept, really.
Step 4: Drag the picture into the folder
Click the picture file, hold down your mouse button or trackpad, and drag it onto the destination folder. Release to drop it. That is the core action. That is the move. That is the magic trick without the smoke machine.
If the folder is visible in the sidebar, you can drag the picture directly there. If the folder is open in another Finder window, drag the picture into that window. If the folder is nested inside another folder, hover over it briefly while dragging so Finder opens the folder and lets you go deeper.
For multiple pictures, hold Command and click each file you want, or use Shift to select a range. Then drag one of the selected images into the folder. The whole group moves together.
Step 5: Decide whether you want to move or copy the picture
This step matters. Some people want the picture to leave its original location and live in the new folder. Others want to keep the original where it is and place a copy in the folder. Those are very different outcomes, especially if the original image is important.
If you want to copy the picture instead of moving it, hold the Option key while dragging. This tells your Mac to create a copy in the destination folder. It is useful when you want the same image in two places, such as one copy in Downloads and another in Project Assets.
If you want a shortcut rather than a duplicate, create an alias. That gives you a quick link to the image without making another full file. This is handy when you want fast access without cluttering your storage with duplicates.
Step 6: Check that the picture landed in the right folder
Open the destination folder and confirm the picture is there. This sounds obvious, but skipping this step is how people end up saying, “I swear I moved it,” while staring into the abyss.
You can click the image once and press the Space bar again to preview it with Quick Look. If you want more details, select the image and press Command + I for Get Info. This lets you confirm the file name, file size, kind, and location.
If the image is not where you expected, do not panic. Finder usually responds well to calm, reasonable behavior. Search for the file again, check Recent items, or look in the original location to see whether you copied instead of moved.
Step 7: Organize the folder so future-you says thanks
Once the picture is in the folder, take ten extra seconds to make the folder easier to use. Rename the file if needed, especially if it has a vague camera-generated name. Add tags if you use Finder tags. Sort the folder by Name, Date Added, or Kind. If this folder is important, drag it to the Finder sidebar for quick access.
For example, instead of leaving a file named IMG_9034.JPG, rename it team-headshot-maria.jpg. That tiny upgrade makes the image easier to find later, easier to identify in search, and easier to share with someone who does not enjoy decoding mystery filenames.
Good organization is not glamorous, but neither is digging through 1,200 screenshots to find one photo from last Tuesday.
What to Do If Drag and Drop Is Not Working
Sometimes the steps are right and your Mac still decides to be complicated. If drag-and-drop is not cooperating, try these fixes:
- Use Command + C to copy the picture, then open the destination folder and press Command + V to paste it.
- Restart Finder or reopen the folder if the window seems frozen.
- Check your trackpad or mouse behavior if clicking and dragging feels inconsistent.
- Turn on three-finger drag in accessibility settings if dragging with a trackpad feels awkward.
- Make sure you have permission to write to the destination folder, especially on shared or external drives.
If a folder is shared through cloud storage or belongs to another user account, your Mac may stop you from moving files there until permissions are sorted out. In plain English: the folder is not being rude on purpose, it just has rules.
Bonus Tip: If You Meant Adding a Picture to the Folder Icon
This is a different trick, but a useful one. Some people do not mean placing a photo inside a folder. They mean using a picture as the folder’s icon so the folder looks custom. Mac can do that too.
Here is the quick version:
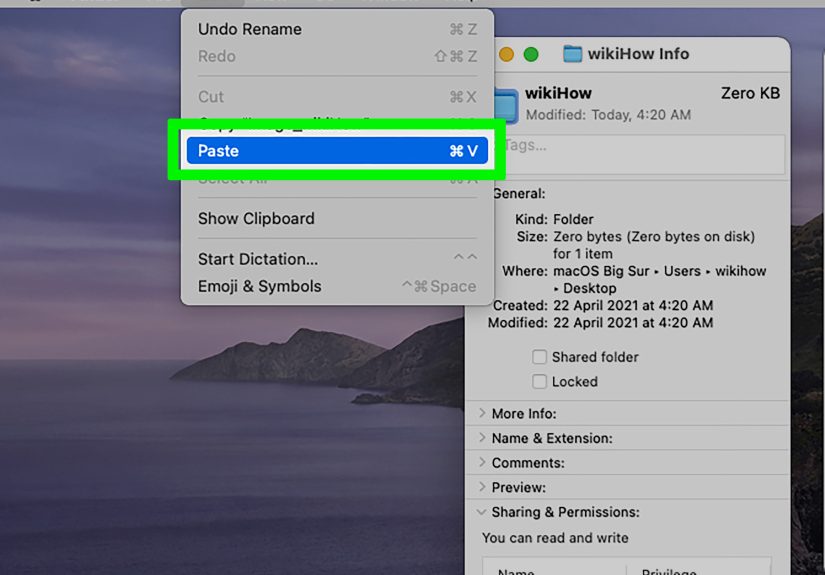
- Open the picture in Preview.
- Select the image and copy it.
- Select the folder in Finder and press Command + I.
- In the Info window, click the small folder icon at the top.
- Paste the image.
Now your folder can wear a custom picture like a tiny badge of honor. Is it necessary? Not always. Is it fun? Absolutely.
Common Mistakes to Avoid
- Dropping the picture into the wrong folder: This happens most often when several folders have similar names.
- Accidentally moving instead of copying: Use the Option key when you need a duplicate.
- Keeping useless file names: Rename important images while you still remember what they are.
- Using the Desktop as permanent storage: A little temporary chaos is fine; a permanent screenshot swamp is not.
- Ignoring folder structure: One organized parent folder is better than twenty random image dumps.
Real-World Experiences: What This Looks Like in Everyday Use
If you use a Mac every day, adding a picture to a folder becomes one of those small tasks that quietly repeats itself hundreds of times. It starts with something innocent, like moving a screenshot from the Desktop into a project folder. Then it becomes saving product photos for a website, dropping travel pictures into a vacation album folder, organizing school assignments, or collecting receipts for taxes. The action is tiny, but the effect adds up.
One of the most common real-world experiences is the “I’ll sort it later” habit. A picture gets downloaded. Then another. Then fifteen more. They land in Downloads, or on the Desktop, and sit there while life keeps moving. A week later, you know the image exists, but you do not know where. That is when a simple folder system starts to feel less like boring housekeeping and more like a survival skill.
Another very relatable moment happens when you are working fast and accidentally move the original image instead of copying it. Suddenly the picture is missing from where you expected it, and you feel like your Mac has betrayed you personally. In reality, Finder did exactly what it was told. That is why learning the difference between a move, a copy, and an alias is so useful. It turns a frustrating guessing game into a deliberate choice.
People who work with images a lot also discover that naming matters almost as much as location. A folder full of files named IMG_1001, IMG_1002, and IMG_1003 is not organized just because it is technically in a folder. Real organization means you can find what you need without opening twelve files and whispering threats at your screen. Renaming images right after moving them can save serious time later.
There is also the emotional side of file organization, which sounds dramatic until you have cleaned up a messy Mac and felt instantly calmer. A neat folder of family photos feels better than a Desktop covered in random image files. A tidy work folder reduces friction. A properly named screenshot folder makes you feel suspiciously competent. These are not life-changing events, but they are quality-of-life wins, and computers are full of those.
For trackpad users, the experience can vary too. Some people love dragging files around. Others feel like they are trying to move a grain of rice across ice. Turning on three-finger drag, using the sidebar, or relying on copy-and-paste instead of drag-and-drop can make the process much smoother. The best workflow is the one that feels reliable to you, not the one that looks coolest in a tutorial.
Over time, the people who stay organized are not usually the most technical. They are the ones who build tiny habits: create the folder first, move the picture immediately, rename it while the context is fresh, and keep important folders easy to reach. That is it. No complicated system. No color-coded file empire required. Just a few repeatable steps that prevent digital clutter from multiplying like it has a personal grudge.
So yes, adding a picture to a folder on Mac is simple. But in everyday use, it is also one of those little skills that makes the whole computer feel easier to manage. And that is worth more than it seems.
Conclusion
Learning how to add a picture to a folder on Mac is one of those basic skills that pays off immediately. Open Finder, locate the image, choose the destination folder, drag and drop, decide whether to move or copy, confirm the file arrived, and clean up the folder so it stays useful. That is the entire system.
Once you get comfortable with those seven steps, your Mac becomes easier to navigate, your pictures become easier to find, and your future self stops wasting time on digital hide-and-seek. And honestly, that is a pretty solid return on a task that takes less time than reheating coffee.