
Table of Contents >> Show >> Hide
- Why Fresh Pumpkin Pie Is Different (and When It’s Worth It)
- Ingredients
- Step 1: Make Fresh Pumpkin Purée (Thick, Smooth, Not Watery)
- Step 2: Make the All-Butter Pie Crust (Flaky Without Drama)
- Step 3: Par-Bake the Crust (Because Soggy Bottoms Are Tragic)
- Step 4: Mix the Filling (Smooth Custard, Not Spicy Concrete)
- Step 5: Bake Like a Pro (Set Custard, No Cracks)
- Cooling, Serving, and Storage
- Troubleshooting (Because Pie Shouldn’t Be a Personality Test)
- Fun Variations (Same Pie, New Personality)
- FAQ
- Kitchen Stories & Real-Life Pumpkin Pie Experiences (Because We’ve All Been There)
- SEO Tags
Pumpkin pie is basically a cozy sweater you can eat. But when you make it with fresh pumpkin,
it turns into the fancy version of that sweaterstill comfy, just… with better stitching and fewer weird lumps.
This guide walks you through a truly homemade fresh pumpkin pie recipe (yes, including the crust), plus the
small pro moves that keep your pie from doing any of the following: weeping, cracking, or turning your crust
into a sad sponge.
You’ll get a silky custard filling, warm spice, and a crust that actually stays crisp. And if you’ve ever wondered
why some pumpkin pies taste like “pumpkin-scented candle (limited edition),” we’ll fix that too.
Why Fresh Pumpkin Pie Is Different (and When It’s Worth It)
Using fresh pumpkin gives you a roasted, earthy sweetness you won’t always get from canned purée. The tradeoff?
Fresh pumpkin can be watery, stringy, and unpredictable if you treat it like a can with a stem.
The solution is simple: roast it, purée it until ultra-smooth, and remove excess moisture.
Do that, and your filling becomes rich and custardy instead of vaguely… swampy.
If you want the most consistent “classic American pumpkin pie” flavor, canned purée is famously reliable.
But if you’re here for the full-from-scratch experience (or you’ve got cute pie pumpkins begging to be useful),
fresh is absolutely worth it.
Ingredients
For the flaky, all-butter crust (1 single crust)
- 1 1/4 cups (150g) all-purpose flour
- 1/2 teaspoon fine salt
- 1 tablespoon sugar (optional, but helps browning and flavor)
- 1/2 cup (113g) unsalted butter, very cold, cut into cubes
- 3–5 tablespoons ice water
For the fresh pumpkin filling
- 2 cups (about 450g) thick homemade pumpkin purée (see Step 1)
- 2 large eggs + 1 yolk (for a custardy, sliceable set)
- 1 cup evaporated milk or 3/4 cup heavy cream + 1/4 cup milk
- 3/4 cup packed brown sugar
- 1–2 tablespoons maple syrup (optional, but adds depth)
- 1 tablespoon cornstarch or 1 tablespoon flour (insurance against weepy filling)
- 1 teaspoon ground cinnamon
- 1/2 teaspoon ground ginger
- 1/4 teaspoon ground nutmeg
- 1/8 teaspoon ground cloves (a little goes a long way)
- 1/2 teaspoon salt
- 1 teaspoon vanilla extract
- Optional “chef-y” twist: a tiny pinch of black pepper (yes, really)
Equipment that makes life easier
- 9-inch pie dish
- Food processor (helpful, not mandatory)
- Fine-mesh strainer or cheesecloth
- Instant-read thermometer (highly recommended for perfect doneness)
- Pie weights or dry beans/rice (for par-baking)
Step 1: Make Fresh Pumpkin Purée (Thick, Smooth, Not Watery)
Choose the right pumpkin. Look for small “pie” or “sugar” pumpkins.
Skip big carving pumpkins unless you enjoy stringy, bland regret.
Roast
- Heat oven to 350°F.
- Cut 2 small pie pumpkins in half and scoop out seeds (save them for roasting if you’re feeling virtuous).
- Place pumpkin halves cut-side down on a parchment-lined baking sheet.
- Roast 45–60 minutes, until the flesh is very tender when pierced.
- Cool until you can handle them without needing oven mitts and a life coach.
Scoop & purée
- Scoop out the flesh and blend/food-process until completely smooth.
- If it looks even slightly stringy, keep going. Smooth purée = smooth pie.
Drain (this is the secret handshake)
Homemade purée often carries extra water. Too much moisture can cause a filling that bakes up loose or separates.
To fix it:
- Spoon purée into a fine-mesh strainer lined with cheesecloth (or paper towels in a pinch).
- Set over a bowl and let drain 30–60 minutes. For faster results, gently press.
- You want a texture like thick hummus, not a smoothie.
Shortcut note: You can make the purée 1–3 days ahead and refrigerate it.
It actually drains even better when chilled.
Step 2: Make the All-Butter Pie Crust (Flaky Without Drama)
The key to flaky crust is cold fat. If your butter melts before the oven hits it, the crust loses layers.
So we’re basically doing a spa day for butter: keep it cold and relaxed until bake time.
- In a bowl, whisk flour, salt, and sugar.
- Cut in cold butter until you have pea-size pieces (some larger bits are good).
- Add ice water 1 tablespoon at a time, mixing just until the dough holds together when pinched.
- Form into a disk, wrap, and chill at least 1 hour (overnight is great).
- Roll into a 12-inch circle, place in pie dish, and crimp edges.
- Chill the shaped crust 20–30 minutes before baking (cold dough holds its shape).
Step 3: Par-Bake the Crust (Because Soggy Bottoms Are Tragic)
Pumpkin pie is a custard pie: wet filling, long bake. Par-baking helps the bottom crust stay crisp instead of
turning into “pumpkin pudding with a damp hat.”
- Heat oven to 375°F.
- Line chilled crust with parchment or foil and fill with pie weights/dry beans.
- Bake 15–18 minutes, then remove weights and lining.
- Return crust to oven 5–7 minutes until the bottom looks dry.
- Optional pro move: brush the warm crust lightly with egg white and bake 1 minute more to seal it.
Step 4: Mix the Filling (Smooth Custard, Not Spicy Concrete)
Pumpkin pie should taste like pumpkin plus warm spicenot like your spice cabinet exploded.
Mixing spices individually also lets you control the vibe.
- In a large bowl, whisk brown sugar, cinnamon, ginger, nutmeg, cloves, cornstarch (or flour), and salt.
- Whisk in eggs and yolk until smooth.
- Add pumpkin purée, dairy, vanilla, and maple syrup (if using). Whisk until silky.
- For deeper flavor, cover and refrigerate the filling 30 minutes (or overnight if you’re planning ahead).
Texture check: If your filling looks thin like heavy cream, your purée may still be watery.
Drain the purée a little longer next time (or add 1 extra teaspoon cornstarch now).
Step 5: Bake Like a Pro (Set Custard, No Cracks)
Two enemies here: overbaking (causes cracking and grainy custard) and underbaking (soupy center).
The goal is a pie that’s set around the edges with a gentle wobble in the middle.
- Place a baking sheet in the oven while it preheats (hot sheet = crispier bottom).
- Heat oven to 425°F.
- Pour filling into the warm par-baked crust.
- Set pie on the hot baking sheet and bake 15 minutes at 425°F.
- Reduce oven to 350°F and bake 30–45 minutes more.
- If crust edges brown too fast, cover edges with foil or a pie shield.
How to tell when pumpkin pie is done
- Jiggle test: The center should wobble like Jell-O’s calmer cousinnot ripple like soup.
- Thermometer test (best): Aim for 180°F at the coolest point near center.
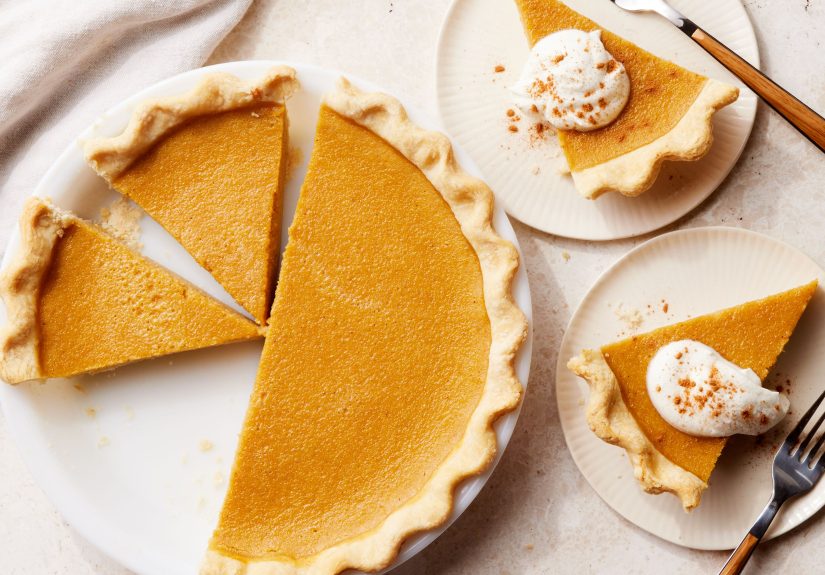
- Visual cues: Filling looks matte (not shiny-wet), edges are set, and the center still has a soft quiver.
Crack prevention tip
Custard cracks from sudden temperature changes and overbaking. If you’re nervous about cracks,
turn off the oven when the pie hits doneness, prop the door slightly with a wooden spoon,
and let the pie cool in the oven for 20–30 minutes before moving it to a rack.
Cooling, Serving, and Storage
Cooling is not optionalhot pumpkin pie is basically molten custard pretending to be sliceable.
Let it cool on a rack at least 2–3 hours.
- Serving: Best at cool room temperature (flavor pops more than straight-from-fridge).
- Food safety: Because it contains eggs and dairy, refrigerate within 2 hours of baking.
- Fridge life: Typically 3–4 days, loosely covered.
- Freezing: Freeze slices wrapped well; thaw in the fridge for best texture.
Troubleshooting (Because Pie Shouldn’t Be a Personality Test)
My filling is watery or won’t set
- Fresh purée wasn’t drained enough. Next time, strain longer.
- Pie needed more bake time. Use the thermometer method to remove guesswork.
- Oven temperature may run coolan oven thermometer can save your desserts and your mood.
My pie cracked
- Overbaked by a few minutes. Next time, pull at the soft-jiggle stage.
- Try the slow-cool method (cooling briefly in the turned-off oven).
- Also: whipped cream exists. Cracks happen. We move on.
My crust is soggy
- Par-bake longer until the bottom looks dry.
- Bake on a preheated sheet.
- Consider the egg-white “seal” step.
Fun Variations (Same Pie, New Personality)
- Condensed milk style: Swap evaporated milk for sweetened condensed milk and reduce sugar (richer, silkier).
- Buttermilk twist: Replace 1/4 cup dairy with buttermilk for a gentle tang that brightens flavor.
- Gingersnap crust: Trade pastry crust for gingersnap crumbs + melted butter (spicy, snappy, very holiday).
- Extra-roasty vibe: Roast the pumpkin a touch longer for deeper caramel notesjust don’t burn it.
FAQ
Can I use a carved jack-o’-lantern pumpkin?
You can, but it’s usually bland and watery. Pie pumpkins (also called sugar pumpkins) are bred for flavor
and smoother textureyour pie will thank you.
Is fresh pumpkin always better than canned?
Fresh can be more flavorful, but canned is more consistent. If you do fresh, draining the purée is what makes it “better”
instead of “why did I do this to myself.”
Do I really need a thermometer?
Need? No. Will it give you calm, confident pie energy? Yes. Custards are notorious for looking underdone until they cool,
so temperature is the most reliable doneness check.
Kitchen Stories & Real-Life Pumpkin Pie Experiences (Because We’ve All Been There)
My first “fresh pumpkin pie” attempt started with peak optimism and a giant carving pumpkin that looked like it could bench-press me.
I figured pumpkin is pumpkin, right? Wrong. That pie came out with the flavor of polite orange water and the texture of damp string.
The crustoh, the crustabsorbed so much moisture that it went from “flaky” to “emotional support blanket” in about twelve minutes.
I served it anyway (because pride), and everyone took a bite with the same expression people make when they’re trying to be nice about a bad haircut.
The second time, I got smarter. I bought two small sugar pumpkins and roasted them cut-side down like they were auditioning for a fall-themed
cooking show. The kitchen smelled like toasted autumn and good decisions. When I blended the purée, it still looked a little loose, so I tried
the draining stepjust sitting the purée in a strainer while I made crust. It felt like overkill… until I saw how much liquid collected in the bowl.
That watery stuff was basically the ghost of my first pie, trying to come back and haunt me.
I also learned the hard way that pumpkin pie is a custard with boundaries. If you overbake it, the filling tightens up like it’s offended,
then cracks as it cools. The first time I saw a crack, I took it personally. The next time, I took a deep breath, turned off the oven,
propped the door with a wooden spoon, and let the pie cool slowly. It worked. No Grand Canyon on top. Just a smooth, gently domed surface
that made me feel like I’d unlocked a minor life achievement.
Then there’s the “jiggle panic.” Pumpkin pie always jiggles a little when it’s done, and the first time you see that, your brain says,
“That’s raw.” But it isn’tcustard sets as it cools. Once I started using an instant-read thermometer, the anxiety disappeared.
Hitting that sweet spot (set edges, soft center, right temperature) turned pumpkin pie from a yearly gamble into something I can actually plan on.
And that’s the real holiday miracle: predictable dessert.
The best part of fresh pumpkin pie, though, is how it changes the experience around the table. People expect “pumpkin pie.”
When they taste one made with roasted, drained purée and balanced spices, they pause. Not because it’s weirdbecause it tastes
deeper and more real. It’s still nostalgic, still classic, but with a little extra warmth and roasted sweetness that makes the whole
thing feel handmade in the best way. Add whipped cream, maybe a tiny grate of nutmeg on top, and suddenly you’re not just serving pie
you’re serving proof that you can, in fact, pull off something that looks like a magazine cover. Even if your first attempt was a damp hat.





