
Table of Contents >> Show >> Hide
- Why a Desk Hutch Makes a Surprisingly Great Medicine Cabinet
- Start With a Quick Reality Check: Space, Depth, and Daily Use
- Choosing the Right Hutch: What to Look For at the Store
- Design Options: Mirror Door, Open Shelf, or Both
- Desk Hutch to Medicine Cabinet: Step-by-Step Conversion
- Step 1: Clean it like it owes you money
- Step 2: Remove or modify the back (if needed)
- Step 3: Patch, fill, and smooth
- Step 4: Sand (or degloss) for paint adhesion
- Step 5: Prime for bathroomsnon-negotiable
- Step 6: Paint with a durable cabinet-grade finish
- Step 7: Seal the vulnerable spots
- Step 8: Add hardware that makes it feel intentional
- How to Mount It Safely (So It Doesn’t Become a Bathroom Trampoline)
- Bathroom-Proofing the Flip: Moisture Management That Actually Matters
- Storage Layout Ideas: Make It Work Like a Real Medicine Cabinet
- What This Flip Costs (Usually) and Where the Savings Come From
- Common Mistakes (and How to Avoid Them)
- Conclusion: A Flip That Looks Custom, Saves Money, and Adds Real Storage
- “What You’ll Experience” During This Flip (About of Real-Life Moments)
If you’ve ever priced out a medicine cabinet lately, you already know the truth: they’re small, they’re shiny,
and they’re somehow priced like they come with a free bathroom remodel. The good news? You can get the same
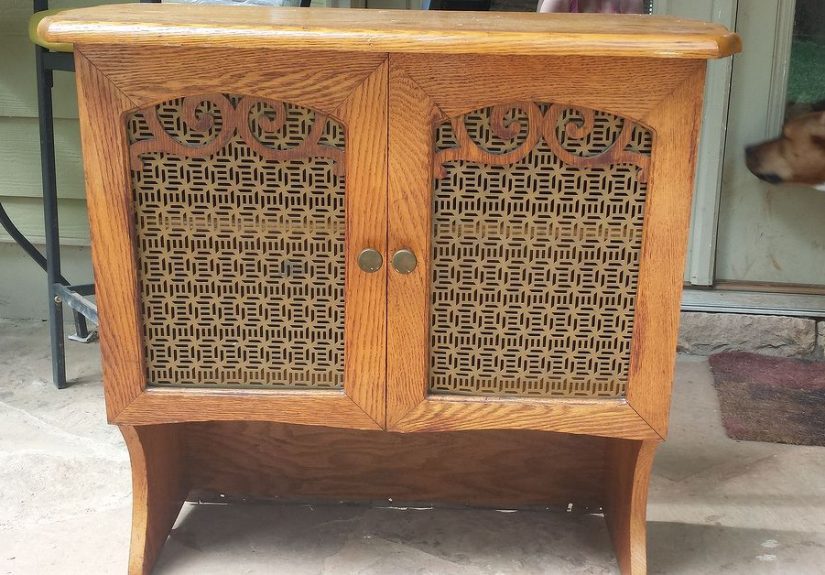
“hidden storage + pretty focal point” vibe for a fraction of the cost by flipping a desk hutch into a
medicine cabinet.
This project is part thrift-store treasure hunt, part practical bathroom upgrade, and part “look what I made!”
bragging rights. Done well, it looks customlike it was always meant to live above a sinkwhile keeping your
toothpaste, skincare, and first-aid odds and ends from taking over the counter like tiny plastic squatters.
Why a Desk Hutch Makes a Surprisingly Great Medicine Cabinet
A desk hutch has a lot going for it: it’s already designed to store small items, it often includes shelving,
and it usually has nice trim details that feel more “furniture” than “builder basic.” In other words, it’s
halfway to charming before you even touch a paintbrush.
The key is picking (and modifying) a hutch so it works in a humid, splash-prone bathroom. A true medicine cabinet
needs moisture-aware finishes, smart storage spacing, and secure mounting. But you don’t need a full woodshop to
pull it offjust a plan, patience, and the willingness to sand something while questioning your life choices
(briefly).
Start With a Quick Reality Check: Space, Depth, and Daily Use
1) Measure like you mean it
Before you fall in love with a hutch at the thrift store, grab a tape measure and confirm three things:
- Wall width: Make sure the cabinet won’t collide with sconces, mirrors, or a nearby wall.
- Depth: Standard desk hutches can be deeper than you want above a sink. Aim for a depth that won’t bonk anyone in the forehead during the morning rush.
- Door swing: Doors should open without hitting a faucet, vanity top items, or your face.
2) Decide: surface-mount or recessed
Traditional recessed medicine cabinets sit inside the wall cavity for a flush look, while surface-mount cabinets
hang on the wall like a picture frame with better secrets. Recessed installs can look sleek, but they require
opening the wall and confirming you won’t run into plumbing or electrical. Surface-mount is usually the simpler
optionand perfect for a furniture flip because you’re working with an existing cabinet box.
Choosing the Right Hutch: What to Look For at the Store
Go for sturdy materials
In bathrooms, humidity is the uninvited guest who never leaves. Solid wood or quality plywood construction holds
up better than bargain particleboard or swollen, crumbly MDF edges. That doesn’t mean you can’t flip an MDF piece
it just means you’ll need to seal it thoroughly, especially on raw edges and any cut surfaces.
Look for these “green flags”
- Square corners and solid joints: If it already wobbles, it won’t magically become stable above your sink.
- Removable shelves: Adjustable shelves make it easier to store taller items like mouthwash or hair products.
- Interesting trim: A little molding can make the finished cabinet look high-end without extra effort.
- Minimal odor: If it smells like mystery basement, it might keep smelling like mystery basement.
And these “red flags”
- Water damage that has softened the wood or caused bubbling.
- Severe warping (doors that won’t sit flat are a daily annoyance).
- Bug holes or active pests (hard passlet it stay someone else’s adventure).
Design Options: Mirror Door, Open Shelf, or Both
Most people want a mirror somewhere near the sink, and your flipped hutch can help with that. You have a few
good options:
- Single mirrored door: Clean and classic. Great for narrow spaces.
- Two smaller doors with mirror panels: Symmetrical, “furniture-like,” and easier to build if your hutch already has divided openings.
- Mirror on the inside of the door: Keeps the exterior looking like furniture, while still being functional.
- Open cubby + mirrored door combo: Everyday items (like hand lotion) out in the open, the rest hidden.
Pro tip: if you’re adding a mirror, you can often have glass shops cut one to size. Just plan your door thickness
and hardware so it closes properly and doesn’t feel like you’re slamming a chandelier.
Desk Hutch to Medicine Cabinet: Step-by-Step Conversion
Step 1: Clean it like it owes you money
Bathrooms demand cleanable finishes, but paint also demands a clean surface. Remove shelf liners, peel off old
stickers, and scrub down the entire pieceinside and outespecially around handles and edges where hands have
left oils. Rinse if needed and let it dry fully.
Step 2: Remove or modify the back (if needed)
Some hutches have a flimsy backing. You may want to replace it with a sturdier plywood back to improve strength
and give yourself a better surface for mounting. If the hutch is too deep, you can also reduce depth by removing
the back and rebuilding the box (this is the “advanced” laneoptional, but doable).
Step 3: Patch, fill, and smooth
Fill unwanted holes, dents, and old hardware marks with wood filler. Once cured, sand smooth so you don’t end up
with a “modern textured finish,” also known as “oops I skipped prep.”
Step 4: Sand (or degloss) for paint adhesion
You don’t have to sand the piece down to bare wood in most cases, but you do want to scuff the surface so primer
and paint can grip. Focus on glossy finishes and high-touch areas. Wipe away dust thoroughly.
Step 5: Prime for bathroomsnon-negotiable
In a high-humidity room, primer is your insurance policy. Use a quality bonding primer, and consider a mildew-
resistant primer if your bathroom struggles with moisture. Priming is also how you keep wood tannins, old stains,
or mystery finishes from bleeding through and ruining your fresh paint job.
Step 6: Paint with a durable cabinet-grade finish
For a medicine cabinet, think “wipeable” and “tough.” Many DIYers like cabinet and trim enamels, including
waterborne alkyd or acrylic-urethane styles, because they level smoothly and cure hard. Choose a satin or
semi-gloss sheen for easier cleaning and better moisture resistance.
Apply thin, even coats, let them dry properly, and lightly sand between coats if you want the smoothest finish.
This is how you get the “it looks store-bought” effect instead of the “I painted this during a sitcom binge” look.
Step 7: Seal the vulnerable spots
Bathrooms are rough on furniture, so don’t skip these protective moves:
- Seal raw edges: Especially if you cut MDF or plywoodprime those edges thoroughly.
- Caulk interior seams: A thin bead where the back meets the sides can reduce moisture intrusion and make cleaning easier.
- Optional topcoat: If your paint system recommends it, a compatible clear coat can add durability. Follow manufacturer guidance so you don’t create peeling problems.
Step 8: Add hardware that makes it feel intentional
Hardware is the jewelry of furniture flips. A desk hutch becomes a medicine cabinet the moment you add details
that match bathroom function:
- Soft-close hinges (if your cabinet style allows) for a quieter, sturdier feel.
- Magnetic catch so doors stay closed when someone stomps through the hallway like a small rhinoceros.
- Shelf pins or adjustable tracks for flexible storage.
- Small interior bins or door racks to keep tiny items upright and visible.
How to Mount It Safely (So It Doesn’t Become a Bathroom Trampoline)
Option A: Surface-mount (recommended for most desk hutch flips)
Surface mounting is usually best for a flipped hutch because you keep the cabinet box intact and avoid cutting the wall.
The goal is to anchor into studs when possible, or use appropriate wall anchors rated for the cabinet’s weight.
- Locate studs and plan your fastener locations.
- Level the cabinet and mark mounting points carefully.
- Use strong screws into studs, or heavy-duty anchors if studs don’t align.
- Consider a French cleat system for extra support and easier leveling.
If your cabinet is heavy or you’re unsure about wall conditions, this is a great moment to ask a handy friendor a profor help.
No shame. Gravity is undefeated.
Option B: Recessed install (only if your wall allows it)
Recessed medicine cabinets can look sleek, but they’re not always compatible with a furniture flip cabinet because wall cavities have limits.
If you’re attempting a recessed approach, you’ll need to confirm:
- Stud spacing: Many recessed cabinets are designed to fit between studs, often on 16-inch centers.
- No obstructions: Plumbing vents, electrical lines, or blocking may make recessed installs impractical.
- Proper framing: Recessed cabinets typically need framing support around the opening.
If any of that sounds like a big deal, it can beso treat recessed installs as an “only if it makes sense” option, not a requirement.
Bathroom-Proofing the Flip: Moisture Management That Actually Matters
Even a beautifully painted cabinet will struggle in a steamy bathroom if moisture lingers. The cabinet finish is one layer of defense;
bathroom habits and ventilation are another. Use your exhaust fan during and after showers, open a window if you can, and avoid trapping
steam in the room. The faster the space dries, the longer your cabinet stays crisp instead of gummy.
Also: keep your flipped cabinet out of direct shower spray range. “Water-resistant” paint is not the same thing as “please hose me down daily.”
If your layout forces proximity, be extra diligent about sealing seams and choosing a durable enamel system.
Storage Layout Ideas: Make It Work Like a Real Medicine Cabinet
Use shelf spacing strategically
Most bathrooms need a mix of tall and short storage. Consider:
- Top shelf: backup items (extra toothpaste, refills, travel stuff).
- Middle shelf: daily skincare, deodorant, contact lens supplies.
- Bottom shelf: taller bottles like mouthwash or hair products.
Add a “don’t fall over” rail
A thin wood lip or narrow trim piece along the front of a shelf can keep bottles from tumbling when the door closes.
This one small detail can make the cabinet feel custom.
Create a tiny-item zone
Cotton swabs, nail clippers, bandages, hair tiesthese items love chaos. Small lidded jars, drawer organizers, or labeled bins
keep them from becoming a plastic confetti situation.
What This Flip Costs (Usually) and Where the Savings Come From
The biggest savings is the cabinet box itself. A thrifted hutch might cost the same as one fancy recessed cabinet hinge.
A realistic budget might include:
- Secondhand desk hutch: low-cost (thrift store, marketplace, reuse center)
- Primer + cabinet enamel
- New hinges/knob/pull
- Mounting hardware (plus optional French cleat)
- Mirror or glass insert (optional)
If you already have basic supplies (sandpaper, filler, brushes/rollers), the final number can stay refreshingly reasonableespecially compared to new, branded medicine cabinets.
Common Mistakes (and How to Avoid Them)
- Skipping primer: Paint may peel or chip faster in humidity. Prime first.
- Using wall paint on a cabinet: Walls don’t get grabbed and slammed open daily. Cabinets do.
- Not letting paint cure: “Dry” and “cured” are different. Give it time before loading it up.
- Under-mounting: If it’s not anchored well, it’s not doneno matter how pretty it is.
- Ignoring ventilation: Moisture management helps protect everything in your bathroom, including your hard work.
Conclusion: A Flip That Looks Custom, Saves Money, and Adds Real Storage
Turning a desk hutch into a medicine cabinet is one of those rare DIY projects that checks all the boxes:
it’s budget-friendly, it’s sustainable, it adds everyday function, and it can look genuinely designer if you
take your time with prep and finishing. Pick a sturdy piece, seal and paint it for bathroom life, mount it safely,
and you’ll end up with storage that feels built-inwithout paying built-in prices.
“What You’ll Experience” During This Flip (About of Real-Life Moments)
Here’s the part people don’t always tell you: a furniture flip like this is basically a small emotional journey
disguised as a home project. The first stage is thrillyou spot the desk hutch, imagine it floating above
your sink like a Pinterest dream, and convince yourself it was destiny. You carry it home and immediately feel
like the main character in a very practical makeover montage.
Then comes stage two: the suspicious wipe-down. You start cleaning and realize the hutch has lived at least
three lives. You discover sticky residue in places that raise questions you don’t want answered. You scrub anyway,
because you’ve come too far and the cabinet is now your responsibility.
Stage three is sanding optimism. You begin with confidence“This won’t take long!”and twenty minutes later
you’re finding dust in the air like it’s emotionally attached to your lungs. This is when you learn the true value
of a mask, a vacuum, and the ability to laugh at yourself while looking like a powdered donut.
Primer is stage four: the glow-up preview. Suddenly the piece looks cohesive and intentional, like it’s
shedding its “retired office furniture” identity. This is usually when you send at least one photo to someone
with the caption, “IT’S HAPPENING.”
Painting is stage five: patience training. The first coat looks questionable. The second coat looks promising.
Somewhere between coats, you realize the phrase “thin, even layers” is basically a life lesson, not just a painting tip.
You also discover that cabinet paint has opinions about humidity, drying time, and whether you deserve a smooth finish today.
Hardware is stage six: instant personality. You attach the knob or pull and it finally feels like a real bathroom
cabinetlike it belongs in the space. If you add a mirror, that’s stage seven: the ‘wow’ moment. Even if the mirror
install is simple, it changes the whole vibe. Suddenly it’s not just storageit’s a functional focal point.
And then there’s the final stage: mounting nerves. Holding a level, staring at the wall, double-checking marks, and
thinking, “If I mess this up, I will have to look at it every day.” This is completely normal. Once it’s anchored and solid,
though, you’ll feel an oddly satisfying calmlike you just solved a small life problem with screws and determination.
The best “experience” payoff comes later: the first busy morning when the counter stays clear, the cabinet opens smoothly, and
everything has a place. That’s when you realize this flip wasn’t just cuteit actually improved your daily routine. And that’s
the kind of DIY that earns permanent bragging rights.





