Table of Contents >> Show >> Hide
- Why a Dish Lamp Works (and Why It Looks So Fancy)
- Tools and Supplies
- Before You Start: Choose Your Build Style
- Step 1: Plan the Stack (Dry Fit Like You Mean It)
- Step 2: Mark the Center (So Your Lamp Isn’t Leaning Like It’s in a Boy Band)
- Step 3: Drill Holes in Ceramic/Porcelain Without Breaking Your Soul
- Step 4: Create a Cord Exit at the Base
- Step 5: Assemble the Lamp Base
- Step 6: Mount the Socket (The “It’s Actually a Lamp Now” Moment)
- Step 7: Wire the Socket Safely
- Step 8: Shade, Bulb, and Finishing Touches
- Design Ideas That Look “Collected,” Not “Accidentally Assembled”
- Troubleshooting (Because DIY Is 30% Crafting, 70% Problem-Solving)
- Cost Breakdown (Approximate, But Comforting)
- FAQ
- DIY Dish Lamp Experiences: The Stuff You Learn Halfway Through (and Wish You Knew at the Start)
Picture this: you’re strolling through the thrift store, minding your own business, when a stack of mismatched teacups and saucers whispers, “We were born to be dramatic.” You could ignore it… or you could bring those dishes home and turn them into a one-of-a-kind lamp that looks like it costs Anthropologie money without requiring Anthropologie money.
This DIY dish lamp tutorial walks you through the whole processplanning the stack, drilling porcelain/ceramic without turning it into confetti, assembling the base, and wiring the socket safely. Along the way, you’ll get options for different build styles (glue-stack vs. threaded-rod “tank build”), design ideas, and the little “wish someone told me that earlier” tips that keep your sanity intact.
Why a Dish Lamp Works (and Why It Looks So Fancy)
A dish lamp is basically functional sculpture: stacked bowls, saucers, teacups, and even a teapot become a lamp base with a cord running through the center. The shapes create instant visual rhythmcurves, lips, and patterns that feel curated even when your “curation” was a five-minute rummage in the thrift aisle.
Bonus: you get to upcycle, personalize, and build something that sparks conversation. People will ask, “Where did you get that?” and you’ll say, “From the land of 50-cent saucers and unreasonably confident DIY decisions.”
Tools and Supplies
The Dishes (Your Lamp’s “Outfit”)
- Base bowl (wide, stable, and ideally heavy)
- Saucers/plates (2–4, depending on height)
- Teacups (1–2 for “stacked” drama)
- Optional showpiece: a teapot, creamer, or sugar bowl for a bold middle section
- Backups: grab duplicates if you canceramic can be… emotionally fragile during drilling
Hardware + Electrical Parts
- Lamp kit (socket, cord, harp/harp saddle if using a shade)
- Threaded lamp rod (optional but recommended) + nuts and washers (for a stronger build)
- Rubber washers or grommets (reduces wobble and protects dishes)
- Strain relief (often part of a kit; helps protect the cord)
- LED bulb (lower heat = happier glue and happier ceramics)
- Lampshade (optionalexposed bulb looks modern, shade looks classic)
Adhesives (Pick Your Personality)
- Two-part epoxy (fast, strong, good for ceramics)
- E6000-style adhesive (slower cure, flexible, strong; great if you want more working time)
Drilling Tools
- Diamond drill bit or diamond hole saw (for porcelain/ceramic)
- Drill (corded or cordless; variable speed helps)
- Painters tape (helps prevent the bit from skating)
- Water (spray bottle or shallow tubcooling is non-negotiable)
- Safety gear: eye protection, gloves, and a dust mask/respirator if drilling dry at any point
- Soft support: towel, foam pad, or folded cloth to cushion the dish
Before You Start: Choose Your Build Style
Option A: The “Glue-Stack” Build (Simple + Fast)
You drill holes through each piece, thread the cord through, then epoxy each layer into a single stacked base. This is the most approachable route and works well when the stack isn’t super tall or heavy.
Option B: The “Threaded-Rod” Build (Sturdier + More Adjustable)
You drill holes to fit a threaded lamp rod (“lamp pipe”), then stack dishes with washers and nuts holding everything straight. The cord runs through the rod. This style is more forgiving for alignment and usually more durableespecially if you’re building a taller lamp or using heavier pieces.
If you’re torn: use the threaded rod for structure and add small dabs of epoxy between a few key layers for extra stability. It’s like wearing both a belt and suspendersridiculous until you drop your pants in public. (This is a lamp metaphor. Mostly.)
Step 1: Plan the Stack (Dry Fit Like You Mean It)
- Arrange your stack on a table without glue or drilling. Move pieces around until the silhouette looks balanced.
- Alternate shapes (bowl → saucer → teacup → saucer → teapot → saucer → teacup). Alternating tends to “lock” the stack visually and physically.
- Check stability: lightly tap the top. If it teeters, swap the base bowl for something wider or heavier.
- Think about cord exit: if your base bowl sits flush, you may need a side exit hole. If it has a ruffled edge, feet, or gaps underneath, you might route the cord without drilling a second hole.
Step 2: Mark the Center (So Your Lamp Isn’t Leaning Like It’s in a Boy Band)
Center holes matter because tiny off-center errors multiply as you stack. If your saucer is 2 mm off, by the time you reach the top, your lamp will look like it’s trying to moonwalk away.
- Use a ruler to find the midpoint, or
- Use a washer or round template to help visually locate center, or
- For saucers, measure diameter across and mark the midpoint lightly.
Place painters tape in an “X” over the mark and draw the dot on the tape. Tape helps the bit grip and reduces surface chipping.
Step 3: Drill Holes in Ceramic/Porcelain Without Breaking Your Soul
Golden Rules of Drilling
- Go slow. High speed = heat = cracks.
- Use water to cool the bit and reduce dust.
- Let the bit do the work. Pressure is not a personality trait.
- Support the dish on a towel or foam to prevent stress fractures.
Two Easy Cooling Methods
- Shallow tub method: set the dish on a towel inside a plastic tub with enough water to cover the drilling area. This keeps the bit cool while you work.
- Spray bottle method: tape the drilling spot, spritz frequently, and pause as needed to keep things cool.
Drilling Steps
- Put on eye protection. (Ceramic dust has no chill.)
- Secure the dish so it won’t spinuse a folded towel, foam pad, or a helper holding it gently.
- Start the bit at a slight angle to “bite,” then slowly straighten once a groove forms.
- Keep water on the spot and drill at low speed with light pressure.
- Stop occasionally to check progress and re-wet the area.
- As you break through, slow down even more to reduce chipping on the backside.
Hole Size: How Big Should It Be?
Match your hole size to your build style:
- Glue-stack cord-through build: the hole needs to fit the cord (and any plug end if you’re threading an intact plugmany people avoid this by using a kit that’s meant to be wired at the socket end).
- Threaded-rod build: the hole should fit the lamp rod and allow room for washers. Many lamp rods are “1/8 IPS” sizeuse the recommended bit size for your rod and test on a backup dish if possible.
Step 4: Create a Cord Exit at the Base
Your cord has to escape somewhere (same). You have three common options:
- Side hole in the base bowl: drill near the bottom edge for the cord to exit cleanly.
- Notch method: if the base has a foot ring or thick lip, you can file a small notch where the cord passes.
- Gap method: use a bowl with a ruffled or lifted edge so the cord can slip out without drilling another hole.
Step 5: Assemble the Lamp Base
If You’re Doing the Glue-Stack Build
- Thread the cord through the pieces as you go. This prevents the cord from getting trapped in a glued maze.
- Mix epoxy in small batches. Fast-cure epoxies don’t wait for you to finish your podcast.
- Glue one layer at a time: apply a thin, even bead, press together, and wipe squeeze-out immediately.
- Check alignment constantly: step back, rotate the lamp, and ensure it’s vertical.
- Let it cure fully before attaching electrical components or moving it around.
If You’re Doing the Threaded-Rod Build
- Insert the lamp rod through the base and stack pieces in your chosen order.
- Use washers between pieces where needed (especially where a teacup meets a saucer) to improve stability.
- Tighten nuts graduallysnug, not Hulk-strength. Over-tightening can crack ceramics.
- Thread the cord through the rod (most rods are hollow for this exact reason).
- Add a felt pad or protective base under the bowl to prevent scratching furniture and to help stability.
Step 6: Mount the Socket (The “It’s Actually a Lamp Now” Moment)
You have a couple of clean ways to create a stable top mount for the socket:
- Wide-mouth canning lid method: drill a center hole and use it as a mounting plate for the socket hardware, then glue the lid to the top teacup opening if needed.
- Washer/wood disk method: if the teacup opening is too large or too small, use a disk (wood or a smaller lid) that fits the opening and supports the socket assembly.
- Harp saddle method: if your kit includes a harp, install it so you can use a shade and finial.
Step 7: Wire the Socket Safely
Safety note: If wiring makes you nervous, it’s okay to use a lamp kit with clear instructions or consult a professionalelectricity is not the craft supply you “wing.” Always unplug while working and fully reassemble before testing.
Identify the Neutral vs. Hot Wire
- On many lamp cords, the ribbed wire is neutral and the smooth wire is hot.
- The socket usually has a silver screw (neutral) and a brass screw (hot).
Basic Wiring Steps (Most Lamp Kits Follow This Pattern)
- Split the cord jacket at the end (often about 2 inches) and strip insulation from the wire ends.
- Form small loops in the wire ends so they wrap neatly around screws.
- Tie an underwriter’s knot (a strain-relief knot) so tugging on the cord doesn’t yank wires off the terminals.
- Attach neutral (ribbed) to silver; attach hot (smooth) to brass. Tighten firmly.
- Reassemble the socket components and ensure no bare wire is exposed outside the terminals.
Step 8: Shade, Bulb, and Finishing Touches
- Choose an LED bulb to reduce heat and keep your adhesive and ceramics happier long-term.
- Shade tips: a drum shade looks modern; a tapered shade looks classic; a pleated shade screams vintage charm.
- Add felt to the base to protect furniture and prevent sliding.
- Balance check: place the lamp on a level surface and gently tapno wobble allowed.
Design Ideas That Look “Collected,” Not “Accidentally Assembled”
1) The Cottagecore Stack
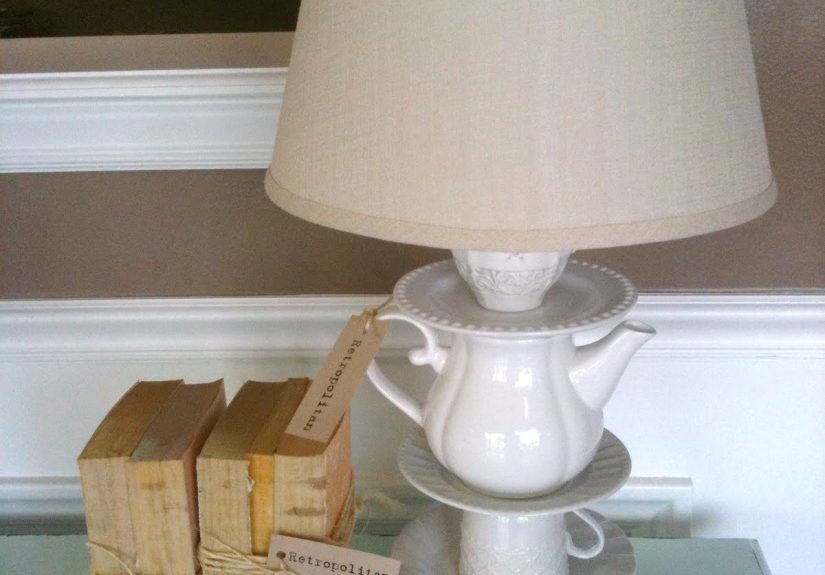
Floral teacups, a scalloped saucer, and a soft linen shade. Bonus points if you add a tiny teapot in the middle like the lamp is serving tea and gossip.
2) The Modern Neutral
All-white dishes, minimal pattern, and an exposed bulb or crisp white drum shade. The secret sauce is repeating shape (same style saucers) rather than repeating print.
3) The Maximalist “Grandma’s China Cabinet”
Bold patterns, gold trim, and a textured shade. Keep the base bowl heavier to prevent tippingmaximalism is fun until it faceplants.
Troubleshooting (Because DIY Is 30% Crafting, 70% Problem-Solving)
The Drill Bit Skates Around Like It’s on Ice
- Use painters tape.
- Start at an angle to score a groove.
- Use lighter pressure and lower speed.
Chipping Around the Hole
- Slow down at breakthrough.
- Support the underside with a soft pad.
- Use washers to cover minor chips (also looks intentional).
The Stack Wobbles
- Add rubber washers between pieces.
- Switch to a wider base bowl.
- If glue-stacking, ensure each layer is fully cured before adding weight above it.
The Lamp Doesn’t Turn On
- Check bulb first (seriouslyit’s often the bulb).
- Re-check hot/neutral connections.
- Make sure the socket is fully reassembled before testing.
Cost Breakdown (Approximate, But Comforting)
Dish lamps are famous for the “look expensive, cost reasonable” ratio. Typical costs include:
- Dishes: thrifted pieces often cost less than a fancy coffee
- Lamp kit: usually modest
- Diamond bit: sometimes the priciest single tool if you don’t already own one
- Epoxy/adhesive: small cost, big role
- Shade: can range from bargain to “why is fabric expensive?”
Translation: your lamp can land in the “I can’t believe you made that” category without landing in the “I can’t believe I spent that” category.
FAQ
Do I have to use a teapot?
Nope. You can use just bowls/saucers/teacups. A teapot adds height and drama, but it’s optionallike eyelashes.
Do I need a drill press?
No. A steady hand, the right diamond bit, tape, and water usually get the job done. Go slow and stay patient.
Is epoxy necessary if I use a threaded rod?
Not always. A rod build can be stable with washers and nuts alone. Epoxy is helpful as “anti-wiggle insurance,” especially if pieces don’t sit perfectly flat.
What bulb should I use?
LED is your best friend: bright, low-heat, and generally kinder to glue, ceramics, and your electric bill.
DIY Dish Lamp Experiences: The Stuff You Learn Halfway Through (and Wish You Knew at the Start)
Let’s talk real life. On paper, a DIY dish lamp is “stack dishes, drill holes, add lamp kit, become an artistic legend.” In reality, it’s also a master class in patience, improvisation, and learning that ceramic has feelings and those feelings are mostly “no.” Here are the most common experiences DIYers run intoand how to turn them into wins instead of dramatic monologues.
First: drilling is the moment you discover whether you’re a peaceful person or just someone who hasn’t drilled porcelain yet. The bit will try to wander, especially on glazed surfaces, and your instincts will scream, “PUSH HARDER!” Don’t. The calmest, slowest approach usually works best. People who succeed tend to treat the drill like a slow dance partner: steady, predictable, and absolutely not into sudden moves. Painters tape helps, water helps more, and taking breaks helps your blood pressure the most.
Second: you’ll probably change your design halfway through. This isn’t failureit’s evolution. Once you see the drilled pieces stacked together, you may realize the pattern placement feels too busy, the silhouette looks top-heavy, or the teacup you loved in the store looks oddly small in the stack. Many DIYers end up drilling a few extra saucers “just in case,” then thank their past selves for that decision. Extra pieces also let you experiment with height: adding one more saucer can make the whole lamp look intentional rather than “I ran out of dishes.”
Third: the base matters more than your heart wants to admit. It’s tempting to choose the prettiest bowl, but stability is the real star. If the base is too narrow or lightweight, the lamp can feel wobbly even if everything is glued perfectly. A heavier bowlor one with a wider footprintoften solves the problem instantly. And if you’re routing the cord out of the bottom, you’ll appreciate a base that naturally creates a gap. Many makers end up falling in love with ruffled-edge bowls for exactly this reason: fewer risky side holes, fewer cracked bowls, and fewer “I swear I’m fine” moments.
Fourth: adhesive timing is a whole personality test. Fast epoxy is great because it grips quickly, but it’s not forgiving if you’re the kind of person who likes to adjust alignment for twenty minutes while whispering, “Almost… almost… perfect…” Some DIYers prefer slower adhesives because they allow tiny corrections and reduce panic. The most common “aha” moment is using small batches of epoxy (instead of mixing the whole thing at once) and keeping a damp cloth nearby for squeeze-out cleanup before it sets like a rock.
Fifth: wiring feels scarier than it isuntil it’s done wrong. Most people report that once they understand hot vs. neutral (ribbed wire usually neutral; silver screw usually neutral), the process becomes more “follow steps” than “summon electrical wizardry.” The underwriter’s knot is a big confidence booster because it adds strain relief, which is exactly what you want when the cord is running through a ceramic tower you worked too hard to rebuild. The most satisfying moment is that first test: plug it in, flip the switch, and watch your dish stack become a working light fixture. It’s a tiny triumph that feels weirdly huge.
Finally: the compliments are real. People are drawn to dish lamps because they feel nostalgic and clever at the same timelike a vintage tea party that learned how to pay the electric bill. And once you make one, you’ll never look at a thrift store dish aisle the same way again. You’ll start mentally stacking plates while pretending you’re “just browsing,” which is basically the DIY version of having superpowers.