
Table of Contents >> Show >> Hide
- What Exactly Is a Rafter Tail (and Why It Matters on an Arbor Swing)?
- Before You Cut: Pick a Style That Matches Your Home (and Your Patience)
- Tools & Materials (Plus the “Don’t Be a Hero” Safety Checklist)
- 3 Reliable Ways to Lay Out Rafter Tail Designs
- How to Cut Pergola Rafter Tails Cleanly (Step-by-Step)
- Printable Rafter Tail Patterns (Full-Size for a 2×6)
- How to Make Your Own Custom Rafter Tail (Without a Design Degree)
- Batch Cutting Like a Pro (Even If You’re Not One)
- Wood, Fasteners, and Finish: The Outdoor Details That Actually Matter
- Arbor Swing Integration: Making the Pretty Parts Work With the Swing
- FAQ: Quick Answers That Save You From Re-Cutting Lumber
- Real-World Experiences and Lessons DIYers Commonly Learn (The Fun Part)
- Conclusion
Let’s be honest: a pergola or arbor swing can look gorgeous… right up until you notice the rafters are just
square-cut boards sticking out like they forgot to put on pants. The fix is delightfully simple: rafter tails.
Those decorative end cuts turn “basic backyard lumber” into “custom outdoor feature” faster than you can say
“Why do all my neighbors suddenly want to come over?”
In this guide, you’ll learn how to cut pergola rafter tail designs for a DIY arbor swing (or any pergola/arbor),
how to repeat the cut cleanly across multiple boards, and how to print full-size patterns you can trace today.
We’ll keep it practical, detailed, and just funny enough to make sanding feel like character development.
What Exactly Is a Rafter Tail (and Why It Matters on an Arbor Swing)?
A rafter tail is the decorative profile cut into the exposed end of a rafter or beam. On pergolas,
arbors, and swing arbors, rafter tails are the “eyebrows” of the structure: they frame the whole look.
A clean, consistent profile makes a DIY build look intentionallike you planned it and didn’t just “wing it”
with a cart full of 2x lumber and optimism.
Arbor swing-specific note
Many arbor swing builds use beefier crossbeams (often 2×8 or larger) to support swing loads and movement.
Your rafter tail design should live on the cantilevered portion of the beam (the overhang past the post),
not near the swing hang points or midspan where strength matters most. Translation: keep the pretty cuts on the
“decorative zone,” and keep the “load zone” thick, solid, and boring (boring is strong).
Before You Cut: Pick a Style That Matches Your Home (and Your Patience)
Rafter tail profiles range from simple to “I own five routers and a medieval scroll.” If this is your first time,
start with a curve or chamfer. You’ll get big visual payoff with low risk of turning your board into modern art.
- Simple Arch: friendly, classic, hard to mess up.
- Ogee/Scroll: elegant S-curve; looks fancy, requires careful cutting and sanding.
- Modern Chamfer + Radius: clean lines with a small curve; very forgiving.
- Craftsman Step: squared shoulders and clean geometry; great for arts-and-crafts homes.
Rule of thumb: don’t carve away the backbone
Keep your deepest cut shallow enough that you’re not significantly reducing the board’s “effective depth,” especially
for swing beams and primary rafters. If you’re unsure, choose a profile that removes material gradually (curves)
rather than aggressive notches. When in doubt, keep the cut decorative and modest.
Tools & Materials (Plus the “Don’t Be a Hero” Safety Checklist)
Tools you might use
- Measuring tape, pencil, square
- Printer + scissors (for paper templates)
- Jigsaw (most common) or bandsaw (if you have one)
- Drill + bit (for starter holes on inside corners)
- Sander (random-orbit + sanding block)
- Optional: router + flush-trim/pattern bit (for repeatable, crisp copies)
- Clamps + sacrificial backing board
Safety checklist
- Wear eye protection and hearing protection when cutting or routing.
- Clamp your work. “Holding it with my knee” is not a technique.
- Cut outside the line and sneak up to itespecially on curves.
- If you’re a teen DIYer: have an experienced adult supervise power tool use.
- Watch for splinters, kickback, and blade wanderingwoodworking rewards patience, not speed.
3 Reliable Ways to Lay Out Rafter Tail Designs
Method 1: Printable paper patterns (fastest, easiest)
Print the pattern, verify the scale with a 1-inch test square, tape it to the board end, and trace.
This is ideal when you want consistency without doing a bunch of measuring.
Method 2: The grid method (old-school, surprisingly accurate)
Draw a grid on the board end (for example, 1-inch squares) and copy a design square-by-square.
It’s a great method when you’re working from a plan or sketch and you want repeatability without a printer.
Method 3: Make one “master” tail, then use it as a template
Cut one rafter tail as perfectly as you can, then trace it onto the rest. If you’re cutting a lot of rafters,
consider upgrading the master into a plywood/MDF template you can clamp and route for near-identical results.
How to Cut Pergola Rafter Tails Cleanly (Step-by-Step)
-
Choose your overhang and mark the “no-cut zone.”
Decide how far your rafters or beams extend past the posts. Mark that area so your decorative tail stays
on the overhang and doesn’t creep into structural territory. -
Trace the pattern.
Align the pattern to the board’s edges. Use a sharp pencil. If you’re tracing the same design many times,
label the pattern and mark “top” and “outside face” so you don’t flip it halfway through and create a
surprise “before and after” set. -
Drill starter holes for tight inside corners (if needed).
If your design has an inside corner, drill a hole that lets your jigsaw blade turn without overcutting.
This keeps corners crisp and reduces cracking. -
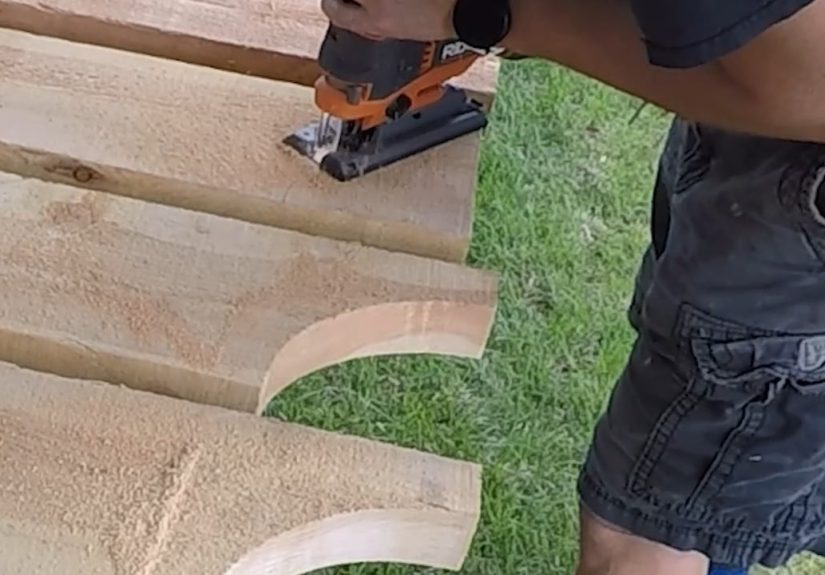
Rough cut with a jigsawstay just outside the line.
Aim for “close,” not “perfect.” Cutting exactly on the line with a jigsaw is how you learn new words you
can’t say in front of your grandma. -
Refine to the line.
Use a sanding block, rasp, or file for small corrections. For curves, a spindle sander is amazing if you
have one, but sandpaper wrapped around a scrap dowel also works. -
Repeat the cut consistently.
Trace your finished piece onto the next rafter. For batches, stack-cutting can work (clamp boards together
and cut multiple at once), but only if everything is secure and your saw can handle the thickness. -
Optional pro move: template + router flush-trim.
If you need “every tail identical,” make a template from 1/4-inch plywood or MDF. Rough cut each board
close to the line, clamp the template on top, and use a flush-trim bit to match the template perfectly.
This method takes longer to set up but saves time on sanding and looks ultra-clean.
Quick comparison: which method should you use?
| Method | Best for | Pros | Cons |
|---|---|---|---|
| Jigsaw + sanding | Small projects, simple designs | Minimal tools, flexible | Harder to keep identical; more sanding |
| Jigsaw + master tracing | Medium batches (6–20 boards) | Consistent enough, quick setup | Master must be perfect; still some variation |
| Template + flush-trim router | Big batches, crisp finish | Very consistent; less cleanup | More setup; router safety matters |
Printable Rafter Tail Patterns (Full-Size for a 2×6)
Below are four printable rafter tail patterns sized for a standard 2×6
(actual depth about 5.5 inches). Each pattern includes a 1-inch test square and a light grid.
Printing tips: Print at 100% scale (no “fit to page”). Measure the 1-inch square.
If it’s not 1 inch, adjust print settings until it is. Then cut out the paper pattern, tape it to the board end,
and trace.
Pattern A: Simple Arch (Beginner-Friendly)
1-inch test square
Cut line: flat top, gentle arch near bottom
Cut along bold line
Pattern B: Ogee-Inspired Curve (Looks Fancy, Still Doable)
1-inch test square
Cut along bold line
Pattern C: Modern Chamfer + Soft Radius (Clean + Forgiving)
1-inch test square
Cut along bold line
Pattern D: Craftsman Step (Straight Lines, Strong Personality)
1-inch test square
Cut along bold line
Want to scale these patterns? If you’re cutting 2×8 or 2×10 tails, keep the same “look” by
scaling the height to match the board depth. The easiest method is to print the pattern, then transfer it onto
cardboard and redraw it proportionally using a simple grid (1-inch squares) on the larger board.
How to Make Your Own Custom Rafter Tail (Without a Design Degree)
If you want a signature look, you can design a rafter tail in 15 minutes with a pencil, a flexible ruler (or
anything bendy), and a little bravery.
A simple “design recipe” that works
- Start with boundaries: mark a rectangle the size of your board end (example: 5.5″ tall by 10″ long).
- Choose one big move: a single arc, a chamfer, or one step. Keep it bold and simple.
- Add one small detail: a tiny notch, a radius, or a second curve. One detail = custom. Five details = regret.
- Test it in cardboard: cut the shape in cardboard first and hold it up from 10 feet away. If it looks good from 10 feet, it will look great from the patio.
When you love it, transfer the design to a plywood template so every rafter tail matches, even if you’re cutting
boards over multiple days (and your “steady hand” is not steady every day).
Batch Cutting Like a Pro (Even If You’re Not One)
Make one “golden rafter”
Cut one tail slowly and perfectly. Sand it smooth. This becomes your reference. Trace it onto all other boards.
If you change the design halfway through, your pergola will look like it’s wearing mismatched sockscute in humans,
confusing in architecture.
Use stop blocks for consistent overhang
If every rafter overhang is exactly the same, every tail looks intentional. Use a stop block on your workbench so
each board sits in the same position while tracing and cutting.
Label your faces
Mark “top” and “outside” on every board. Many outdoor boards have a “nicer” face. Keep that face outward
consistently so the structure looks uniform after staining or painting.
Wood, Fasteners, and Finish: The Outdoor Details That Actually Matter
Choose the right wood (and don’t skip end-grain protection)
Pergolas and arbors are commonly built with pressure-treated lumber, cedar, or redwood depending on budget and
the look you want. Whatever you choose, remember that rafter tail cuts expose fresh end grainprime real estate
for moisture. Sand smooth, then seal or prime cut ends before final finishing.
Use exterior-rated hardware and corrosion-resistant fasteners
Outdoor projects live in water, humidity, and fastener-hating conditions. If you’re using pressure-treated lumber,
pick fasteners/connectors rated for treated wood and exterior use. It’s boring advice, but it prevents the kind of
“mystery rust streaks” that appear the moment you host your first barbecue.
Finish like you mean it
- Stain + sealer for a natural look (recoat as needed over time).
- Exterior paint for maximum uniformity (especially if boards vary in tone).
- Clear UV sealer if you want the wood to show but still age gracefully.
Arbor Swing Integration: Making the Pretty Parts Work With the Swing
A DIY arbor swing is basically a pergola that got a job: it doesn’t just look nice, it also holds a moving load.
That means your rafter tails should support the vibe, not sabotage the structure.
Smart placement
- Put rafter tails on overhang ends beyond the posts.
- Keep swing hang points away from decorative cuts and notches.
- Maintain consistent spacing and alignment so the swing area looks centered and intentional.
Design tip: match rafter tails to the rest of your trim
If your house has Craftsman elements, a stepped tail looks “at home.” If your house is more traditional, arches and
gentle curves feel right. When everything matches, people will assume you hired someone. You don’t have to correct them.
FAQ: Quick Answers That Save You From Re-Cutting Lumber
How do I keep my jigsaw cut from looking wavy?
Use a sharp blade, go slow on curves, and keep the shoe flat. Cut just outside the line and sand to perfection.
If you need crisp copies across many boards, upgrade to the template + router method.
Can I cut multiple rafters at once?
You can, but only if everything is clamped securely and your tool can handle the thickness. Many DIYers find it
safer to cut one at a time and speed up the process with a good tracing template and a consistent workflow.
Should I sand before or after installing?
Sand before installing whenever possible. It’s easier to reach curves and edges on sawhorses than on a ladder while
trying not to drop your sander onto your toes.
Real-World Experiences and Lessons DIYers Commonly Learn (The Fun Part)
You can read all the steps in the world, but the best advice often comes from what happens during the build
the little moments where you realize woodworking is 30% measuring, 20% cutting, and 50% whispering “please look symmetrical”
while you squint at a curve.
First, almost everyone underestimates how much a rafter tail affects the whole structure. You cut one test tail,
hold it up, and suddenly your basic arbor swing starts looking like a backyard feature instead of a weekend project.
That’s the magic: a small design change creates a big “custom” impression. It’s also why it’s worth doing a dry run.
Many DIYers print a pattern, tape it on, trace it, then step back ten feet to judge it like a stranger would. If it
looks balanced from ten feet, you’re golden. If it looks like a ski jump, you just saved yourself from repeating that
mistake twelve times.
Next lesson: the first cut is rarely the final cut. A jigsaw is a wonderful tool, but it has personality. It can
drift. It can flex. It can decide that your smooth curve should become “abstract coastline.” The good news is that
you don’t need a museum-worthy cut right off the saw. Most DIYers get their best results by cutting slightly outside
the line, then sanding to the pencil mark. It feels slower, but the finish looks dramatically cleaner. And if you’re
making multiple rafters, you’ll be shocked how much time you save by making one “golden rafter” and tracing it over
and over instead of re-measuring every board.
Another common “aha” moment: consistency beats complexity. A simple arch repeated perfectly across eight rafters
looks more professional than a complicated scroll that varies from board to board. That’s why templates are such
a big deal. Some DIYers start with paper patterns, then graduate to a cardboard template, and eventually cut a thin
plywood template once they’re confident. By the time you’re on rafter number six, you’ll understand why the template
method feels like cheatingin the best way.
Outdoor builds also teach a humbling truth: the weather has opinions. Wood moves. It dries. It swells. And if you
forget to seal exposed end grain, the outdoors will remind youoften with checking, roughness, or discoloration.
People who build arbor swings and pergolas tend to become unexpectedly passionate about sealing cut ends and choosing
exterior-rated fasteners. It’s not glamorous, but it’s the difference between “still looks great next season” and
“why is my hardware leaving rust tattoos on my beams?”
Finally, there’s the satisfaction factor. Cutting rafter tails is one of those tasks where you can see progress fast.
The first tail feels like a test. The second feels like confidence. By the time you’re doing the last few, you’re
in a rhythmtrace, cut, sand, repeatwhile quietly judging past-you for ever considering square ends. When everything
goes up and the tails line up in a clean row, the structure looks intentional, and your DIY arbor swing suddenly feels
like a destination. Add the swing, and the project becomes the kind of place people gravitate toward without being
told to. That’s the real win: not just building a thing, but building the spot where memories happen.
Conclusion
Cutting pergola rafter tail designs for a DIY arbor swing is one of the highest-impact upgrades you can make with
basic tools. Use printable patterns for speed, the grid method for flexibility, or a router template for ultra-clean
repeatability. Keep decorative cuts on the overhang, protect your end grain, use outdoor-rated hardware, and you’ll
end up with a structure that looks custom, intentional, and ready for every “Can you send me your plans?” text message.






