
Table of Contents >> Show >> Hide
- First, a quick reality check: “35mm” can mean stills or movies
- Why a movie camera is mechanically harder than a still camera
- A modern DIY blueprint: let motors do the hard part
- The OpenReflex lesson: 3D printing can produce real camera geometry
- The hardest parts of a 3D printed 35mm movie camera (and how builders tackle them)
- Processing and workflow: the underrated half of the build
- Practical build tips for a 3D printed 35mm camera that actually works
- So… is it worth it?
- Experience: what it feels like to build and shoot a 3D printed 35mm movie camera
There are two kinds of people in the world: the ones who think “film is dead,” and the ones who keep a fresh roll
of 35mm in the fridge like it’s a sacred family heirloom. If you’re reading this, odds are you’re in Camp Two
or at least you’re film-curious enough to flirt with it.
Now add a third ingredient: 3D printing. Suddenly, the idea of building a 3D printed 35mm movie camera
stops sounding like a mad-scientist fever dream and starts sounding like… a weekend project that will absolutely
run long, involve at least one tiny screw escaping into the carpet, and still be worth it.
In this deep dive, we’ll unpack what it really takes to make a working 35mm motion-picture-style camera with
3D-printed parts why it’s hard, why it’s cool, and why the results can look so wonderfully imperfect that you’ll
forgive the occasional “artistic” light leak. Along the way, we’ll reference real-world DIY builds (including a
standout project that uses motors and a microcontroller instead of traditional clockwork), and we’ll translate the
technical film-language into something you can actually use without needing a camera assistant and a headset.
First, a quick reality check: “35mm” can mean stills or movies
The term “35mm” is sneaky because it’s used in both photography and cinema. In still photography, 35mm film is
typically in a cartridge, and the camera advances frame-by-frame for single exposures. In motion picture film, 35mm
refers to a film gauge designed to move continuously through a camera, exposing frames in rapid sequence.
Motion picture 35mm commonly uses formats described in “perfs” (perforations): 4-perf is a widely used
standard, and 3-perf is a format designed to reduce film usage while still accommodating common aspect
ratios. Kodak’s filmmaker reference guide describes 4-perf as the most common shooting format and explains how
different aspect ratios can be extracted from it, while also detailing 3-perf and other variations. That matters
because “movie camera” design depends heavily on how the film is pulled down and registered at the gate.
Translation: if you’re building a 3D-printed camera that shoots “movies” on 35mm, you’re not just making a box
that holds film. You’re making a machine that moves film precisely, repeatedly, and gently like a tiny robotic
ballet dancer that also hates dust.
Why a movie camera is mechanically harder than a still camera
A pinhole camera can be as simple as “light-tight box + small hole + film.” A still camera adds complexity:
a shutter, a film plane, and a way to advance film reliably. A movie camera adds a new boss battle:
continuous film transport plus repeatable frame positioning, over and over again, at speed.
A classic film movie camera typically needs:
- Intermittent movement: film advances, stops, gets exposed, advances again.
- A shutter synchronized to movement: the film should not be moving while it’s being exposed (unless you want abstract art).
- Registration stability: the frame should land in the same place every time, or the image will “weave” and jitter.
- Gentle handling of perforations: sprocket holes are tough, but they’re not immortal.
That’s why the best DIY approaches don’t just “copy” an Arriflex or Panavision mechanism. They rethink the problem
around what’s achievable with consumer-level fabrication and parts you can actually obtain.
A modern DIY blueprint: let motors do the hard part
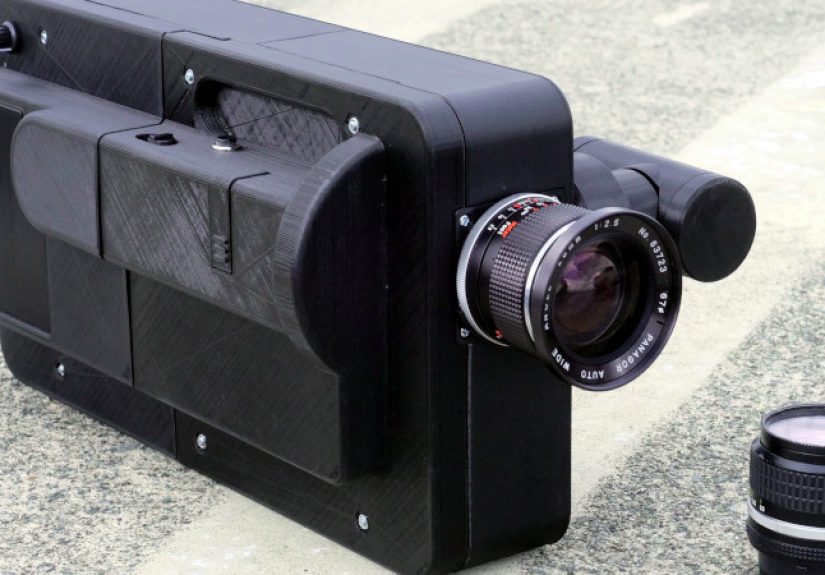
One of the most talked-about examples of a 3D printed 35mm movie camera is a proof-of-concept build designed by
engineer and photographer Yuta Ikeya. The premise is beautifully practical: instead of using rare motion-picture
loads and specialized processing, the camera can use ordinary photographic 35mm film (C-41) and
simplify the whole “getting started” experience.
The project uses a motor-driven mechanism controlled by a microcontroller (Arduino), and it relies heavily on
3D-printed components (notably reinforced PLA) for the structure and internals. Film is spliced to create a longer
strip and loaded into a dedicated cartridge to shoot short footage a clever workaround when you don’t want to
build an entire motion-picture loading ecosystem from scratch.
Even the film handling gets a “maker-friendly” redesign: rather than depending on a factory-perfect path, the
system is built around what you can reasonably assemble, align, test, and improve. Hackaday’s coverage highlights
the additional complexity of film transport in a movie camera and describes Ikeya’s approach as using motors and
electronics in place of a more complex purely mechanical design which is honestly a great summary of the “DIY
cinema engineering” mindset.
What this approach teaches builders
- Don’t worship the old mechanisms. Respect them, yes. Copy them exactly? Only if you enjoy pain.
- Leverage modern control. A motor and controller can give you consistent pull-down timing without precision-machined gears.
- Design for iteration. A 3D-printed camera isn’t “built once.” It’s “built, tested, tweaked, rebuilt, then bragged about.”
The OpenReflex lesson: 3D printing can produce real camera geometry
If you want proof that a mostly 3D-printed camera can be genuinely functional not just a novelty the OpenReflex
project is an important milestone. OpenReflex is an open-source analog SLR concept built largely from 3D-printed
parts, with a mirror viewfinder and a mechanical shutter. It’s been shared through maker platforms and photographed
like a legit camera, because it is one.
While OpenReflex is primarily a still camera project, it matters here because it demonstrates that complex internal
geometry mirror boxes, film planes, mounts, and light paths can be created with consumer printing and careful
assembly. If you’re building a movie camera, those same fundamentals still apply: if the film plane is off, if the
gate isn’t flat, if the interior reflects light, your footage will politely punish you.
Why OpenReflex is relevant to a 35mm movie camera build
- Light-tight design principles: printed parts must block stray light at seams and joints.
- Mechanical simplicity: a fixed shutter speed can still yield great results if the exposure workflow is clear.
- Lens adaptability: DIY cameras often live or die by whether you can mount real glass reliably.
The hardest parts of a 3D printed 35mm movie camera (and how builders tackle them)
1) Film transport: “move, stop, repeat” without shredding the film
Film transport is the soul of a movie camera. If transport is uneven, you’ll get frame spacing issues; if it’s
rough, you can damage perforations; if it slips, the image jitters.
Kodak’s technical documentation discusses perforation types, noting that “BH” perforations are generally used for
camera and intermediate films, while “KS” perforations are commonly used for projection print films. In practical
terms, this is a reminder that film perforations aren’t all identical in purpose and your transport design should
treat them with respect.
DIY builders commonly address transport in one of three ways:
- Sprocket-driven transport: gripping perfs directly (high accuracy, higher risk if misaligned).
- Friction capstan/roller transport: pushing film via rollers (gentler, but can slip).
- Hybrid systems: using a sprocket for registration and rollers for smooth feed/take-up.
2) The gate and pressure plate: where sharpness lives
Your film gate is the “stage” where each frame performs. If the film isn’t held flat, sharpness suffers, and the
image may pulse as the film bows. Traditional cameras rely on carefully machined pressure plates; DIY cameras often
use a combination of printed structures, springs, and strategically placed low-friction surfaces.
Practical tricks makers use:
- Matte black interior surfaces to reduce reflections and flare.
- Replaceable wear strips (thin plastic or polished metal) where film slides.
- Modular gate inserts so you can tweak frame size without reprinting the whole camera.
3) Light sealing: because photons are nosy
3D-printed parts tend to have seams. Seams tend to leak light. Light leaks tend to show up exactly on the
best take you’ve ever shot. That’s not superstition; that’s tradition.
Successful DIY designs treat light sealing as a system:
- Labyrinth seams (overlapping joints) instead of butt joints.
- Foam or felt seals where doors and panels meet.
- Interior baffling to block oblique light paths.
- Dark, non-gloss finishes inside the film chamber and around the gate.
And yes: sometimes a small “leak or two” becomes part of the look Hackaday even notes that a bit of light leak in
the showcased 3D-printed movie camera may enhance the artistic feel. But it’s better to choose that look than to
have it choose you.
4) Exposure control: the “triangle” still rules
Whether you’re shooting stills or motion, exposure is still exposure: you balance sensitivity (ISO), aperture, and
shutter time. A fixed shutter speed is common in DIY projects, which means you’ll often “ride” exposure using
aperture and film speed (and sometimes neutral density filters).
If you’re coming from digital, the biggest mental shift is that ISO is baked into the film. B&H’s educational
material explains ISO as a measure of sensitivity for film (or sensors), which is the most polite way possible to
say: “choose your film wisely, because you can’t change your mind mid-roll without consequences.”
Processing and workflow: the underrated half of the build
Building the camera is only half the adventure. The other half is getting images out in a format you can edit,
share, and obsess over at 2 a.m. like a true artist.
C-41 vs ECN-2: why makers often pick the easier road
Motion picture color negative film is commonly processed in ECN-2, which includes steps like a prebath and backing
removal to deal with rem-jet on certain stocks (Kodak’s filmmaker reference guide describes the ECN-2 process and
notes the prebath/rem-jet removal stage). That’s great for professional workflows, but it’s not always convenient
for hobby projects.
That’s why Ikeya’s project explicitly leans into C-41 photographic film: it’s easier to find, easier to process at
many labs, and easier to “just try” without building a full motion-picture pipeline.
Scanning: turning physical frames into editable footage
Once the film is developed, you have options:
- Lab scanning: often the easiest path if your frames fit expected formats.
- DIY scanning: slower, but you control the look and can handle odd frame sizes.
- Hybrid workflow: scan as high-res stills, then assemble in editing software as an image sequence.
The DIY path is popular for experimental formats because you can treat each frame like a photograph. It also lets
you keep the “analog truth” dust, scratches, sprocket-hole peeks without a lab auto-correcting your art into
bland perfection.
Practical build tips for a 3D printed 35mm camera that actually works
Print strategy: strength where it counts
- Overbuild the film path. Film transport surfaces should be rigid and smooth.
- Design parts to be replaceable. Gates and rollers wear. Let them be swappable modules.
- Use hardware smartly. Screws, heat-set inserts, and metal shafts can do what plastic shouldn’t.
Calibration: test like you mean it
- Run a dummy roll (expired film or leader) to test transport before risking fresh stock.
- Check frame spacing by marking the film and advancing it through the mechanism.
- Hunt light leaks with a flashlight inside the chamber (camera closed) in a dark room.
Lens choices: the easiest way to upgrade your results
A great lens won’t fix bad film transport, but it will reward a good build. Many DIY projects adapt existing
lenses because optical design is its own universe of pain. If you can mount a known lens securely, you eliminate a
huge variable and focus on the mechanics you’re actually trying to learn.
So… is it worth it?
If your goal is “the most efficient way to shoot a movie,” then no a used digital camera will run circles around
your print bed. But if your goal is to understand imaging from the inside out, to build something that transforms
light into a physical object you can hold, and to create footage that looks like nothing else because your camera
is literally one-of-one… then yes. A 3D printed 35mm movie camera is not just worth it it’s kind of the point.
And the best part? Even when things go wrong, the results can still look right. Film is forgiving in a strange,
romantic way. A little jitter becomes energy. A little leak becomes mood. A handmade camera doesn’t need to be
perfect it just needs to be honest.
Experience: what it feels like to build and shoot a 3D printed 35mm movie camera
Here’s the part nobody puts on the parts list: building a 3D printed 35mm camera is an emotional arc. It starts as
excitement (“I’m basically a camera manufacturer now”), becomes suspicion (“Why are there so many tiny
components?”), dips into chaos (“Where did that spring go?”), and eventually lands in something like pride the
quiet, satisfying kind you get when a complicated thing finally does what it’s supposed to do.
The first “experience” is the print itself. You’ll learn quickly that not all black filament is created equal.
Some prints come out beautifully opaque; others hold up to a bright light like a haunted lampshade. You start
thinking about wall thickness the way bakers think about crust. You reprint a door because you can see a faint seam
and you suddenly understand why camera companies have entire engineering teams dedicated to “making sure light stays
out.”
Assembly feels like building a musical instrument. You’re not just fastening parts; you’re tuning them. A roller
that’s a fraction too tight will drag. A gear that’s a fraction too loose will skip. You’ll probably run test film
through the transport path more times than you’d like to admit. This is normal. It’s also where you learn the
difference between “it moves” and “it moves reliably.” When the mechanism finally advances smoothly, it’s a small
miracle and you treat it like one.
Then comes the first shoot. You load film with the careful concentration of someone defusing a bomb, except the
bomb is your own expectations. If your camera has a fixed shutter speed (common in DIY builds), you start planning
shots differently. You think about sunlight and shade as if they’re physical objects. You pick a film speed that
matches your world rather than forcing the world to match your settings. You might even carry a tiny notebook,
writing down aperture guesses like you’re a cinematographer from 1978.
The real magic arrives after processing, when you finally see frames that only your camera could have made. Maybe
the image is ultra-wide because of a custom gate. Maybe the frame line is visible and gorgeous. Maybe there’s a
slight weave that makes motion feel alive. You’ll almost certainly spot imperfections a flare from an internal
reflection, a brief jitter where the transport hesitated but instead of disappointment, you often feel clarity:
“Okay, I know what to fix.” Each roll becomes feedback, not failure.
And yes, you’ll probably discover at least one light leak you didn’t intend. Here’s the funny part: when it shows
up on screen, you might not even hate it. Sometimes it looks like a vintage transition. Sometimes it looks like a
memory. Sometimes it’s just a reminder that this isn’t a factory machine it’s a handmade camera that turns your
engineering choices into a visible signature. Once you accept that, the project stops being about perfection and
becomes about voice.
That’s the experience in a nutshell: you print, you build, you test, you shoot, you develop, you scan, and you
learn. A 3D printed 35mm movie camera doesn’t just capture images it captures the process of making the camera
itself. And that’s a kind of footage you can’t buy off the shelf.





