Table of Contents >> Show >> Hide
- Quick Recipe Snapshot
- Why This Recipe Works
- Ingredients
- Step-by-Step: Classic Chocolate Meringue Pie
- How to Slice It Like a Pro
- Troubleshooting: Common Chocolate Meringue Pie Problems
- Variations That Still Feel Classic
- Make-Ahead and Storage Tips
- FAQ
- Kitchen Notes: What Baking This Pie Feels Like (and What You Learn)
- Conclusion
There are two kinds of people in this world: those who think chocolate pie is “nice,” and those who hear
chocolate meringue pie and immediately start clearing shelf space in the fridge like it’s a national emergency.
If you’re here, I’m guessing you’re in the second group (welcome, we have cocoa).
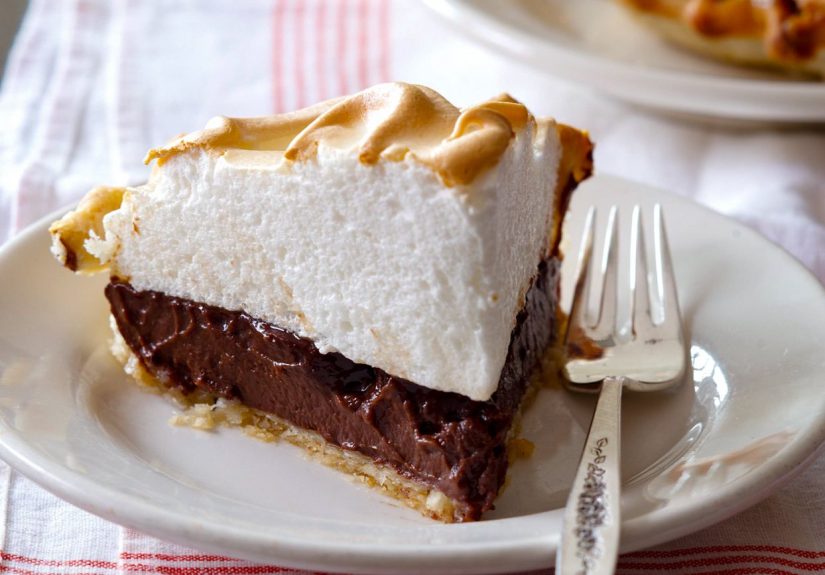
This is the classic, old-school American chocolate meringue pie: a crisp, fully baked pie crust filled with silky
chocolate custard and topped with a billowy meringue that’s toasted to a golden tan. It’s dramatic, nostalgic,
and just fussy enough to feel like you accomplished something heroicwithout actually requiring a cape.
Quick Recipe Snapshot
- Yield: 1 (9-inch) pie (8 slices)
- Active time: about 35–45 minutes
- Chill time: 2–4 hours (for clean slices)
- Skill level: confident beginner (you’ve got this)
Why This Recipe Works
A truly great chocolate meringue pie is a balancing act: the filling should be thick enough to slice cleanly, but
still taste like pudding’s more sophisticated cousin. The meringue should be airy yet stable, toasted on top and
fully attached to the crust so it doesn’t shrink like it’s trying to avoid responsibility.
- Cornstarch + egg yolks create a custard that sets firmly without becoming rubbery.
- Both cocoa and chopped chocolate give deep flavor and a smoother finish than cocoa alone.
- Hot filling under the meringue helps “cook” the underside of the topping, reducing weeping and sliding.
Ingredients
For the Baked Pie Crust
- 1 (9-inch) pie crust, fully baked and cooled (homemade or store-bought)
Tip: This pie needs a fully baked crust because the filling is cooked on the stovetop. A pale crust is a soggy crust
waiting to happenso bake it until it’s nicely golden.
For the Chocolate Filling
- 3/4 cup granulated sugar
- 1/3 cup unsweetened cocoa powder (natural or Dutch-process)
- 3 tablespoons cornstarch
- 1/4 teaspoon fine salt
- 2 1/2 cups whole milk
- 4 large egg yolks
- 2 ounces bittersweet or semisweet chocolate, finely chopped
- 2 tablespoons unsalted butter
- 2 teaspoons vanilla extract
For the Meringue Topping
- 4 large egg whites, at room temperature
- 1/4 teaspoon cream of tartar
- 1/2 cup granulated sugar
- 1/8 teaspoon fine salt
- 1 teaspoon vanilla extract
Step-by-Step: Classic Chocolate Meringue Pie
Step 1: Prep the crust
-
Make sure your 9-inch pie crust is fully baked and completely cooled.
Set it near the stoveyou’ll want it ready when the filling is hot.
Step 2: Start the chocolate filling
-
In a medium saucepan (heavy-bottomed is best), whisk together the sugar, cocoa powder, cornstarch, and salt.
This dry whisking breaks up cocoa lumps before liquid ever hits the pot. -
Slowly whisk in about 1/2 cup of the milk to make a smooth paste (this is your anti-lump insurance).
Then whisk in the remaining milk until smooth.
Step 3: Temper the yolks (so they don’t scramble)
- Place egg yolks in a bowl and whisk briefly.
-
Set the saucepan over medium heat and cook, whisking constantly, until the mixture is steaming and beginning to thicken.
You’re aiming for a gentle bubble, not a chocolate volcano. -
Scoop about 1/2 cup of the hot chocolate mixture and slowly whisk it into the yolks to warm them (this is tempering).
Then pour the warmed yolks back into the saucepan, whisking the whole time.
Step 4: Cook until thick and glossy
-
Continue cooking over medium heat, whisking steadily, until the filling thickens to a pudding consistency and begins to bubble.
Once it bubbles, cook for 1 minute while whisking (this helps fully activate the cornstarch). -
Remove from heat. Add chopped chocolate and butter, stirring until melted and smooth.
Stir in vanilla. - Optional but recommended for an ultra-silky filling: pour the custard through a fine-mesh sieve into a bowl.
-
Immediately pour the hot filling into the cooled crust and smooth the top.
Do not let it sit uncoveredwe’re going straight to meringue while it’s hot.
Step 5: Make the meringue
- Preheat oven to 350°F.
- In a clean, dry mixing bowl (any grease can sabotage you), beat egg whites and salt until foamy.
- Add cream of tartar and beat to soft peaks (the whites should droop gently when you lift the beaters).
-
With the mixer running, add sugar graduallyabout 1 tablespoon at a timebeating until glossy stiff peaks form.
The peak should stand upright, like it’s proud of its life choices. - Beat in vanilla just until combined.
Step 6: Top the pie (seal those edges!)
-
Spoon the meringue onto the pie while the filling is still hot.
Start around the edges, spreading the meringue so it touches the crust all the way around.
This seal helps prevent shrinking and weeping. -
Pile the remaining meringue in the center and swirl decoratively with the back of a spoon.
(This is the part where you get to feel like a pie influencer.)
Step 7: Bake until toasted
-
Bake at 350°F for 10–14 minutes, or until the peaks are lightly golden.
Keep an eye on it in the last few minutesmeringue goes from “sun-kissed” to “campfire incident” quickly. - Cool the pie on a wire rack for about 1 hour at room temperature, then chill 2–4 hours before slicing.
How to Slice It Like a Pro
- Use a sharp knife dipped in hot water and wiped dry between slices.
- Slice with confident, clean downward cutsavoid sawing back and forth through the meringue.
- For the neatest servings, chill at least 3 hours. If you’re cutting sooner, embrace the “rustic wedge” aesthetic.
Troubleshooting: Common Chocolate Meringue Pie Problems
“My filling is runny.”
Usually one of three things: the custard didn’t bubble long enough to fully thicken, the heat was too low to activate the cornstarch,
or the measurement was off. Next time, make sure you see a gentle bubble and keep whisking for a full minute after bubbling begins.
“My filling got lumpy.”
Lumps can happen if dry ingredients weren’t fully whisked or if the yolks heated too fast. The fix is easy: strain the filling through
a fine-mesh sieve before pouring into the crust.
“My meringue wept (little droplets).”
Meringue weeping can come from undercooking, overcooking, or humidity being… well, humidity. Adding the meringue over
hot filling, gradually adding sugar, and baking just until golden helps. Also: meringue is not a fan of long refrigerator stays.
“My meringue shrank away from the crust.”
That happens when the meringue wasn’t sealed to the crust edge. Spread the meringue to touch the crust all the way around
before you pile it high in the middle.
Variations That Still Feel Classic
Espresso Chocolate Meringue Pie
Add 1–2 teaspoons instant espresso powder to the dry filling ingredients for a mocha vibe without turning it into a coffee dessert.
Extra-Deep Chocolate
Swap 1/4 cup of the milk for strong brewed coffee, or add an extra ounce of chopped chocolate at the end.
Crust Options
- Traditional pastry crust: flakiest and most classic.
- Chocolate cookie crust: dramatic and crowd-pleasing (just bake and cool fully).
- Graham crust: sweeter, crunchier, and very “potluck friendly.”
Make-Ahead and Storage Tips
- Best day to serve: the day it’s made (meringue is happiest then).
- Refrigeration: cover loosely and refrigerate up to 24 hours. Expect some texture changes in the meringue over time.
- Freezing: not recommended (custard and meringue textures suffer).
FAQ
Can I use carton egg whites for the meringue?
Fresh egg whites whip up more reliably for classic meringue. If carton whites are your only option, choose a brand
labeled suitable for whipping and expect slightly less volume.
Do I have to use cream of tartar?
It helps stabilize the meringue, making it less likely to collapse. If you don’t have it, a small splash of lemon juice
can help, but cream of tartar is the classic choice.
Why room-temperature egg whites?
Room-temp whites whip with more volume and speed. If you forgot, place the eggs (in shells) in warm water for 5–10 minutes,
then separate.
Kitchen Notes: What Baking This Pie Feels Like (and What You Learn)
Making classic chocolate meringue pie is one of those kitchen projects that starts out calm and ends with you standing in front of the oven
like a proud stage parent at a school play. There’s a rhythm to it: whisk, whisk, whisk; pause to admire how glossy the custard looks; whisk again;
then suddenly you’re sculpting clouds on top of a pie like you moonlight as a weather system.
The first lesson most bakers learn is that timing matters, but not in a scary waymore in a “keep things moving” way.
Custard waits for no one. If you wander off to answer a text while the filling is heating, it will pick that moment to form a ring of
chocolate lava around the edge of the pan. The fix is simple: stay near the stove, whisk steadily, and treat bubbles as your finish line.
Once the custard bubbles and you whisk it for that extra minute, you’ll feel the texture change from “liquid hope” to “pudding certainty.”
The second lesson is that meringue is basically a personality test. If you add sugar too fast, the whites look grainy and sulk.
If your bowl has even a whisper of grease, the whites will refuse to rise on principle. But when you do it rightclean bowl, gradual sugar,
steady beatingthe meringue turns glossy and proud, with peaks that hold their shape like tiny vanilla mountain ranges. It’s weirdly satisfying,
like organizing a junk drawer and finding matching batteries.
Then comes the iconic moment: spooning meringue onto the hot filling. This is where the pie becomes classic.
You’ll notice the meringue spreads more easily at the edges if you start there first, sealing to the crust all the way around.
That seal is the difference between a pie that slices like a dream and a pie where the meringue slides off like it’s late for an appointment.
Once the edges are sealed, you can pile the rest in the middle and make swoops with the back of a spoon. The swoops are not required,
but they are highly encouraged for morale.
Baking the meringue is the part that makes you hover. You’re aiming for “golden and toasty,” not “bonfire.”
The peaks brown first, the valleys last, and the whole top can change color in the time it takes you to say,
“I’ll just check it one more ti” so keep a close eye near the end. When it comes out, you get that bakery-window look:
a glossy, toasted top that makes people say, “Wait… you made that?”
Cooling teaches patience. Warm chocolate custard tastes amazing, but it’s also basically molten pudding.
If you slice too early, you’ll get delicious chaos on a plate. Chill time is what turns your pie into clean layers:
crisp crust, thick chocolate filling, and airy meringue. The reward is that first proper slicesharp edges, defined layers,
and a forkful that’s creamy, light, and rich all at once.
And finally: serving this pie tends to create stories. Someone will mention their grandma. Someone will ask if you’re available for birthdays.
Someone will “just take a sliver” and return for a slice the size of Rhode Island. It’s the kind of dessert that doesn’t just end a meal
it becomes the topic of conversation. Which, honestly, is exactly what classic American pies were designed to do.
Conclusion
Classic chocolate meringue pie is part recipe, part tradition, and part edible show-off moment. With a fully baked crust, a smooth stovetop custard,
and a properly sealed, gently toasted meringue, you get that perfect contrast: crisp, creamy, fluffy, and deeply chocolatey.
Make it for holidays, potlucks, or a random Tuesday when you need your kitchen to feel like a warm memoryand don’t be surprised if people request it forever.