
Table of Contents >> Show >> Hide
- How a DIY Ice Cream Maker Works
- Best DIY Ice Cream Maker Designs
- Materials for a Simple DIY Ice Cream Maker
- Basic Coffee Can Ice Cream Maker Plan
- Hand-Crank Ice Cream Maker Plans
- Ice and Salt Ratio for Homemade Ice Cream Makers
- Food Safety Tips for Homemade Ice Cream
- Recipe Base for Testing Your DIY Ice Cream Maker
- Common DIY Ice Cream Maker Problems
- Flavor Ideas for Your Homemade Ice Cream Maker
- Practical Experiences: What I Learned Building and Using DIY Ice Cream Makers
- Conclusion
- SEO Tags
There are two kinds of people in summer: people who buy ice cream, and people who look at a pile of ice, salt, coffee cans, and scrap wood and think, “Yes, this is engineering.” If you are in the second groupor dangerously close to joining itthis guide to building a DIY ice cream maker is for you.
A homemade ice cream maker does not need to be complicated. At its heart, every ice cream maker has the same job: keep a cold container moving while the ice cream base freezes. That motion prevents giant ice crystals from forming, adds a little air, and turns sweet dairy into something scoopable instead of a sad frozen brick. The classic ice-and-salt setup still works beautifully because salt lowers the freezing point of ice water, creating a colder brine around the cream container.
Below, you will find practical ice cream maker plans, design options, materials, troubleshooting tips, and a long, friendly section of real-world experience for anyone who wants fewer kitchen disasters and more “how did you make this?” compliments.
How a DIY Ice Cream Maker Works
A DIY ice cream maker relies on three simple ideas: cold, motion, and patience. The cold comes from an ice-and-salt bath or a pre-frozen container. The motion comes from shaking, rolling, cranking, or rotating the inner canister. The patience comes from you, the brave dessert engineer, resisting the urge to open the lid every 45 seconds.
When ice cream freezes slowly without movement, large ice crystals develop. That is why a forgotten bowl of sweet cream in the freezer becomes hard and icy. Churning constantly moves the mixture against the cold container wall, scraping frozen bits back into the base and keeping the texture smoother. Fat from cream, sugar from the recipe, and a bit of air all help the final scoop become creamy rather than crunchy.
Best DIY Ice Cream Maker Designs
There are several ways to build a homemade ice cream maker. The best design depends on your tools, budget, available space, and how much you enjoy turning a handle while your friends cheer like you are competing in the Dessert Olympics.
1. The Coffee Can Ice Cream Maker
This is the easiest DIY ice cream maker plan and one of the most fun. You place a sealed smaller food-safe metal can inside a larger can or bucket. The ice cream base goes into the small can. Ice and rock salt go around it. Then the container is rolled, shaken, or gently turned until the base thickens.
This plan is great for beginners because it uses common materials, costs very little, and teaches the basic science of ice cream making. It is also excellent for kids’ activities, camping trips, backyard parties, and anyone who enjoys dessert with a side of mild upper-body exercise.
2. The Hand-Crank Bucket Ice Cream Maker
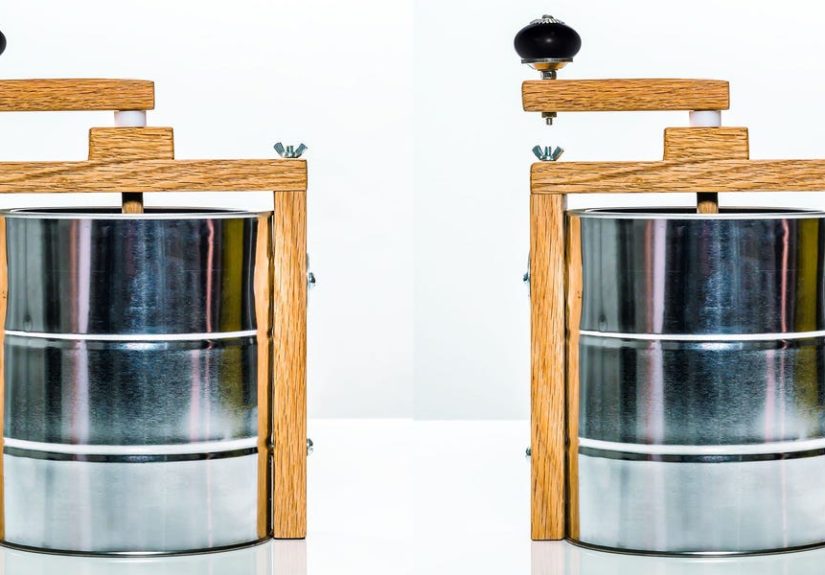
This is the old-fashioned version many people remember from summer cookouts. A metal canister sits inside a wooden or plastic bucket filled with ice and salt. A paddle, called a dasher, turns inside the canister while the container stays cold. You can build a simple version using a food-safe inner canister, a sturdy outer bucket, a crank handle, and a central paddle shaft.
The hand-crank design is better for larger batches because it keeps the mixture moving more consistently than a rolling can. It also creates that charming “everyone takes a turn” energy, which is perfect because the person who cranks the longest usually feels morally entitled to the first scoop.
3. The Freezer-Bowl Stir Method
If you want the lowest-tool version, you can use a stainless-steel bowl that has been chilled in the freezer. Pour in the cold ice cream base, place the bowl back in the freezer, and stir vigorously every 20 to 30 minutes until thick. This is not technically a machine, but it follows the same principle: freeze while disturbing the ice crystals.
The texture may not be as silky as churned ice cream, but it is a useful fallback when you have cream, sugar, and ambition but not enough hardware.
4. The Low-Speed Drill or Motor-Assisted Plan
Some DIY builders like to attach a slow rotating mechanism to the crank shaft. This can work, but it should be approached carefully. Ice, salt water, and electricity are not a comedy trio you want performing in your kitchen. If you try a motor-assisted version, use a low-speed, low-voltage setup, keep all electrical parts away from melted ice, and involve an experienced adult if power tools are involved.
For most home builders, a hand crank is safer, cheaper, easier to clean, and more satisfying. Besides, dessert tastes better when you can say, “I suffered for this vanilla.”
Materials for a Simple DIY Ice Cream Maker
For a basic coffee-can or bucket-style homemade ice cream maker, gather these materials:
- One small food-safe metal canister or stainless-steel container with a tight lid
- One larger bucket, pail, or clean outer can
- Crushed ice or small ice cubes
- Rock salt or kosher salt
- Heavy-duty tape or clamps to secure lids
- A towel or gloves for handling cold containers
- Optional: a wooden frame, crank handle, center shaft, and simple paddle
The most important material rule is simple: anything touching the ice cream must be food-safe. Do not use rusty cans, paint-lined containers, random garage buckets, or mystery metal that looks like it came from a pirate ship. The outer bucket can be more flexible because it holds only ice and salt, but the inner container should be clean, smooth, and safe for food contact.
Basic Coffee Can Ice Cream Maker Plan
Step 1: Choose the Inner Container
Use a clean, food-safe metal canister with a tight lid. A one-quart size is ideal for a small batch. The lid must seal well because salty ice water leaking into your ice cream is one of life’s more preventable tragedies.
Step 2: Add the Ice Cream Base
Pour in a chilled ice cream base. Do not fill the container more than two-thirds full because the mixture needs room to expand as air is incorporated. A simple base can include heavy cream, whole milk, sugar, vanilla, and a pinch of salt. If you use eggs, cook the base properly and cool it thoroughly before churning.
Step 3: Nest the Small Container in the Large One
Place the sealed inner container inside a larger can or bucket. Pack ice around it, then sprinkle salt over the ice. Continue layering ice and salt until the inner container is surrounded.
Step 4: Roll or Turn the Container
Secure the outer lid and roll the container gently back and forth for 10 to 20 minutes. If you are using a bucket, turn the inner canister by hand or attach a simple crank. The goal is steady movement, not violent shaking. You are making dessert, not auditioning for a demolition crew.
Step 5: Check the Texture
Open the inner container carefully, keeping salt water away from the ice cream. When the mixture looks like soft serve, it is ready to eat or pack into a freezer-safe container for firming. For harder scoops, freeze the churned ice cream for several hours.
Hand-Crank Ice Cream Maker Plans
A hand-crank ice cream maker is more involved but still very achievable. The design has four main parts: an outer bucket, an inner canister, a crank shaft, and a paddle. The paddle scrapes and stirs the ice cream base while the salt-and-ice bath chills the canister from the outside.
Recommended Dimensions
For a family-size batch, use an inner canister that holds 1 to 2 quarts and an outer bucket wide enough to leave at least 2 inches of space around it for ice and salt. The inner canister should sit securely in the center without wobbling. A simple wooden crossbar across the top can hold the crank shaft in place.
Simple Paddle Design
The paddle does not need to be fancy. A central rod with two flat food-safe blades can stir the base well enough for home use. The blades should come close to the inner wall without scraping harshly. If the gap is too wide, frozen cream sticks to the wall. If the blades scrape too hard, the crank becomes annoying and the texture may be uneven.
Crank Handle Setup
A basic crank can be made from a sturdy handle attached to the top of the shaft. The motion should be smooth and slow. Ice cream does not need high speed. In fact, too much speed can splash the base, warm the mechanism, and create unnecessary chaos. Aim for steady turning until the mixture thickens.
Ice and Salt Ratio for Homemade Ice Cream Makers
The classic ratio is about one part salt to four or five parts ice by volume. You do not need laboratory precision. Layer ice, sprinkle salt, add more ice, and repeat. Crushed ice works faster because it creates more contact with the canister. Rock salt is traditional because its coarse crystals distribute well, but kosher salt can also work.
As the salt melts the ice, the brine becomes colder than plain ice water. This colder bath pulls heat from the ice cream base. That is why plain ice alone is usually not enough for a good old-fashioned churn. Without salt, your mixture may stay disappointingly soupy while everyone pretends not to look at the store-bought backup pint in the freezer.
Food Safety Tips for Homemade Ice Cream
Homemade ice cream is fun, but dairy and eggs deserve respect. Use pasteurized milk and cream. If your recipe contains eggs, avoid raw egg bases unless you are using pasteurized eggs or pasteurized egg products. A cooked custard base should be heated carefully, then chilled completely before churning.
Keep the base refrigerated until you are ready to churn. Wash your hands, sanitize containers, and do not let melted salt water touch the finished dessert. Once churned, transfer ice cream to a clean freezer-safe container. If it melts heavily, do not repeatedly refreeze it and serve it again. Texture suffers, and food safety becomes less reliable.
Recipe Base for Testing Your DIY Ice Cream Maker
Before trying complicated flavors, test your DIY ice cream maker with a simple vanilla base. It gives you a clear sense of how well your machine freezes, churns, and thickens.
Simple Egg-Free Vanilla Base
- 2 cups heavy cream
- 1 cup whole milk
- 2/3 cup sugar
- 1 tablespoon vanilla extract
- 1/8 teaspoon salt
Whisk the ingredients until the sugar dissolves. Chill the mixture for at least 4 hours, preferably overnight. Pour it into your DIY ice cream maker and churn until it reaches soft-serve thickness. This base is forgiving, creamy, and ideal for testing because there is no custard cooking step.
Common DIY Ice Cream Maker Problems
The Ice Cream Is Too Icy
Icy texture usually means the base froze too slowly, had too much water, or was not churned enough. Chill the base longer, use more ice and salt, make sure the container has good contact with the brine, and churn steadily. A recipe with enough cream and sugar will also freeze more smoothly.
The Ice Cream Will Not Freeze
If your ice cream stays liquid, the brine may not be cold enough, the base may have started too warm, or the batch may be too large. Add more ice and salt, reduce the amount of base, and make sure the inner container is surrounded evenly.
The Flavor Tastes Salty
Salt water probably leaked into the inner container. Check the lid seal, use tape or clamps if needed, and wipe the top carefully before opening. Even a small splash of brine can turn vanilla into “ocean surprise,” which is not a flavor most people request twice.
The Texture Is Greasy
A greasy or buttery texture can happen when a high-fat base is over-churned. Stop when the mixture looks like soft serve. It will firm up later in the freezer. More churning is not always better; sometimes it is just dairy cardio.
Flavor Ideas for Your Homemade Ice Cream Maker
Once your DIY ice cream maker works, the fun begins. Vanilla is a great starting point, but homemade ice cream is basically a blank canvas wearing a parka. Try crushed cookies, roasted strawberries, peanut butter ribbons, chocolate chunks, caramel swirls, toasted coconut, coffee, mint, or brownie pieces.
Add solid mix-ins near the end of churning, not at the beginning. If you add them too early, they can sink, freeze too hard, or interfere with the paddle. Sauces and ribbons should usually be layered into the storage container after churning so they remain distinct instead of disappearing into the base.
Practical Experiences: What I Learned Building and Using DIY Ice Cream Makers
The first lesson of DIY ice cream making is that confidence freezes faster than cream. The plan may look simple on paper, but the tiny details decide whether you get smooth ice cream or a cold dairy puddle with ambition. The biggest improvement comes from chilling everything ahead of time. A cold base, a cold inner container, and plenty of ice make the process easier. When the base starts warm, the ice bath spends too much energy cooling it down before freezing can even begin.
The second lesson is that lids matter more than people think. A loose lid is not just inconvenient; it is dessert sabotage. Salt water has a sneaky way of finding gaps. Before making a real batch, fill the inner container with plain water, seal it, and roll or turn it for a few minutes. If water leaks out, salt water can leak in. Fix the seal before sacrificing cream and vanilla to the engineering gods.
The third lesson is to use smaller batches when testing a new build. A half batch freezes faster, puts less stress on the crank, and gives better feedback. If the machine handles a small batch smoothly, scale up. If it struggles, you have saved ingredients and possibly your dignity.
Another useful discovery is that crushed ice beats big cubes. Large cubes leave air pockets around the inner canister, reducing cold contact. Crushed ice packs tightly and creates a better freezing environment. If you only have large cubes, wrap them in a towel and break them up carefully. Your ice cream maker will reward you with faster freezing and smoother texture.
Hand-cranking also has a rhythm. At first, the handle turns easily because the base is liquid. As the ice cream thickens, resistance increases. That is a good sign. Do not panic and start cranking aggressively. Slow, steady movement works better than frantic spinning. When the crank becomes noticeably harder and the mixture looks like soft serve, stop and check. Overdoing it can damage texture, especially with rich cream bases.
Finally, homemade ice cream tastes best when you let it rest briefly after churning. Straight from the maker, it is soft and wonderful, but 2 to 4 hours in the freezer gives it a scoopable structure. Use a shallow container if you want it to firm faster. Press parchment or plastic wrap against the surface before sealing the lid to reduce ice crystals. Label the flavor and date, unless your household treats mystery freezer containers as an adventure sport.
The most enjoyable part of using a DIY ice cream maker is the shared process. People gather around it. Someone turns the crank. Someone else checks the ice. A third person offers extremely confident advice while doing no work. Then, when the first scoop lands in a bowl, everyone acts as though they personally invented refrigeration. That is the real charm of these ice cream maker plans: they turn a simple dessert into a small event.
Conclusion
Building a DIY ice cream maker is a satisfying project because it combines kitchen science, simple tools, and a reward you can eat. Whether you choose the coffee can plan, a hand-crank bucket design, or a simple freezer-bowl method, the principles stay the same: keep the base cold, keep it moving, use enough ice and salt, and protect the mixture from leaks.
The best homemade ice cream maker is not necessarily the fanciest one. It is the one you will actually use. Start simple, test with vanilla, improve your seals and paddle design, then experiment with flavors. Before long, your freezer may become a tiny scoop shop, and you may become the person neighbors casually visit “just to say hi” while holding an empty bowl.
Note: This article is intended for safe home DIY use. Use food-safe containers, keep salt water away from the ice cream, and avoid unsafe electrical modifications near ice or liquid.





