
Table of Contents >> Show >> Hide
- What Is a Chestnut Roaster?
- What Is a Toasting Fork?
- Why Chestnuts Need Special Treatment
- How to Roast Chestnuts in a Chestnut Roaster
- Can You Roast Chestnuts Without a Fireplace?
- How to Use a Toasting Fork
- How to Choose the Best Chestnut Roaster
- How to Choose a Good Toasting Fork
- Cleaning and Caring for Your Tools
- Fresh Chestnut Buying and Storage Tips
- What to Serve With Roasted Chestnuts
- Why These Old-Fashioned Tools Still Matter
- Common Mistakes to Avoid
- Experiences With a Chestnut Roaster And Toasting Fork
- Conclusion
There are kitchen tools that simply do their job, and then there are tools that make the room feel warmer before the food is even ready. A chestnut roaster and toasting fork belong firmly in the second category. They are practical, yes, but they also bring a little old-fashioned theater to cooking: the glow of fire, the crackle of shells, the smell of toasted nuts, and the proud moment when someone says, “Wait, you roasted these yourself?”
Chestnuts may sound like something that only exists in holiday songs, but they are very real, very delicious, and surprisingly easy to prepare when you have the right equipment. A chestnut roaster helps cook the nuts evenly over an open flame, grill, fireplace, or stovetop, while a toasting fork turns simple fireside snacks into a tiny celebration. Together, they create a cozy cooking setup that feels part campfire, part Christmas market, and part “I definitely know what I’m doing,” even if you just learned how to score a chestnut five minutes ago.
This guide explores what these tools are, how to choose them, how to use them safely, and why they still deserve a place in modern kitchens and outdoor cooking kits. Whether you are roasting chestnuts, toasting bread, warming marshmallows, or creating a nostalgic fireside snack board, this humble duo can turn a chilly evening into something memorable.
What Is a Chestnut Roaster?
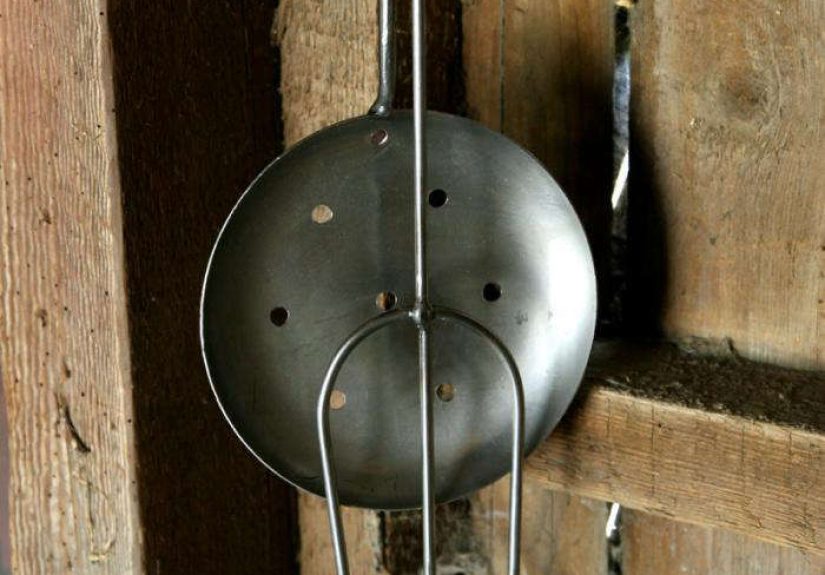
A chestnut roaster is usually a pan or basket designed specifically for cooking chestnuts over heat. The classic version has a long handle and a perforated base, meaning the bottom contains holes that allow direct heat and smoke to reach the nuts. Those holes are not decorative polka dots. They are the difference between chestnuts that taste gently smoky and chestnuts that taste like they spent a sad afternoon in a regular frying pan.
Traditional chestnut roasters are often made from iron, carbon steel, stainless steel, or cast iron. Some look like shallow pans with long handles, while others resemble grill baskets. The perforations encourage even roasting, help steam escape, and give the shells that rustic charred look people associate with street vendors and holiday markets.
Unlike a standard skillet, a chestnut roasting pan is built for direct heat. That makes it ideal for open fires, wood-burning stoves, charcoal grills, and fire pits. Some modern versions can also be used on gas burners or in ovens, depending on the manufacturer’s instructions. The key is choosing a roaster that matches where and how you plan to cook.
What Is a Toasting Fork?
A toasting fork is a long-handled fork used to hold food over a flame. Think of it as the refined cousin of a sharpened stick. It can be used for marshmallows, hot dogs, bread, sausages, fruit, and even small pieces of cheese or vegetables if you are brave and have a steady hand.
Traditional toasting forks were common fireplace tools. Modern versions may be made from stainless steel, iron, or chrome-plated metal, often with wooden or heat-resistant handles. Some are fixed-length and sturdy, while others are telescoping, making them easier to store and safer for children under adult supervision because the handle can extend farther from the heat.
When paired with a chestnut roaster, the toasting fork adds flexibility. While chestnuts roast in the pan, someone can toast slices of bread, roast marshmallows, or warm small bites over the same fire. It turns one cooking activity into an entire fireside experience.
Why Chestnuts Need Special Treatment
Chestnuts are not like almonds, walnuts, or pecans. They are softer, starchier, and higher in moisture. Their texture after roasting is closer to a sweet potato than a crunchy nut. That is part of their charm. A well-roasted chestnut is tender, mildly sweet, earthy, and warm enough to make cold fingers forgive winter.
Because chestnuts contain moisture, they must be scored before roasting. This means cutting an “X” or a slit through the shell. Skipping this step is not a cute shortcut. Unscored chestnuts can burst as steam builds inside the shell. At best, you get a messy oven. At worst, your fireplace performs an unwanted nut-based fireworks show.
How to Score Chestnuts
Place each chestnut flat-side down on a cutting board. Use a sharp paring knife or chestnut knife to cut an “X” across the rounded side. Cut through the outer shell, but avoid slicing deeply into the nutmeat. The goal is to create a steam vent and make peeling easier after roasting.
Some cooks prefer one long slit across the rounded side instead of an X. Both methods work, but the X often opens more dramatically during roasting, creating those curled-back shells that look so satisfying in photos. Yes, chestnuts can have a glamour shot moment.
How to Roast Chestnuts in a Chestnut Roaster
Using a chestnut roaster over an open fire is simple, but it rewards patience. You want steady heat, not giant flames licking the pan like a dragon with poor table manners.
Step-by-Step Open-Fire Method
- Choose fresh chestnuts. Look for glossy, firm shells without visible mold, cracks, or rattling inside.
- Wash and dry them. Dirt and debris are not seasoning.
- Score each chestnut. Cut an X or slit into the shell.
- Preheat the roaster. Hold it near the fire or place it over hot coals for a minute.
- Add chestnuts in a single layer. Crowding leads to uneven cooking.
- Shake often. Move the pan every few minutes so the nuts roast evenly.
- Cook for 15 to 25 minutes. Timing depends on size, heat level, and distance from the fire.
- Watch for visual cues. The shells should open and curl back, and the nutmeat should become tender.
- Steam briefly. Wrap hot chestnuts in a towel for 5 to 10 minutes to loosen the skins.
- Peel while warm. Once cold, chestnuts become stubborn little puzzles.
The best fire for chestnut roasting is not a roaring blaze. Hot coals are more reliable because they provide steady heat. If you are using a fireplace, roast near the edge of the fire rather than directly in tall flames. If you are using a grill, medium-high indirect heat works well.
Can You Roast Chestnuts Without a Fireplace?
Absolutely. A chestnut roaster is romantic, but it is not the only path to success. You can roast chestnuts in an oven, air fryer, grill, or even a heavy skillet. The flavor will vary, but the basic principles stay the same: score, heat, steam, peel, eat.
Oven Method
Preheat the oven to 350°F to 425°F, depending on the recipe and the size of the nuts. Place scored chestnuts on a baking sheet or in a roasting pan, cut-side up. Roast until the shells curl back and the nutmeat is tender, usually about 20 to 35 minutes. Larger chestnuts may take longer.
After roasting, wrap them in a clean towel or place them in a covered bowl for a few minutes. This traps steam and helps loosen the inner skin. Peel as soon as they are cool enough to handle. Chestnuts are one of those foods that require enthusiasm. Hesitate too long and they become harder to peel, as if personally offended by your delay.
Grill Method
A perforated chestnut pan is excellent on a charcoal or gas grill. Place the scored nuts in the roaster, set it over medium heat, and shake frequently. The holes allow the fire’s heat to reach the shells directly, giving the chestnuts a slightly smoky flavor.
Stovetop Method
If your roaster is compatible with your stovetop, you can use it over a gas flame. Electric and induction stoves require more care because many traditional perforated pans are not designed for flat glass surfaces. Always follow the tool’s instructions. A chestnut is not worth sacrificing your cooktop.
How to Use a Toasting Fork
A toasting fork is refreshingly simple: spear food, hold it near heat, rotate, and try not to look too proud when it turns golden. The trick is distance. Food should be close enough to toast but far enough to avoid immediate burning.
For bread, use thick slices that will not tear easily. For marshmallows, rotate slowly until the outside is golden and the inside softens. For hot dogs or sausages, use fully cooked varieties when possible and heat them evenly. For fruit, try apple wedges, pineapple chunks, or firm peaches. The fire adds caramelization, and suddenly dessert looks like you planned it instead of improvising because someone ate all the cookies.
Toasting Fork Safety Tips
- Choose a fork with a long handle to keep hands away from flames.
- Use heat-resistant gloves when cooking near open fire.
- Do not let children run with roasting forks.
- Keep the sharp ends pointed away from people.
- Never leave a hot metal fork where someone may grab it accidentally.
- Clean the fork after every use, especially after sticky marshmallows.
Open-fire cooking should feel cozy, not chaotic. Keep water, sand, or a fire extinguisher nearby when using a fire pit or fireplace. Avoid risky liquid-burning tabletop fire pits, especially models that use alcohol or other liquid fuels in ways that can create flame-jetting hazards. A safe fire is the secret ingredient nobody brags about, but everybody appreciates.
How to Choose the Best Chestnut Roaster
Not all chestnut roasters are created equal. Some are heirloom-quality tools that can last for decades. Others are lightweight seasonal gadgets that bend if you look at them with too much confidence. Here is what to consider before buying.
Material
Cast iron holds heat well and creates excellent roasting conditions, but it is heavier and needs proper care. Carbon steel heats quickly and is often lighter. Stainless steel resists rust and is easy to clean, though it may not deliver the same rustic heat retention as iron.
Handle Length
A long handle matters if you plan to roast over a fireplace, fire pit, or campfire. Short handles are fine for oven or grill use, but over open flames, distance is comfort. Your eyebrows will agree.
Perforation Size
The holes should be large enough to allow heat and smoke through but small enough to keep chestnuts from falling out. A good roaster balances airflow with stability.
Capacity
If you are roasting for one or two people, a small pan works. For family gatherings, choose a larger roaster that holds chestnuts in a single layer. Stacking them leads to uneven cooking, which leads to someone biting into a half-raw chestnut and questioning your leadership.
Compatibility
Before buying, check whether the roaster is intended for open fire, grill, oven, gas stovetop, or multiple uses. A beautiful fireplace roaster may not work on your modern induction cooktop.
How to Choose a Good Toasting Fork
A good toasting fork should feel sturdy, balanced, and safe. Stainless steel is popular because it resists rust and cleans easily. Wooden handles add comfort and a classic look, while telescoping handles make storage easier.
For family use, consider blunt-tipped or rounded fork designs when available, especially for younger users. For serious open-fire cooking, fixed-length forged forks often feel stronger and more controlled. If you camp often, choose a lightweight fork with a carrying case so it does not poke holes in your gear like a tiny metal porcupine.
Cleaning and Caring for Your Tools
Chestnut roasters and toasting forks are low-maintenance, but they are not no-maintenance. After use, let the tools cool completely. Brush away ash, shell fragments, and food residue. Wash with warm water and mild soap if the material allows it, then dry thoroughly to prevent rust.
Cast iron and carbon steel may need a light coating of oil after cleaning. Store them in a dry place. If your roaster has a wooden handle, avoid soaking it. Wood and water have a complicated relationship, and water usually wins.
For sticky toasting forks, soak only the metal tips in warm water before scrubbing. Marshmallow residue has the personality of glue, so cleaning sooner is easier than cleaning later.
Fresh Chestnut Buying and Storage Tips
Fresh chestnuts should feel heavy for their size and have tight, shiny shells. Avoid nuts with mold, large cracks, or a hollow rattle. Because chestnuts contain more moisture than many other nuts, they are perishable and should be refrigerated if not used right away.
Store fresh chestnuts in a breathable or lightly ventilated bag in the refrigerator. Use them within a few weeks for best flavor and texture. Cooked and peeled chestnuts can be refrigerated in an airtight container or frozen for longer storage. Freezing is useful if you find good chestnuts in season and want to save some for soups, stuffing, desserts, or late-night snacking.
What to Serve With Roasted Chestnuts
Roasted chestnuts are wonderful on their own with a sprinkle of salt, but they also play nicely with other flavors. Try them with melted butter, rosemary, cinnamon, honey, smoked paprika, or cracked black pepper. Their mild sweetness makes them suitable for both savory and sweet dishes.
For a cozy fireside platter, serve roasted chestnuts with toasted bread, sharp cheddar, apple slices, dried cranberries, and warm cider. Add marshmallows and chocolate if you want the children to become suddenly very interested in “traditional cooking.”
Chestnuts also work beautifully in stuffing, soups, pasta, rice dishes, and roasted vegetable sides. Chopped roasted chestnuts can add texture to Brussels sprouts, mushrooms, squash, or green beans. They are also excellent folded into holiday desserts or pureed into a creamy spread.
Why These Old-Fashioned Tools Still Matter
In a world full of digital timers, air fryers, smart ovens, and kitchen gadgets that require firmware updates, a chestnut roaster and toasting fork feel refreshingly human. They do not beep. They do not need Wi-Fi. They ask only for fire, food, and a little attention.
That simplicity is their charm. They slow cooking down just enough to make people gather around. Someone shakes the roaster. Someone else turns bread over the flame. Another person asks if the chestnuts are ready every ninety seconds. The whole process becomes part of the meal.
These tools also connect modern cooks to older food traditions. Chestnut roasting has long been associated with winter markets, holiday gatherings, and outdoor cooking. Toasting forks belong to the same family of practical fireplace tools that made warmth and food happen in the same place. Using them today feels nostalgic without being impractical.
Common Mistakes to Avoid
Forgetting to Score the Chestnuts
This is the biggest mistake. Always score chestnuts before roasting. Steam needs an escape route, and your ceiling does not need roasted nut fragments.
Cooking Over Flames That Are Too High
Chestnuts roast best over steady heat, not wild flames. High flames can burn the shells before the inside cooks through.
Peeling Too Late
Peel chestnuts while they are warm. Once cool, the shell and inner skin become harder to remove.
Using the Wrong Tool for the Heat Source
Make sure your roaster is safe for your fireplace, grill, oven, or stovetop. A tool designed for campfire use may not be suitable for a glass cooktop.
Ignoring Fire Safety
Keep the cooking area clear, supervise children, and never use unsafe liquid-fuel fire devices. Good food should create memories, not emergency room paperwork.
Experiences With a Chestnut Roaster And Toasting Fork
The first time you use a chestnut roaster and toasting fork, you may feel like you have stepped into a holiday postcard. Then, about two minutes later, you realize the postcard never mentioned ash, hot handles, or the fact that chestnuts require a surprising amount of commitment. That is part of the fun.
One of the best experiences is roasting chestnuts outdoors on a cool evening. The fire has settled into glowing coals, everyone has moved closer for warmth, and the roaster begins its soft metallic shuffle as you shake the pan. At first, nothing seems to happen. Then the shells start to split wider. A sweet, nutty smell rises through the smoke. People who claimed they were “not hungry” suddenly become official taste testers.
The toasting fork usually steals attention from the younger crowd. Marshmallows go on first, because tradition has rules. Some people patiently rotate them into perfect golden clouds. Others aim straight for flaming torches and call it “caramelized.” Bread is another underrated favorite. A thick slice toasted over open heat develops crisp edges and a smoky flavor that makes ordinary butter taste like a luxury item.
Indoors, the experience is quieter but just as satisfying. A fireplace chestnut roaster adds a sense of ceremony to a winter evening. You score the nuts at the kitchen counter, carry them to the hearth, and roast them while conversation drifts around the room. When the chestnuts are ready, everyone gathers to peel them while they are still warm. It is slightly messy, very hands-on, and far more memorable than opening a bag of snacks.
There is also a learning curve. The first batch may include a few chestnuts that are too dark on one side or a few that refuse to peel cleanly. That does not mean failure. It means you are learning the heat of your fire, the size of your nuts, and the rhythm of shaking the pan. By the second or third batch, you start to understand when the shells look right and when the aroma says, “Now would be a smart time to stop.”
A chestnut roaster and toasting fork are especially useful for gatherings because they invite participation. Instead of one person disappearing into the kitchen, people cook together. One guest handles the roaster. Another manages the toast. Someone else peels chestnuts and announces which ones are “perfect,” as if judging a tiny agricultural competition. The tools create activity, conversation, and a little harmless drama.
They are also excellent for camping. A compact chestnut roaster or grill basket can sit over coals, while telescoping toasting forks handle marshmallows, hot dogs, and bread. After a day outdoors, warm chestnuts feel hearty and comforting without requiring complicated prep. Add a mug of cider or coffee, and suddenly your campsite feels like a rustic café with worse chairs but better stars.
The lasting appeal of these tools is not only the food. It is the pace. Roasting chestnuts and toasting snacks over a flame forces everyone to slow down. You cannot swipe a screen and rush the fire. You wait, turn, shake, smell, peel, and share. In that sense, a chestnut roaster and toasting fork are not just cooking tools. They are small instruments of coziness, and frankly, most kitchens could use more of those.
Conclusion
A chestnut roaster and toasting fork may look simple, but together they offer one of the most enjoyable ways to cook with fire. The roaster brings out the sweet, tender flavor of chestnuts, while the toasting fork expands the experience to bread, marshmallows, sausages, fruit, and other fireside favorites. With the right tools, a few safety habits, and properly scored chestnuts, you can turn an ordinary evening into something warm, fragrant, and deliciously memorable.
Whether you are shopping for a traditional fireplace roaster, a campfire-friendly pan, or a set of sturdy toasting forks, focus on durable materials, comfortable handles, safe length, and easy cleaning. The best tools are the ones you will actually usenot just admire on a wall while eating microwave popcorn.
In the end, roasting chestnuts is about more than food. It is about gathering, slowing down, and enjoying the kind of cooking that asks for your attention in the best possible way. Add a good fire, a reliable roaster, a few toasting forks, and people you like, and you have all the ingredients for a tradition worth repeating.





