Table of Contents >> Show >> Hide
- Before You Start: Pick Your Spot, Prep the Tree, and Gather Supplies
- Plan the Look: Color, Theme, and the “Rule of Three”
- The Best Order to Decorate a Christmas Tree (Step-by-Step)
- Step 1: Shape and fluff (even real trees benefit)
- Step 2: Put lights on the Christmas tree (the glow layer)
- Step 3: Add ribbon and garland (the “movement” layer)
- Step 4: Hang ornaments (start big, then layer smaller)
- Step 5: Add fillers and picks (the secret weapon)
- Step 6: Topper time (crown the tree)
- Step 7: Finish the base (the “photo frame” of the tree)
- How to Make Your Christmas Tree Look Professionally Decorated
- Christmas Tree Theme Ideas (Pick One or Mix Two)
- Common Christmas Tree Decorating Mistakes (and Quick Fixes)
- Safety and Sanity Checklist (Because Holiday Cheer Shouldn’t Spark)
- Extra : Real-Life Experiences Decorating a Christmas Tree (Lessons From the Glitter Trenches)
- Wrap-Up: Your Foolproof Christmas Tree Decorating Formula
Decorating a Christmas tree is basically interior design in a conical shapepart art, part engineering, part “why is there glitter in my socks?” The good news: you don’t need a design degree (or a magical holiday elf) to make your tree look intentional, full, and photo-ready. You just need a simple plan, the right order of operations, and one important mindset shift: you’re building layers, not hanging random ornaments like you’re dodging lasers in an action movie.
This guide walks you through a step-by-step, no-drama method for how to decorate a Christmas treewhether it’s real or faux, slim or full, minimal or “the tree can be seen from space.” We’ll cover lighting techniques, ribbon and garland styling, ornament placement, theme ideas, safety tips, and quick fixes for common mistakes.
Before You Start: Pick Your Spot, Prep the Tree, and Gather Supplies
1) Choose the right location (your tree deserves a good angle)
- Keep it away from heat sources (vents, fireplaces, radiators) so it doesn’t dry out and shed like a stressed-out houseplant.
- Leave clearance for walking paths and doors. A gorgeous tree is less charming when it blocks the hallway like a festive traffic cone.
- Pick the “front” if the tree sits in a corner. If it’s visible from multiple sides, plan to decorate 360°.
- Stability mattersespecially with kids and pets. If your cat is an aspiring tree climber, anchor the tree or choose shatterproof ornaments.
2) Prep a real tree (aka: keep it hydrated and happy)
If you’re decorating a real Christmas tree, give it a fresh trunk cut if possible and place it in a sturdy, water-holding stand. Add water dailyyes, daily. A well-watered tree stays greener longer and is less of a fire risk than a dry one. If needles are falling fast or branches feel brittle, it’s time to retire it (dignified exit, no encore).
3) Prep a faux tree (fluffing is the glow-up)
If you want your artificial Christmas tree to look full, fluff first. Give branches a gentle shake, then fan out each branch tip. Work from the trunk outward so the interior isn’t bare. This is the difference between “department store display” and “sad triangle with ornaments.” Put on music. Fluffing is a commitment.
4) Quick supply checklist
- Lights (mini, C6/C7, or specialtyplus spare bulbs if applicable)
- Extension cord + power strip (if needed) + timer
- Tree topper (star, angel, bow, floral spray, etc.)
- Ribbon and/or garland (greenery, beads, tinsel, feltyour vibe)
- Ornaments (large, medium, small) + ornament hooks
- Filler picks (sprays, berries, florals, pinecones) for depth
- Tree skirt or collar (and something to hide cords)
- Optional: gloves (for scratchy branches), wire, and zip ties for securing décor
Plan the Look: Color, Theme, and the “Rule of Three”
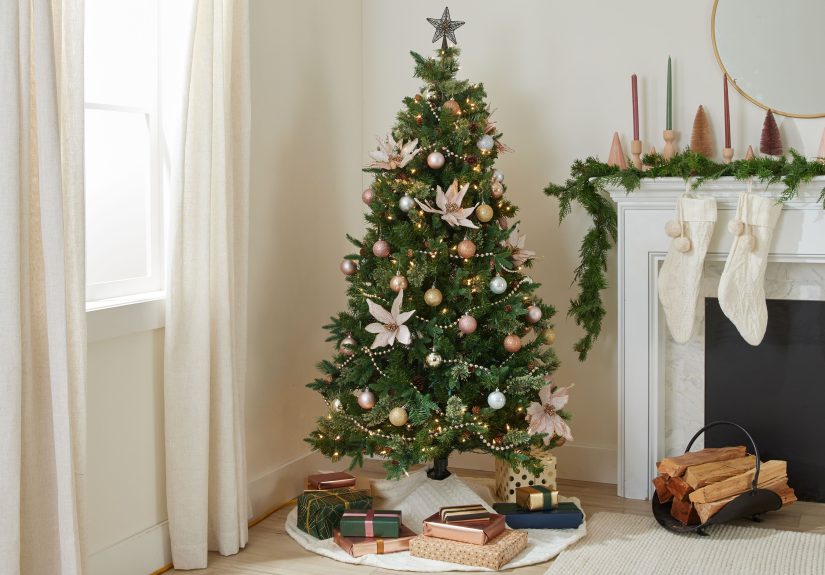
You can absolutely freestyle your Christmas tree decorating ideas. But if you want a tree that looks “styled,” a tiny bit of planning helps. Here’s an easy formula: pick 2–3 main colors plus one metal (gold, silver, champagne). Then choose one repeating texture (velvet ribbon, glass ornaments, rustic wood, glitter accents) to make the whole thing feel cohesive.
Examples:
- Classic: red + green + gold (mix matte and shiny so it doesn’t look flat)
- Modern cozy: cream + sage + champagne (add warm wood ornaments)
- Glam: black + white + gold (high contrast, lots of sparkle)
- Playful: pink + teal + silver (yes, it’s allowed; the holiday police are busy)
The Best Order to Decorate a Christmas Tree (Step-by-Step)
If you only take one thing from this guide, take this: Lights first, then ribbon/garland, then ornaments, then topper, then finishing touches. It’s the easiest way to get depth and avoid the dreaded “everything is fighting for the same branch.”
Step 1: Shape and fluff (even real trees benefit)
Stand back and look for gaps. Rotate sections. Spread branches so the silhouette is even. If your tree is pre-lit, still flufflights look better when they’re not hovering in midair like confused fireflies.
Step 2: Put lights on the Christmas tree (the glow layer)
Lights create the foundation. A tree with great lighting looks good even before the ornaments go on. For a balanced look, many decorators use a rule of thumb like about 100 lights per foot of tree height (and more if you want a brighter, denser sparkle). Bulb size matters too: mini lights give a twinkly texture; larger bulbs read bolder and more retro.
Two reliable lighting methods:
- The spiral drape: start at the top and wrap lights around the tree in a gentle spiral. It’s fast and uses fewer lights.
- The “section” method: visually divide the tree into vertical sections and weave lights within each section for a deeper, more even glow.
Pro move: don’t just wrap lights around the outside. Tuck some deeper toward the trunk so the tree glows from within. If your lights have an obvious plug end, plan where that will land so it’s easy to hide and still reaches the outlet.
Safety note: inspect cords for damage, don’t overload extension cords, and turn lights off when you leave home or go to bed. A timer is the easiest “set it and forget it” option.
Step 3: Add ribbon and garland (the “movement” layer)
Ribbon and garland create flow and help the tree look styled, not just “ornaments on branches.” You can do ribbon, garland, or bothjust keep the scale appropriate to your tree size.
Two popular ribbon techniques:
- Vertical waterfall: cut multiple lengths and tuck them from the top down, letting them cascade in soft curves. This gives a designer look and plays nicely with ornaments.
- Loose wrap: drape ribbon around the tree in horizontal passes. Don’t pull it tighttuck it slightly into branches to make it look billowy.
Wired ribbon is easier to shape and holds those pretty swoops. Want extra depth? Layer two ribbons: one patterned (plaid, stripes) + one solid texture (velvet) + maybe a third metallic or mesh ribbon for sparkle.
Garland tips that instantly look better:
- Go looser than you think. Tight garland looks like it’s restraining the tree.
- Use depth: tuck some garland toward the trunk, not just on the outer tips.
- If using beads, let them drape naturallygravity is your co-designer.
Step 4: Hang ornaments (start big, then layer smaller)
Ornaments are where your theme comes to life. The easiest way to make a tree look full and intentional is to start with larger statement ornaments, then fill with medium, then finish with small ornaments and special details. Think “build the skyline,” then “add the streetlights.”
How to place ornaments like a pro:
- Place some ornaments deeper inside the branches to create depth (especially shiny balls that reflect light).
- Vary finishes (matte, glossy, glitter) so everything doesn’t blur together.
- Cluster strategically: small groups of 2–3 can look styled, but avoid “one area got attacked by ornaments.”
- Balance the weight: distribute your biggest ornaments around the tree, not all at eye level.
If you have sentimental ornaments (the ones that don’t match but do matter), give them a “gallery wall” approach: group a few together in a dedicated zone or spread them evenly so they feel intentional.
Step 5: Add fillers and picks (the secret weapon)
This is the step that makes your tree look like it was styled by someone who owns a ladder and confidence. Add picksberries, pinecones, frosted sprigs, floral stems, metallic spraysinto gaps to create texture and fullness. Repeat the same pick in several places so it looks cohesive (not like a craft store exploded).
Step 6: Topper time (crown the tree)
Most people add the tree topper near the end, once they can see the overall balance. If your topper is large or tricky to secure, you can test-fit it earlier to make sure the wiring/structure worksthen remove it while you decorate. When you’re ready, secure it firmly (floral wire or pipe cleaners can help) and step back to make sure it’s centered from your main viewing angle.
Step 7: Finish the base (the “photo frame” of the tree)
Add a tree skirt or collar to hide the stand and visually ground the tree. Tuck cords behind the skirt and consider a timer so you’re not crawling under branches every night like you’re defusing a holiday bomb. Presents (real or decorative) complete the look and make the whole setup feel finished.
How to Make Your Christmas Tree Look Professionally Decorated
Create depth on purpose
Designer-looking trees aren’t just “more ornaments.” They’re layered. Put a few neutral or shiny ornaments deeper inside the tree (think champagne, gold, silver). Then place your statement ornaments closer to the front. The lights bounce off the inner ornaments and create that rich, dimensional glow.
Use balance, not perfect symmetry
Aim for even distribution, not identical placement. After every few minutes, step back and look at the tree from different angles. If something feels heavy on one side, move one ornamentdon’t add five more to “fix it.” That’s how you end up with Ornament Spiral of Doom.
Keep your scale consistent
Big trees look best with some larger ornaments (4–6 inches) mixed in. Tiny ornaments on a tall tree can look like sprinkles on a skyscraper. If your tree is slim, go lighter on bulky garland and oversized décor so you don’t swallow the shape.
Christmas Tree Theme Ideas (Pick One or Mix Two)
- Classic Americana: red ribbon, warm white lights, gold accents, timeless ornaments
- Cozy Cabin: plaid ribbon, wood ornaments, pinecones, warm tones
- Modern Minimal: limited palette, lots of negative space, statement topper
- Candyland: bright colors, playful ornaments, peppermint stripes, oversized bows
- Coastal Winter: blue + white + silver, shell or star ornaments, airy ribbon
- Kids’ Tree: shatterproof ornaments, felt garland, theme ornaments (animals, cartoons, sports)
- Memory Tree: family ornaments, photo ornaments, handwritten tags, meaningful ribbon
Common Christmas Tree Decorating Mistakes (and Quick Fixes)
“My tree looks sparse.”
- Fluff more (yes, more).
- Add inner ornaments and a few filler picks to create depth.
- Use ribbon vertically to cover gaps with “movement” instead of stuffing ornaments everywhere.
“My lights look like they’re wearing a belt.”
- Tuck lights deeper into branches as you wrap.
- Use the section method for more even coverage.
- Add a second strand only in the emptiest zones (you don’t always need to redo everything).
“Ribbon looks stiff and weird.”
- Loosen the tensionribbon should drape, not strangle.
- Use wired ribbon so it holds a soft curve.
- Tuck ribbon slightly into branches to create a billowy, dimensional look.
“Ornaments keep sliding off.”
- Use proper ornament hooks instead of bent paper clips (we respect your ingenuity, but still).
- Choose branches with more support for heavy ornaments, closer to the trunk.
- For extra security, add a small twist of floral wire.
Safety and Sanity Checklist (Because Holiday Cheer Shouldn’t Spark)
- Inspect light strings and cords; replace damaged sets.
- Follow manufacturer guidance for how many strands can connect end-to-end.
- Don’t overload extension cords; keep connections away from water in a live tree stand.
- Turn off tree lights when leaving home or going to bed; use a timer for convenience.
- Never use lit candles on the tree.
- For real trees: keep watered daily and remove when it dries out and drops needles.
Extra : Real-Life Experiences Decorating a Christmas Tree (Lessons From the Glitter Trenches)
The first time I tried to “decorate a Christmas tree like a pro,” I assumed it meant buying more ornaments. So I did what any confident beginner does: I bought a suspiciously large box of shiny balls, turned on the lights, and started hanging things wherever my arm landed. Ten minutes in, my tree looked like it was wearing jewelry stolen from three different decades. The top was bare, the middle was crowded, and the bottom looked like a holiday garage sale. I learned quickly that the secret isn’t more décorit’s better structure.
The second year, I tried ribbon. I watched one video, felt unstoppable, and wrapped the ribbon around the tree like I was taping down a moving box. It was tight. It was flat. It was… a festive seatbelt. The fix was embarrassingly simple: loosen it and tuck it inward. The moment I started pushing the ribbon slightly toward the trunk, it puffed up into soft loops and suddenly looked intentional. Wired ribbon was another game-changerturns out “holds its shape” is exactly what you want when your tree is basically a vertical wind tunnel every time someone walks by.
Then came lighting. I used to do the quick spiral and call it a day, but certain parts of the tree always looked dimlike it was saving electricity. When I finally started weaving lights deeper into the branches, the whole tree got that cozy glow-from-within effect. The best part? The ornaments looked better without me changing a single ornament. Lighting is not just illuminationit’s makeup for your tree. (And yes, this means you should probably step back and judge your work from across the room like a director reviewing a scene.)
My favorite “grown-up” improvement has been the inside-out ornament trick. I place a handful of simple, neutral ornaments deeper inside firstmostly shiny ones that catch light. Then I add the statement ornaments closer to the front. That one move adds depth and makes the tree feel fuller without buying a truckload of decorations. It also helps sentimental ornaments blend in more naturally, instead of looking like they got accidentally invited to the wrong party theme.
The most practical lesson? Decorate in passes. I do lights, then ribbon/garland, then big ornaments, then medium, then small. After each pass, I rotate the tree (or at least walk around it) and fix obvious gaps. This keeps me from “solving” one bare spot by piling ten ornaments on the same branch like I’m trying to win a contest. Also: take a photo. Cameras are brutally honest. If something is lopsided, your phone will rat you out immediately.
Finally, the safety habits that stuck: I inspect lights, use a timer, and turn the tree off at night. It’s not dramaticit’s just sensible. The goal is a beautiful tree that feels magical, not a tree that makes you wonder why the outlet is warm. Holiday joy should sparkle, not sizzle. If you do the basicsgood lighting, layered décor, balanced ornament placementyou’ll end up with a Christmas tree that looks styled, feels personal, and makes everyone say, “Wow.” Even if there’s still glitter in your socks until March.
Wrap-Up: Your Foolproof Christmas Tree Decorating Formula
If you’re ever unsure what to do next, remember this easy order: fluff → lights → ribbon/garland → big ornaments → smaller ornaments → fillers → topper → base. Stick to a simple color plan, add depth by placing some décor inside the branches, and step back often. That’s how you get a Christmas tree that looks cohesive, full, and joyfully “finished.”