Table of Contents >> Show >> Hide
- Why a Torii Gate Works So Well in Minecraft
- 1. Build a Minimalist Starter Torii Gate
- 2. Build a Classic Red Torii Gate
- 3. Build a Cherry Grove Torii Gate
- 4. Build a Weathered Bamboo and Deepslate Torii Gate
- 5. Build a Giant Overwater Torii Gate
- Common Mistakes That Make a Torii Gate Look Off
- Final Thoughts on Building a Torii Gate in Minecraft
- Builder Experiences: What Creating Torii Gates in Minecraft Actually Feels Like
If your Minecraft world has ever looked a little too square, too beige, or too much like a warehouse with emotional baggage, a torii gate can fix that fast. A torii gate is simple in shape, dramatic in silhouette, and perfect for turning an ordinary path, shrine, garden, or lake into a place that feels intentional. In other words, it is the architectural equivalent of putting on a really good jacket.
In traditional Japanese design, a torii is a gateway made with two upright posts and horizontal crossbeams. In Minecraft, that clean structure translates beautifully because the game rewards bold outlines, contrast, and symmetry. Even better, modern Minecraft gives builders more tools than ever for Japanese-inspired builds, especially with cherry wood, bamboo, pink petals, terracotta, and clean color-heavy blocks.
This guide covers five ways to build a torii gate in Minecraft, from tiny starter builds to huge showpiece designs. You will also learn which materials work best, how to match your build to the surrounding biome, and how to avoid common mistakes that make a torii gate look less “sacred landmark” and more “two fence posts having a disagreement.”
Why a Torii Gate Works So Well in Minecraft
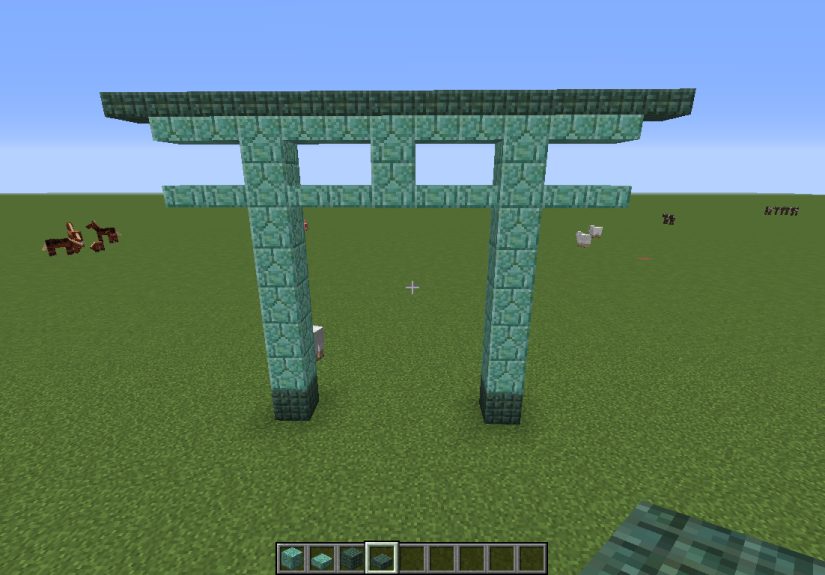
A torii gate is one of the best Minecraft decorative builds because it does a lot with very little. It is basically a silhouette-first structure: two pillars, one main beam, one secondary beam, and sometimes a curved or layered top. That means you do not need hundreds of rare materials to make it look good. You just need smart proportions.
It also fits several popular Minecraft styles. A torii gate can anchor a Japanese Minecraft build, decorate a cherry grove base, frame a bridge, mark the entrance to a village, or stand dramatically in shallow water. Since Minecraft 1.20 added cherry groves and expanded bamboo building options, it has become much easier to create peaceful, shrine-like areas with pink and green accents. If you want stronger colors, red concrete gives you that classic bold look, while terracotta adds texture and a more weathered finish.
The big secret is this: a torii gate looks best when it feels like it belongs somewhere. Build one with a purpose. Let it begin a path, lead toward a pagoda, frame a mountain view, or guard the route to your enchanting room. Random gate in a flat field? Fine. Gate leading to something mysterious? Chef’s kiss.
1. Build a Minimalist Starter Torii Gate
Best for early survival worlds
If you are just starting out and do not yet have stacks of fancy blocks, this is the easiest torii gate design to build. The goal is not museum-level authenticity. The goal is to create a strong, readable shape with cheap materials and zero drama.
Use stripped spruce logs, dark oak logs, or even regular oak if that is what your survival world has available. For the top beam, slabs and stairs help create a slightly layered look without needing a complicated block palette. This build works especially well at the entrance to a farm, starter house, or village path.
Recommended blocks
- 2 upright logs or stripped logs
- 1 main top beam using planks or logs
- 1 lower crossbeam using slabs
- Optional lanterns, trapdoors, or stone path blocks nearby
How to build it
- Place two pillars about 3 to 5 blocks apart.
- Make each pillar 4 to 6 blocks tall.
- Add a main horizontal beam that extends one block beyond each pillar.
- Place a second, thinner beam one block below the top beam.
- Use slabs or stairs on top to soften the outline and add depth.
This small torii gate is proof that good Minecraft design is mostly about proportion. Keep the posts thick enough to feel grounded, but do not overbuild it. A tiny path marker should not look like it is preparing to host a boss fight.
2. Build a Classic Red Torii Gate
Best for iconic shrine-style builds
If you want the version most players recognize instantly, go with a classic red torii gate. The strong red-and-black contrast pops in almost any biome and looks especially good near stone steps, gravel paths, lanterns, ponds, and cherry trees. This is the build most people picture when they search for a Minecraft torii gate tutorial.
Red concrete is the cleanest choice if you want a bold, modern finish. If you prefer texture, red terracotta or glazed terracotta accents can make the build feel older and more handcrafted. Blackstone, deepslate, or nether brick work beautifully for the top caps and contrast lines.
Recommended blocks
- Red concrete or red terracotta for the main body
- Blackstone, deepslate, or nether brick for trim
- Stone stairs and lanterns for the approach path
- Pink petals, azalea bushes, or bamboo around the base
How to build it
- Build two red pillars 6 to 8 blocks tall.
- Cap the tops with dark trim to give the structure more weight.
- Add a thick top beam that extends 1 to 2 blocks past both posts.
- Place a second beam slightly lower and narrower.
- Use stairs or slabs to create a subtle upward flare at the edges.
The key to this version is contrast. If everything is the same red block, the structure can look flat. Add a darker band near the tops, a shadow line beneath the main beam, and a path that leads somewhere important. Suddenly your gate stops being decoration and starts feeling like an entrance.
3. Build a Cherry Grove Torii Gate
Best for peaceful, scenic Minecraft worlds
Thanks to cherry groves, Minecraft finally has a biome that practically begs for a torii gate. Pink petals falling through the air, cherry wood nearby, mountain terrain, and soft colors everywhere? The game is basically whispering, “Build something pretty here.”
This version leans into atmosphere. Instead of going fully traditional red, use cherry wood with darker accents such as stripped dark oak, spruce, or deepslate. The result feels softer, more natural, and perfectly matched to the biome. You can also place the gate at the top of stone stairs or beside a pond with lily pads and lantern reflections for maximum main-character energy.
Recommended blocks
- Cherry logs, cherry planks, and cherry stairs
- Dark oak, spruce, or deepslate trim
- Pink petals, moss, lanterns, and stone bricks nearby
- Bamboo fences or trapdoors for detail work
How to build it
- Set the posts slightly wider than the minimalist version for a more graceful shape.
- Use cherry logs vertically so the color reads clearly from a distance.
- Add a layered top beam using stairs and slabs to soften the profile.
- Surround the base with petals, stone edging, and a curved path.
- Frame the gate so that it reveals a mountain, tree, or shrine behind it.
This is less about raw structure and more about setting. A cherry grove torii gate looks best when the landscape participates. Let petals spill onto the path. Add elevation changes. Tuck in some lanterns. The gate should feel like the biome grew around it instead of being dropped in by a builder who had three stacks of cherry planks and a dream.
4. Build a Weathered Bamboo and Deepslate Torii Gate
Best for rustic or overgrown shrine builds
If you want a torii gate that looks older, quieter, and a little mysterious, skip the bright polished style and build with bamboo and dark stone. Bamboo is a fantastic material in modern Minecraft because it brings a warm, natural tone without looking like standard oak or birch. Pair it with deepslate, blackstone, or mossy stone and you get a gate that feels like it has stood there for years, waiting for some brave player to follow the path beyond it.
This style works especially well in jungle edges, lush gardens, mountain temples, and hidden pathways. It also looks amazing with vines, moss carpets, coarse dirt, and uneven stone steps. Basically, if your build vibe is “forgotten shrine with suspiciously good lighting,” this is your winner.
Recommended blocks
- Bamboo blocks, stripped bamboo blocks, or bamboo planks
- Deepslate bricks, blackstone, or stone brick accents
- Moss, vines, lanterns, and coarse dirt
- Optional campfires hidden under leaf blocks for misty atmosphere
How to build it
- Use bamboo or stripped bamboo for the vertical supports.
- Add a darker stone beam or trim line to break up the color.
- Build an uneven path with mossy or cracked blocks nearby.
- Decorate asymmetrically with leaves, vines, and stones.
- Keep the structure simple so the aging details do the storytelling.
Do not make this design too neat. The whole point is texture. Let one side have more moss than the other. Use a few cracked bricks. Add a small pond, reeds, or bamboo stalks nearby. A weathered torii gate should look like it has history, even if that history is technically “you built it last night while eating chips.”
5. Build a Giant Overwater Torii Gate
Best for dramatic landmark builds
This is the showoff build, and honestly, sometimes that is healthy. A giant torii gate standing in shallow water or at the edge of a lake creates one of the most dramatic silhouettes you can make in Minecraft. It is perfect for a central server landmark, a shrine island, or the entrance to a major base. If your regular torii says, “Welcome,” this one says, “Please admire my commitment.”
The trick here is scale control. Big builds can go wrong fast when every block is enlarged without adjusting the proportions. Keep the pillars thick, but not absurdly chunky. Make the upper beam dominant. Use stairs, slabs, and trapdoors to stop huge flat surfaces from looking like billboard panels.
Recommended blocks
- Red concrete, red terracotta, or red wool for the main color
- Blackstone, deepslate, or nether brick trim
- Stone or prismarine details for a shoreline approach
- Lanterns, reflection pools, and a long bridge or dock
How to build it
- Start with a wide base and measure both sides before building upward.
- Make the main pillars tall enough to dominate the shoreline.
- Use layered beam construction to create depth from a distance.
- Place it in shallow water or just off the coast for reflection.
- Add a viewing path or bridge so players approach it head-on.
This style thrives on presentation. Face it toward sunrise. Frame it with mountains. Put lanterns behind it at night. Give players a reason to walk toward it slowly. You are not just building a gate here; you are staging a reveal.
Common Mistakes That Make a Torii Gate Look Off
1. The posts are too close together
If the structure feels cramped, widen the gap. Torii gates need breathing room.
2. The beam does not extend past the posts
The overhang matters. Without it, the gate loses that unmistakable silhouette.
3. Everything is one texture
Even a clean build needs contrast. Use a second block for trim, shadow lines, or caps.
4. The gate leads nowhere
A torii gate should mark a transition. Connect it to a path, temple, pond, bridge, courtyard, or hill shrine.
5. The surroundings are ignored
A great torii gate is half structure, half landscaping. Use petals, lanterns, stairs, moss, bamboo, and water to sell the mood.
Final Thoughts on Building a Torii Gate in Minecraft
The best thing about building a torii gate in Minecraft is that it works at almost every scale. You can make one in ten minutes using starter materials, or spend a whole weekend crafting a massive shrine entrance with custom landscaping, layered paths, and a cherry grove backdrop worthy of a screenshot folder you absolutely swear you will organize one day.
If you want the easiest route, go minimalist. If you want the iconic look, go red concrete with dark trim. If you want something peaceful, cherry wood is your friend. If you want atmosphere, weathered bamboo and deepslate are a fantastic pair. And if you want to make the entire server say “okay wow,” build the giant overwater version and enjoy your well-earned pixel glory.
Whichever style you choose, remember this: the torii gate is not just a build. It is a frame for the space around it. Make the approach beautiful, make the destination meaningful, and your Minecraft world will instantly feel richer, calmer, and a little more legendary.
Builder Experiences: What Creating Torii Gates in Minecraft Actually Feels Like
The funny thing about building torii gates in Minecraft is that the first one usually takes ten minutes, and the second one somehow turns into a full landscaping project with custom stairs, lantern spacing, a pond, three cherry trees, and a path so pretty you start walking slowly through your own base like you are in a cinematic trailer. That is the trap. A very peaceful, very pink trap.
One of the best experiences with this kind of build is how quickly it changes the mood of an area. A basic path is just a path. Add a torii gate at the entrance, and suddenly it feels like a destination. Even if the path only leads to your storage room, it now feels like a sacred chamber of great importance instead of the place where you panic-dump cobblestone and rotten flesh. The transformation is weirdly powerful for a structure that is mostly just posts and beams.
Another thing players notice is how much torii gates teach proportion. In Minecraft, a lot of builds go wrong because they are too flat, too bulky, or too random. Torii gates force you to think about silhouette. You start paying attention to overhang, spacing, trim, and height. Then that skill sneaks into the rest of your builds. Suddenly your houses look cleaner, your bridges look smarter, and your decorative details stop looking like blocks placed by a raccoon with redstone access.
Biome choice also changes the whole experience. Building in a cherry grove feels soft and intentional, with petals and pink tones doing half the aesthetic work for you. Building in a jungle or bamboo-heavy area feels more ancient and hidden. Building over water feels dramatic, especially at sunrise or sunset when the reflection makes the structure seem twice as large. Even snowy areas can work if you want a striking color contrast. A torii gate is one of those rare builds that can feel peaceful, majestic, or mysterious depending on where you place it.
There is also a nice balance between creativity and accessibility. You do not need to be a mega-builder to make a torii gate look good. New players can build a simple version almost immediately, while experienced builders can obsess over every slab, stair, and landscaping trick around it. That makes it one of the most satisfying decorative projects in the game. Low barrier to entry, high ceiling for style. Minecraft in a nutshell, really.
And then there is the screenshot factor. Let us be honest: torii gates photograph beautifully in Minecraft. They frame mountains, ponds, shrines, lantern paths, and cherry trees like they were designed by the world’s most patient art director. A good torii gate gives your build a focal point, which is why so many players end up making more than one. One becomes three. Three becomes a whole shrine district. Next thing you know, you are naming sections of your base and pretending you always intended to create a cultural landmark district. Sure you did.
In the end, the experience of building a torii gate in Minecraft is satisfying because it combines structure, atmosphere, and storytelling. It is not just about stacking blocks. It is about creating a threshold. A place that says, “something begins here.” That is a pretty magical feeling in a game built entirely out of cubes.