
Table of Contents >> Show >> Hide
- What Is 3D-Printed Mirror Fabric?
- Why Makers Are Obsessed With It
- How the Technique Works
- Materials and Tools
- Design Choices That Actually Matter
- A Practical Workflow That Keeps Your Printer (and Mirrors) Happy
- Joining Swatches Into Real, Wearable Panels
- Troubleshooting: Because Reality Always Shows Up
- How Mirror Fabric Fits Into the Bigger 3D-Printed Textile World
- Project Ideas That Don’t Require a Runway (But Might Cause One)
- Conclusion: Sparkle, But Make It Printable
- Maker Experiences: What It Feels Like to Build 3D-Printed Mirror Fabric
Sequins are fun… until you realize they shed like a glittery golden retriever and somehow end up in your keyboard, your snacks, and (mysteriously) your soul.
If you want the sparkle without the craft-store confetti explosion, meet the coolest middle ground between textiles and plastic wizardry:
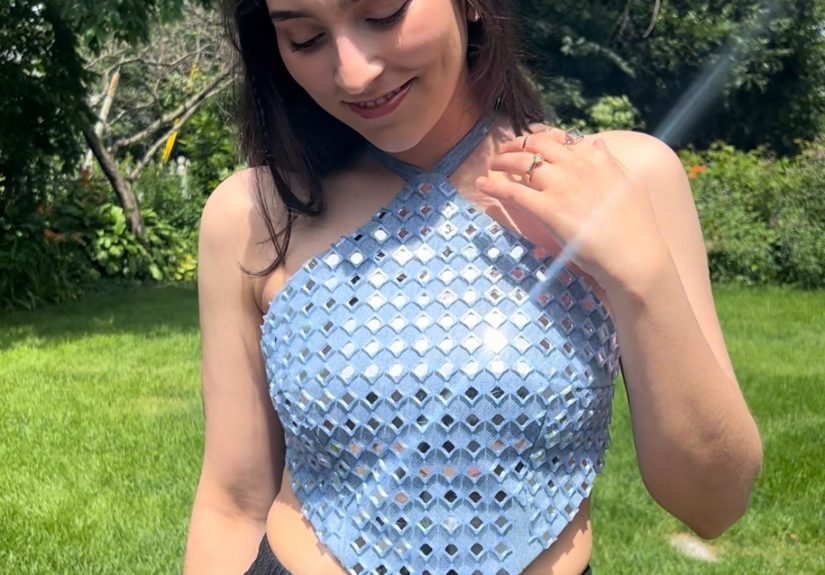
3D-printed mirror fabrica flexible mesh-and-mirror “cloth” created by pausing a 3D print mid-flight, dropping in tiny mirrors, and letting your printer do the rest.
This technique, popularized in the maker-fashion world, blends a few smart ideas into one surprisingly approachable project:
print a thin, tileable pattern; “sandwich” a piece of mesh inside the layers; and embed little reflective mirrors so the finished sheet catches light like you’re wearing a pocket-sized disco ball.
The results can look delicate and couture, but the process is wonderfully garage-friendly.
What Is 3D-Printed Mirror Fabric?
3D-printed mirror fabric is a hybrid material: part printed polymer, part traditional textile, part “wait, how did you do that?”
The basic structure is a printed lattice (often PLA or PETG) that mechanically locks onto a nylon or polyester mesh.
During the print, you pause at specific layers to place small craft mirrors into recessed pockets.
When printing resumes, the next layers capture those mirrors so they sit securely while still letting the overall sheet flex with the mesh.
If the phrase “mirror embroidery” rings a bell, it should. The inspiration for mirror-in-fabric decoration has deep roots in traditional textile work (including mirrorwork techniques used in South Asian embroidery).
This 3D-print version is essentially the maker-era remix: instead of stitching mirrors down, you print the structure that holds them.
Why Makers Are Obsessed With It
- It’s dramatic. Even a small swatch throws light like a stage costume.
- It’s modular. You can print tiles and assemble them into larger pieces.
- It’s approachable. The materials are common: mesh, small mirrors, basic filament.
- It’s customizable. Color, mirror shapes, layout density, and drape are all adjustable.
- It’s a gateway craft. Once you do one “pause-and-embed” print, you start imagining embedding everything (not recommended: snacks).
How the Technique Works
There are two popular approaches to mirror fabric construction, both based on the same core trick:
print → pause → place materials → resume.
The difference is when the mesh and mirrors get added.
Method 1: Single Pause (Mirrors Face Down)
This is the simpler workflow. The print runs nearly to the end, then pauses at the second-to-last layer.
You place the mirrors face down (mirror side toward the bed), lay the mesh over everything, secure it, and resume.
The top layer closes the sandwich.
Method 2: Two Pauses (Mesh First, Mirrors Face Up)
This approach is slightly more involved but offers different visual and structural results.
You pause early (often around layer two) to place and secure the mesh first.
Laternear the second-to-last layeryou pause again to place the mirrors face up (mirror side toward you), then resume to lock them in.
It’s a neat way to control which side becomes the “hero” sparkle surface.
Either way, the mesh is doing a lot of heavy lifting. The printed plastic bonds to itself through the openings of the mesh,
creating a mechanical interlock that’s more reliable than simply “printing on top of fabric and hoping.”
Materials and Tools
What You’ll Need
- Mesh fabric (nylon or polyester): Choose a mesh with minimal stretch for easier placement and cleaner results.
- Craft mirrors: Small round mirrors are common; mixing sizes can create a more textured, jewelry-like look.
- Filament: PLA works; PETG can add toughness; flexible filaments can help with comfort depending on your pattern and printer.
- Adhesive for the bed: Many makers use glue stick (especially if you’re printing a thin lattice).
- Magnets or tape: For securing mesh during the pause (magnets are popular if your bed setup supports them).
Helpful Extras
- Plastic scraper for careful removal
- Tweezers for mirror placement
- Small scissors for trimming mesh
- UV resin or fabric-safe adhesive for joining tiles cleanly
Design Choices That Actually Matter
1) Mirror Pocket Fit: Snug Beats “Hopeful”
The mirrors should sit in pockets that are tight enough to prevent shifting, but not so tight you crack the mirror or distort your print.
If you’re designing your own pattern, prototype a tiny test swatch first.
A tenth of a millimeter in clearance can be the difference between “luxury sparkle” and “why is my nozzle screaming?”
2) Mesh Stretch: Your Secret Enemy
Stretchy mesh moves during placement and can pull your pattern out of alignment as the print resumes.
Less-stretch mesh tends to yield cleaner, more repeatable resultsespecially for tileable swatches.
3) Filament Choice: Shine vs. Strength vs. Comfort
PLA can look crisp and print cleanly, which helps fine lattice details.
PETG can be more impact resistant for accessories that get handled.
And flexible materials (like TPU) can improve comfort for wearablesthough they can be trickier to print and may reduce the “snap” of sharp lattice detail.
4) Pattern Geometry: The Drape Is in the Joints
“Fabric-like” behavior comes from geometry, not magic.
More hinges, thinner bridges, and repeating cells generally increase flexibility.
This is the same idea behind many famous 3D-printed textile experimentssome look like chainmail, others behave like articulated cloth.
If you want softness and drape, design for movement at small scales.
A Practical Workflow That Keeps Your Printer (and Mirrors) Happy
- Cut mesh to bed size so it lays flat with minimal wrinkles.
- Slice your model with planned pauses (one near the end, or twoearly and latedepending on method).
- Prep your bed the way you normally would for thin parts (adhesion matters a lot here).
- Start the print and stay nearbypause timing is not a “check later” moment.
-
At the pause:
- Move the nozzle safely out of the way (if your printer doesn’t automatically).
- Place mirrors carefully into their pockets.
- Lay mesh flat and secure it. Keep magnets/tape out of the nozzle’s travel path.
- Resume and watch the first few passes to confirm nothing shifts.
- Finish, remove, and clean up stringing or stray filament that might obscure mirror surfaces.
Joining Swatches Into Real, Wearable Panels
A single tile is fun. A dozen tiles is fashion.
The maker-friendly trick is to design swatches that “tile” cleanlystraight edges, consistent cell geometry, and predictable repeat patterns.
When joining them, you can:
- Sew swatches onto a base fabric (denim, canvas, or a stable knit) for comfort and support.
- Glue swatches edge-to-edge using a flexible adhesive.
- Use UV resin sparingly for a cleaner seam in non-flex-critical zones (great for structured accessories or decorative panels).
A nice design mindset is to treat mirror fabric like appliqué: it doesn’t have to be the whole garment.
A front panel, a neckline accent, a belt, a pocket flap, or a bag face can deliver maximum wow with minimal “I am now wearing plastic armor” energy.
Troubleshooting: Because Reality Always Shows Up
Problem: The mesh shifts when the print resumes
- Use less-stretch mesh and cut it larger so it can be anchored flat.
- Secure at corners and edges, but keep fasteners out of the nozzle’s path.
- Lower print speed on the first layer after resuming.
Problem: Mirrors don’t sit flat (or pop out)
- Adjust pocket tolerances and test with your exact mirror batch (yes, mirror sizes vary).
- Confirm pause height is correcttoo early and you’ll collide; too late and you won’t capture.
- Ensure the next layer actually bridges and retains the mirror edge.
Problem: Filament strings across the mirror face
- Reduce stringing via retraction tuning and temperature optimization.
- After printing, carefully remove wisps with fine tweezers or a soft tool that won’t scratch the mirror.
Problem: The fabric feels stiff
- Increase the number of joints or reduce bridge thickness in the pattern.
- Try a different mesh density (more openings often increases flexibility).
- Consider PETG/TPU blends of geometry and material strategy (rigid structure in small parts can still drape if designed correctly).
How Mirror Fabric Fits Into the Bigger 3D-Printed Textile World
Mirror fabric is part of a larger trend: makers and engineers trying to get “cloth behavior” out of printers that fundamentally want to make rigid objects.
There are a few major approaches:
Printed-Only Textiles (Chainmail, Links, Hinges)
These designs are all geometry. Think interlocking pieces, hinge triangles, or flexible bridge networks.
Iconic examples of this direction include articulated garments built from thousands of connected elementsproof that “fabric-like motion” can be engineered.
Printed-On-Textile Hybrids (Mesh + Polymer)
This is the mirror fabric lane: let the textile provide softness and stability, and let the print provide structure, decoration, and function.
Printing onto tulle, net, or lace has been popular for years because the holes allow the plastic to lock in mechanically.
Industrial Direct-to-Textile Printing
On the high-end side, companies have built systems that print directly onto garments and textiles with specialized processes and materials.
This is where you’ll see multi-material, full-color, and texture-rich effects intended for fashion and product designamazing, but not exactly “weekend hobby budget.”
Project Ideas That Don’t Require a Runway (But Might Cause One)
- Cosplay accents: wing panels, armor trim, magical collars, or reflective cuffs.
- Bags: a structured front panel that throws heart- or circle-shaped highlights under strong light.
- Stage and dance costumes: sparkle that reads from a distance without the weight of heavy beadwork.
- Home decor: a framed mirror-fabric patch as wall art (yes, it can be that simple).
- Wearable tech: place LEDs behind mesh for an extra glow-through sparkle effect (mesh can add diffusion and a silvery shimmer under light).
Conclusion: Sparkle, But Make It Printable
3D-printed mirror fabric sits in a sweet spot: it’s visually loud (in a good way), technically interesting, and surprisingly doable with common tools.
It also teaches a skill you’ll reuse constantlypause-and-embed printingwhich opens the door to all kinds of hybrid materials and wearable experiments.
Start with a small swatch, tune your pauses, and don’t be afraid to iterate.
The first successful tile is the moment you’ll look at your printer and think, “Okay… you and I are going places.”
Maker Experiences: What It Feels Like to Build 3D-Printed Mirror Fabric
If you’re expecting a calm, meditative crafting session, 3D-printed mirror fabric will politely laugh and then hand you a stopwatch.
The “experience” of making this material is less like knitting by a fireplace and more like a tiny stage production where you are the director,
the stagehand, and the emergency technicianbecause the print pauses and the clock is ticking.
The first moment you realize you have to physically interact with a running print can be weirdly thrilling.
You’re used to slicing, hitting start, and walking away (or at least pretending you can).
With mirror fabric, you stay close, listening for that pause like it’s your favorite song coming on the radio.
When it finally stops, you suddenly move with the delicate precision of a surgeon who has had exactly one cup of coffee:
mirrors in one hand, tweezers in the other, trying not to breathe too aggressively at the mesh.
Most makers report that the first attempt is “educational,” which is a polite word for “I learned three new ways a mesh can wrinkle.”
Mesh wants to curl. Mesh wants to scoot. Mesh wants to become a parachute if your ceiling fan is on.
The win comes when you figure out your personal rhythm: how you cut it, how you anchor it, where you place magnets or tape,
and how you keep everything out of the nozzle’s travel path.
Once you get that down, the workflow stops feeling chaotic and starts feeling like a repeatable technique.
The mirror placement phase is its own mini-game.
You’ll discover that craft mirrors are not all created equalsome are thicker, some have slightly different diameters, and some appear to have been cut by a gremlin with confidence issues.
A common experience is printing a gorgeous swatch… and realizing one mirror is sitting a hair too high, like a single popcorn kernel refusing to cooperate.
That’s usually when makers learn to test-fit mirrors before the “real” print, and to treat tolerances as a featurenot a suggestion.
Then comes the most satisfying part: when the print resumes and you watch the first few lines lay down cleanly.
If nothing shifts, it feels like the universe has briefly approved your choices.
When it finishes, the reveal is genuinely funpeeling up a flexible sheet that looks like it belongs in a fashion tech exhibit.
Many people describe the first successful swatch as “ridiculously sparkly” in person, because mirrors behave differently than shimmer filament:
they throw real reflections, not just surface sheen.
Assembly is where you start thinking like a designer.
Tiling swatches into bigger panels feels a little like quiltingexcept your “fabric squares” are printed plastic lace with embedded mirrors.
Makers often experiment with a few joining strategies before choosing a favorite.
Sewing is forgiving and wearable; gluing can be fast; resin seams can look clean but require thoughtful placement so you don’t create a stiff strip right where you want drape.
The best experience is when you stop chasing perfection and start chasing “good enough to wear,” because the sparkle will do a lot of heavy lifting anyway.
Finally, you’ll probably end up with a new habit: looking at everyday materials and thinking,
“Could I sandwich that into a print?” It’s the mirror-fabric side effect.
And honestly, it’s a good onebecause it’s the mindset that turns a printer from a plastic part machine into a textile experiment lab.






