
Table of Contents >> Show >> Hide
- Before You Reinstall Windows XP
- Way 1: Reinstall Windows XP from Inside Windows
- Way 2: Boot from the Windows XP CD
- Way 3: Use the Manufacturer’s Recovery Partition or Recovery Media
- What to Do After Reinstalling Windows XP
- Common Mistakes to Avoid
- Real-World Experiences Reinstalling Windows XP
- Conclusion
- SEO Tags
Reinstalling Windows XP in 2026 is a bit like polishing a classic car: it can still be useful, but you do it for a reason. Maybe you have a legacy machine that runs old accounting software, a factory workstation tied to ancient hardware, or a family dinosaur of a PC that refuses to retire with dignity. Whatever the reason, reinstalling Windows XP can still bring an old system back to life, provided you do it carefully, legally, and with realistic expectations.
The trick is choosing the right reinstall method. Some approaches try to preserve your programs and files. Others wipe the slate clean and give you that “new computer” feeling, minus the smell of fresh plastic. And if your old PC came from Dell, HP, Lenovo, or another major manufacturer, you may also have a factory recovery option hiding in plain sight. In this guide, we’ll walk through three ways to reinstall Windows XP, explain when each one makes sense, and show you how to avoid the classic mistakes that turn a repair job into a weekend-long drama.
Before You Reinstall Windows XP
Before you touch a setup disc, recovery partition, or mysterious OEM restore menu, stop and do the boring grown-up part first: prepare. Reinstalling Windows XP without preparation is like jumping out of a plane and then asking where the parachute is. Technically memorable, but not ideal.
What You Should Have Ready
- A legitimate Windows XP installation CD or your computer maker’s recovery media
- Your 25-character product key, if your reinstall method requires it
- A backup of personal files such as documents, photos, email archives, browser bookmarks, and anything else you’d cry about later
- Drivers for your motherboard, graphics, audio, network, printer, and other important hardware
- Your program installers or license information for software you plan to reinstall
Know What Each Method Does
Not every reinstall method behaves the same way. An in-place reinstall started from inside Windows can refresh system files while keeping much of your setup intact. A repair install from the XP CD can help if Windows is damaged or unstable but still recognized by setup. A clean install wipes the system partition and starts over. Factory recovery usually returns the PC to its original out-of-the-box condition, which sounds nice until you remember it may also restore all the trialware that came bundled in the first place.
Back Up First, Even If You “Probably Won’t Need To”
That sentence has launched many sad evenings. Even if you plan to use a repair-style reinstall, there is always some risk. Hard drives fail, partitions get selected incorrectly, and one overconfident click can turn “I’m just refreshing Windows” into “Where did my files go?” If the machine still boots, copy your data to an external drive, USB stick, CD, network share, or another safe location before you begin.
Way 1: Reinstall Windows XP from Inside Windows
This method works best when Windows XP still starts normally and you want to refresh the operating system without doing a full wipe. Think of it as the least dramatic reinstall option. If the system is sluggish, corrupted, or missing important components but still boots to the desktop, starting setup from within Windows can be a practical first move.
When This Method Makes Sense
- XP still boots into the desktop
- You want to keep the current structure of the machine as much as possible
- You suspect damaged Windows files but not a dead hard drive
- You have the correct XP installation CD that matches your edition and licensing type
How to Do It
- Start Windows XP normally.
- Insert the Windows XP installation CD.
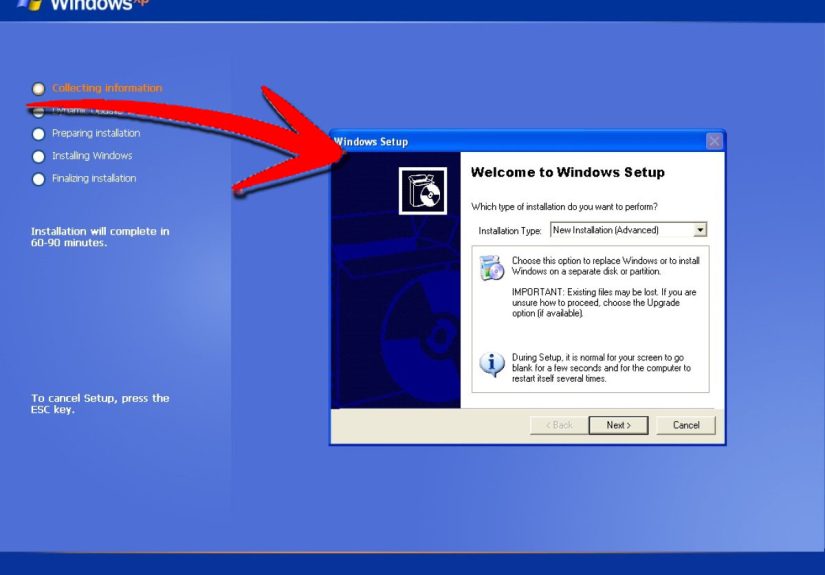
- When the setup menu appears, choose Install Windows XP.
- On the setup screen, select Upgrade (Recommended) if that option appears for your situation.
- Accept the license agreement.
- Enter your product key if prompted.
- Follow the on-screen instructions and let setup reinstall Windows files.
This type of reinstall can preserve a lot of your existing environment, which is why many people prefer it when XP still loads. You are not starting from zero, and you may avoid reinstalling every single program under the sun. That said, this is not magic. If the hard drive is failing, if the registry is badly damaged, or if malware has thoroughly trashed the machine, this softer approach may not solve the real problem.
Pros
- Least disruptive of the three methods
- Often keeps files, settings, and many installed programs intact
- Good first step when the system still boots
Cons
- Won’t fix every deep system problem
- Requires a compatible XP disc and product key
- Can fail if the installation is already badly damaged
Way 2: Boot from the Windows XP CD
If Windows XP will not boot properly, crashes during startup, or acts like it’s auditioning for a horror movie, booting from the CD is usually the smarter path. This method gives you two routes: a repair install or a clean install. They are very different, and mixing them up is one of the easiest ways to make a mess.
Option A: Repair Install from the XP CD
A repair install is useful when you want to keep programs and data but replace damaged Windows system files. It is a favorite move for corrupted startup files, broken services, or registry trouble that prevents normal operation.
How to Do a Repair Install
- Insert the Windows XP CD and restart the computer.
- If needed, enter the BIOS or boot menu and set the computer to start from the CD drive.
- When you see Press any key to boot from CD, press a key.
- At the first setup screen, press Enter to set up Windows XP. Do not choose the first R option if your goal is a repair install of the full operating system.
- Press F8 to accept the license agreement.
- Setup will search for existing Windows installations.
- Select your current Windows XP installation, then press R to repair it.
- Follow the prompts as setup reinstalls Windows XP.
That detail about the two different repair paths matters a lot. The first R leads to the Recovery Console, which is a command-line repair environment. The second R, after setup finds your XP installation, is the one used for an actual repair install. Many people choose the wrong one, then wonder why they’re staring at a black screen asking for commands like it’s suddenly 1999.
Option B: Clean Install from the XP CD
If the system is severely corrupted, infected, cluttered beyond recognition, or you simply want a fresh start, a clean install Windows XP approach is the nuclear option. It is also often the most effective one. Clean installs erase the existing Windows partition, create or reuse a partition, format it, and install a fresh copy of XP.
How to Do a Clean Install
- Boot from the Windows XP CD.
- Press Enter at the setup screen.
- Press F8 to accept the license agreement.
- Select the existing Windows partition.
- Delete the old partition if you truly want a full wipe.
- Create a new partition if needed.
- Choose a file system, usually NTFS, and format the partition.
- Let setup copy files and restart.
- Follow the remaining prompts for region, time, network, and user information.
This is the most thorough reinstall method, but it is also the most destructive. If your data is not backed up, this is the point where your future self begins forming opinions about your past self. The upside is that a clean install can remove years of clutter, broken drivers, strange startup junk, and mystery problems with one decisive reset.
Pros of the CD Boot Method
- Works even when XP won’t boot normally
- Lets you choose between repair and full clean install
- Best option for serious corruption or a fresh start
Cons of the CD Boot Method
- You may need to change BIOS boot order
- Requires the correct installation media
- A clean install removes existing data unless backed up first
Way 3: Use the Manufacturer’s Recovery Partition or Recovery Media
If your computer originally shipped with Windows XP preinstalled, there’s a good chance the manufacturer gave you a restore path that returns the machine to factory condition. This was common on older systems from major brands. Instead of using a generic Microsoft XP CD, you use the PC maker’s recovery partition, recovery discs, or recovery utility.
How This Method Usually Works
The exact process depends on the brand and model. On some older Dell systems, factory restore tools were launched with a keyboard shortcut during startup. Some HP systems used an F11 recovery path. Certain Lenovo systems used OneKey Recovery or a dedicated recovery button or menu. Acer models often relied on a recovery partition and model-specific startup key combinations. In all cases, the idea was the same: restore the computer to the software state it had when it first left the factory.
When This Method Is a Good Choice
- You do not have a standard Windows XP installation disc
- The machine is an OEM desktop or laptop from a major brand
- You want the original drivers and bundled utilities restored automatically
- You are okay with the machine going back to factory condition
The Basic Process
- Restart the computer.
- Watch the screen carefully for the manufacturer’s recovery prompt.
- Press the required key or key combination.
- Select the option to restore or recover the operating system.
- Confirm that you want to continue.
- Let the recovery tool restore the factory image.
This method can be surprisingly convenient because it often handles drivers for you. On the other hand, factory recovery may reinstall old bundled software, trial programs, and utilities that you never asked for in the first place. It’s efficient, but it can also feel like inviting 2005 back into your house and discovering it brought coupons, toolbars, and a suspicious media player.
Pros
- Great for OEM systems with no retail XP disc
- Usually restores drivers and manufacturer tools automatically
- Often simpler than manual installation
Cons
- Restores factory junk along with factory goodness
- Recovery partitions may be missing or damaged
- Key combinations vary by model, so guessing is not a strategy
What to Do After Reinstalling Windows XP
Once Windows XP is back, the job is only half done. A fresh reinstall without follow-up steps is like building a sandwich and forgetting the filling.
Restore Drivers First
Start with the chipset, video, network, and audio drivers. If XP cannot see the network adapter, downloading other drivers becomes annoyingly adventurous. If you prepared a driver folder on a USB stick or disc before reinstalling, this is the moment you congratulate yourself.
Reactivate If Required
Some reinstalls will ask for activation again. Make sure your edition of XP matches your product key. OEM media, retail discs, and volume-license media were not always interchangeable, and this is where many reinstalls hit an unnecessary wall.
Restore Your Data Carefully
Copy back only the files you actually need. A reinstall is a good chance to leave behind junk folders, duplicate installers, and the 87 desktop icons that formed their own local government.
Be Realistic About Security
Windows XP is a legacy operating system. If you must use it, the safest choice is to keep it offline or on a tightly controlled network for a specific purpose. It is fine for an old CNC controller, retro gaming box, or legacy accounting tool. It is not ideal as your main internet machine unless you enjoy living dangerously and explaining malware to yourself.
Common Mistakes to Avoid
- Choosing the wrong repair option: remember, the first R is Recovery Console, not the full repair install.
- Skipping backups: this mistake remains undefeated.
- Using the wrong disc: an XP Home key will not magically love an XP Professional disc.
- Forgetting boot order: if the PC keeps loading the hard drive, it is not ignoring you; it is following BIOS settings.
- Ignoring drivers: after reinstalling XP, missing network or storage drivers can make the machine feel broken again.
Real-World Experiences Reinstalling Windows XP
Anyone who has reinstalled Windows XP on old hardware knows the experience is half technical procedure, half archaeology. You’re not just reinstalling an operating system; you’re reopening a time capsule. First there’s the physical part: the beige tower with dust in places dust should not exist, the optical drive that sounds like it is preparing for takeoff, and the monitor that needs a good ten seconds to remember how brightness works. Then comes the emotional part, where you discover a folder called Stuff New inside another folder called Stuff Old, both last modified sometime during an era when everyone thought custom mouse pointers were classy.
One of the most common real-world lessons is that the reinstall itself is often easier than the aftermath. Setup might finish in under an hour, but then the true scavenger hunt begins: finding drivers, reconnecting printers, restoring old email files, and convincing a stubborn sound card to make noise again. On legacy machines, the network driver is often the first villain. Without it, the machine becomes a perfectly functional island with no bridge to the internet. That’s why experienced techs usually keep a small stash of XP drivers on removable media before they start. It is not glamorous, but neither is explaining to someone why their “working reinstall” cannot get online.
Another common experience is realizing that factory recovery is both a blessing and a prank. On one hand, it can restore a machine faster than a manual install. On the other, it may bring back software bundles that nobody wanted even when they were new. You click through setup, reboot triumphantly, and suddenly you’re staring at trial antivirus pop-ups, ISP shortcuts, and a media app that behaves like it owns the desktop. It is the software equivalent of cleaning your garage and having the old boxes move back in while you sleep.
There is also the oddly satisfying part. A successful Windows XP reinstall can make an old PC feel dramatically better. Boot times improve, crashes disappear, and the machine suddenly remembers what responsiveness is. For legacy tasks, that matters. A retro gaming system, an old office workstation, or a machine tied to specialized hardware may not need modern features. It just needs to work, quietly and consistently, without throwing errors every twenty minutes like a theatrical actor demanding attention.
Most people who have done this more than once will tell you the same thing: patience beats speed. Read every screen. Label your backups. Check which partition you are formatting. Confirm your product key. Keep your drivers ready. The fastest reinstall is usually the one done carefully the first time. The slowest one is the “I know what I’m doing” reinstall that ends with a long stare at a blank desktop and the dawning realization that the backup folder was on the drive you just erased. Windows XP may be old, but it still has one timeless skill: rewarding careful preparation and punishing overconfidence with almost theatrical flair.
Conclusion
If you need to reinstall Windows XP, the best method depends on what the machine can still do and how much you want to preserve. If XP still boots, reinstalling from inside Windows is the gentlest option. If the system is unstable or won’t start, booting from the XP CD gives you a choice between a repair install and a clean install. And if the PC came from a major manufacturer, the recovery partition or recovery media may be the easiest route back to factory condition.
Whichever path you choose, the fundamentals remain the same: back up your files, use legitimate media, confirm your drivers, and do not rush. Windows XP is old, yes, but old systems can still do useful work when handled properly. Treat the reinstall like a restoration project rather than a panic button, and you’ll get much better results.





