Table of Contents >> Show >> Hide
- Before You Start: Supplies, Sizing, and Safety
- Method 1: The Classic Beaded Safety Pin Cuff (Stretchy and Colorful)
- Method 2: The Delicate Safety Pin Chain Bracelet (Minimalist, Not Bulky)
- Method 3: The Woven or Wrapped Safety Pin Bracelet (Textured, Artsy, and Custom)
- Common Mistakes (and How to Avoid Them)
- Care Tips: Keep It Cute, Keep It Comfortable
- Extra: Real-World “Experience” Notes (What People Commonly Learn After Making These)
- Conclusion
Safety pin bracelets are the perfect “wait… that’s made of what?” accessory. They’re inexpensive, surprisingly comfortable when assembled correctly,
and endlessly customizablemeaning you can make one that looks like high-fashion street style, a nostalgic camp craft, or a delicate little chain piece you’d
swear came from a boutique (until you remember you bought the “boutique” at the grocery store checkout lane).
This guide walks you through three classic ways to make a bracelet using safety pins, with practical tips on sizing, comfort, durability, and
how to avoid the one thing nobody wants: a “fashion statement” that also pokes you like an angry mosquito.
Before You Start: Supplies, Sizing, and Safety
Core supplies you’ll use in at least one method
- Safety pins (small to medium, all the same size for a clean look)
- Seed beads or small pony beads (choose a consistent hole size)
- Elastic beading cord (for stretch bracelets) or chain + jump rings (for clasp bracelets)
- Scissors (and a lighter if you’re sealing cord endsoptional)
- Needle-nose pliers (highly recommended for comfort and security)
- Optional: craft glue, jump ring tool, lobster clasp, ribbon, embroidery floss, washi tape
Quick sizing cheat sheet
Wrap a soft measuring tape (or string) around your wrist where you’ll wear the bracelet. For a snug fit, add about 1/4 inch. For a relaxed fit,
add 1/2 inch. If you’re using elastic, you can keep it slightly snugstretch does the rest.
Safety and comfort rules (so your bracelet doesn’t bite)
- Close every pin fullythen gently squeeze the clasp area with pliers so it stays shut.
- Leave space at the top of each pin so it closes easily. Overstuffed pins pop open and become tiny metal gremlins.
- Use age-appropriate supervision: small beads + sharp pins are not ideal for very young kids.
- Avoid questionable metals if you have sensitivities. If your skin hates costume jewelry, it may also hate bargain-bin pins.
Method 1: The Classic Beaded Safety Pin Cuff (Stretchy and Colorful)
This is the iconic safety pin bracelet: a cuff-like band made from beaded pins linked together on elastic cord. It’s sturdy, comfortable, and
ridiculously customizableteam colors, rainbow gradients, monochrome minimalism, or “I found these beads in a drawer and I’m feeling brave.”
What you’ll need
- 50–100 small safety pins (quantity depends on wrist size and pin size)
- Seed beads (one or multiple colors)
- Elastic beading cord (stretch cord)
- Scissors
- Needle-nose pliers (optional, but strongly recommended)
- Optional: a tiny dab of craft glue for extra security
Step-by-step
-
Plan your color pattern. Try one of these:
- Random mix for a confetti look
- Striped blocks (5 pins per color, repeated)
- Ombre gradient (light to dark across the bracelet)
- Team colors (alternate two colors consistently)
-
Bead the safety pins. Open a pin and slide beads on until it’s almost full, leaving a little room so the pin closes smoothly.
Close it completely. -
Lock them down (comfort hack). Use pliers to gently squeeze the clasp area so it’s less likely to open. If you want extra security,
add a tiny dot of craft glue near the clasp area (not on moving partsdon’t glue your pin shut forever unless that’s your vibe). -
Cut elastic cord. Cut a length that’s several times your wrist measurement so you have room to work and knot securely.
(You can trim later, but you can’t un-cut regret.) -
String the pins onto the elastic. Feed the elastic through the closed-loop ends of the pins, keeping them aligned.
For a flatter cuff, many crafters alternate pin direction (one facing left, next facing right) so the bulk distributes more evenly. -
Build the cuff structure. There are two common builds:
- Single-strand cuff: One elastic strand runs through all pin loops. This is simplest, but can twist if not tensioned well.
- Double-strand cuff: Two elastic strands run parallel (top and bottom), which helps the bracelet sit flatter and feel more “finished.”
- Test fit and adjust. Wrap around your wrist, check comfort, and add/remove pins if needed. The cuff should sit smoothly without gaps.
-
Knot securely. Tie a tight double knot (or surgeon’s knot) and pull snug. If desired, dab a tiny bit of glue on the knot and let dry.
Trim the ends.
Troubleshooting the classic cuff
- Bracelet twists: use two strands of elastic or alternate pin direction.
- Pins feel “pokey”: check each clasp is fully closed and gently squeeze with pliers.
- Elastic knot slips: use a stronger knot, add a tiny glue dot, and leave a slightly longer tail before trimming.
- Beads fall off pins: you’re filling pins too tightly or not closing them fullyleave a small closing gap.
Method 2: The Delicate Safety Pin Chain Bracelet (Minimalist, Not Bulky)
If the cuff bracelet is a loud concert tee, the chain version is a crisp white button-down. This method uses a short piece of chain plus jump rings and a clasp,
with one or more safety pins acting as the focal point. It’s lighter, easier to put on, and gives you that “tiny hardware jewelry” look.
What you’ll need
- 1–3 safety pins (small to medium)
- Chain (a few inches, sized to your wrist)
- Jump rings (small, ideally sturdy/closed style for strength)
- Lobster clasp or spring ring clasp
- Two pairs of pliers (or pliers + jump ring tool)
- Optional: beads to decorate the pin
Step-by-step
-
Measure and cut chain. Aim for your wrist measurement plus a little room for the clasp. If you like a bracelet that drapes a bit, add
1/4–1/2 inch. -
Decide your layout. Options:
- Single-pin centerpiece (one pin in the middle)
- Offset pin (pin sits slightly to one side for a modern look)
- Multi-pin charm row (two or three pins spaced with small rings)
- Add beads to the safety pin (optional). Open the pin, slide on a few beads, then close it. Keep it lightthis style is meant to be delicate.
-
Attach the safety pin to the chain with jump rings. Open a jump ring by twisting sideways (never pull it apart front-to-back; it warps).
Connect one end of the chain to the pin, then twist the ring closed again. -
Add the clasp. Use a jump ring to attach the clasp to one chain end. On the other end, attach a jump ring (or a small extender chain)
so you can clasp comfortably. - Check for sharp edges. Run your finger along everything. If anything feels scratchy, adjust the jump ring closure until it’s flush.
How to make it look “store-bought”
- Match metals: silver pin + silver chain, or gold pin + gold chain.
- Use consistent hardware sizes: jump rings that are too big make it look DIY in a “science fair” way.
- Add one intentional charm: a tiny bead drop, letter charm, or small pendant makes it feel designed.
Method 3: The Woven or Wrapped Safety Pin Bracelet (Textured, Artsy, and Custom)
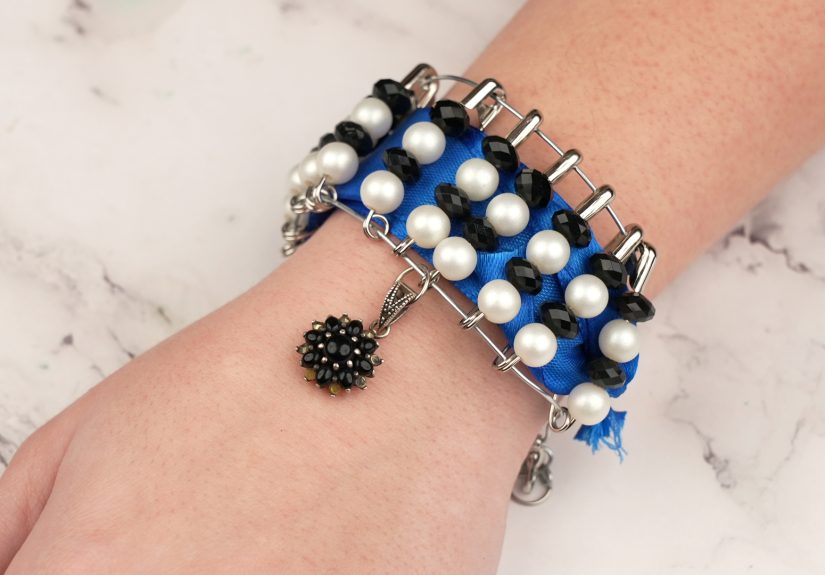
This method turns safety pins into a base for weaving: you bead the pins (or keep them plain), connect them into a band, and then weave ribbon, floss,
or thin cord across the front. The result is part jewelry, part textile craftgreat if you like bracelets with texture and a little “I made this at a cool workshop”
energy.
What you’ll need
- 30–80 safety pins (depending on size and wrist)
- Seed beads (optional)
- Elastic cord or strong thread/cord (to assemble the base)
- Ribbon, embroidery floss, or thin cord for weaving
- Large-eye needle (optional, helpful for weaving)
- Scissors
- Optional: a decorative element like a small brooch-style charm or bead cluster
Build the base (two quick options)
- Elastic base: Assemble a cuff like Method 1, but leave more space between beads so the weaving can show.
- Cord base: String pins on strong cord and tie securely. A double-cord structure helps the bracelet sit flat.
Weave the front
-
Anchor your ribbon/floss. Tie it to one side of the bracelet base (around the elastic/cord, not the sharp pin).
Leave a tail you can knot and hide later. -
Weave across the pins. Thread ribbon/floss over and under the pin bodies (or between bead gaps) to create a pattern.
You can do:- Simple over-under for a clean ladder look
- Diagonal weave for a chevron vibe
- Wrapped sections (wrap around several pins, then switch direction)
- Keep tension even. Pull snug enough to hold shape, but not so tight you curl the bracelet like a potato chip.
- Finish neatly. Knot off on the far side, hide ends under weaving, and trim. A small dot of glue can secure hidden knots.
Design ideas that look intentional (not accidental)
- Two-tone weave: black ribbon + silver pins looks modern and sleek.
- Soft palette: blush floss + pearl-like beads feels delicate and wearable.
- Statement front panel: weave only the center third, leaving metal visible on the sides for contrast.
Common Mistakes (and How to Avoid Them)
1) Overfilling pins with beads
If the pin doesn’t click shut easily, you’ve filled it too much. Leave a small gap so it closes smoothlythis makes it safer and more comfortable.
2) Skipping the “squeeze test”
After closing each pin, squeeze the clasp area lightly with pliers. It helps prevent surprise openings laterespecially if you’re making the bracelet for a kid
or planning to wear it while moving around.
3) Weak finishing knots
Most bracelet failures happen at the knot, not in the beads. Tie tight, double-knot, test gently, and (optionally) reinforce with a tiny glue dot.
Care Tips: Keep It Cute, Keep It Comfortable
- Remove before sleeping if you’re a “blanket wrestler.” Metal bits can snag.
- Avoid water unless you’re sure the pins are stainless/rust-resistant.
- Store flat to keep the cuff shape, especially for woven styles.
- Quick fix kit: keep one spare pin and a few beads in a tiny bagbecause bracelets are dramatic and love an encore.
Extra: Real-World “Experience” Notes (What People Commonly Learn After Making These)
Let’s talk about the part tutorials don’t always say out loud: the experience of making safety pin bracelets is about 50% creativity, 40% tiny bead
wrangling, and 10% asking yourself why you chose the smallest beads known to humanity. If you’re adding this craft to a party, classroom activity,
or a casual “movie night but with snacks and art supplies,” here are the most common “ohhh, that’s how it works” moments people report.
First, most beginners discover that bead size matters more than bead color. A mixed palette looks greatuntil one bead has a slightly smaller
hole and suddenly you’re doing micro-surgery with a safety pin. Many crafters end up sorting beads loosely by type before they start. It feels extra.
It is extra. It also saves your sanity.
Second, there’s usually a “breakthrough minute” when someone figures out their best beading method. Some people bead pin-by-pin with steady hands.
Others swear by using a small bowl so beads naturally slide onto the pin as you tilt itlike you’re feeding a very tiny metal bird. If you’re working with kids
(or adults who act like kids when craft supplies appear), that bowl trick can turn frustration into “wait, that was easy!”
Third, people often underestimate how many pins they’ll need. It’s not because you’re bad at mathit’s because safety pins look huge until you line them up as a
bracelet, and then suddenly you’re wondering if your wrist has been quietly growing in the night. The best practical habit is to assemble in stages:
bead 20 pins, string them, test the length, then continue. This also helps you adjust the pattern so your bracelet doesn’t end with a random lonely pin that looks
like it showed up late to the party.
Fourth, the “comfort test” is real. People sometimes finish a bracelet, admire it, put it on… and then realize one pin wasn’t fully closed. The bracelet becomes a
wearable betrayal. The fix is simple: run your fingers along every clasp before you knot the cord. If anything catches, fix it right then. In group
settings, it’s common to make this a final step: everyone does a quick “clasp check” like a runway pre-flight inspection, except the runway is your couch.
Finally, there’s a fun emotional arc to this craft. The first bracelet is often chaoticcolorful, slightly uneven, and extremely lovable. The second one is cleaner,
because you learned the rhythm. By the third bracelet, people get bold: patterns, gradients, woven panels, charms, matching sets. And that’s the real magic of a safety
pin bracelet project: it starts as a simple DIY and ends with you thinking, “I could totally make these as gifts.” (You can. Your friends will absolutely wear them.
And you’ll become that person who always has extra beads. Welcome.)
Conclusion
Whether you want a chunky beaded cuff, a delicate chain bracelet, or a woven statement piece, safety pins can be the surprisingly stylish backbone of DIY jewelry.
Start with the method that matches your patience level (no judgment), keep your pins securely closed, and remember: the best bracelet is the one you actually
enjoy wearingbecause it doesn’t poke you, it matches your vibe, and it has a great “you made that?!” story attached.