Table of Contents >> Show >> Hide
- Before You Acclimate Your Betta: A 60-Second Prep Checklist
- Why Acclimation Matters for Betta Fish
- Method 1: The Float-and-Add Method (Best “All-Around” Choice)
- Method 2: Drip Acclimation (For Big Water-Parameter Differences)
- Method 3: The Quick-Transfer “Clean Water ASAP” Method (Best for Shipped Bettas)
- Which Betta Acclimation Method Should You Use?
- After Acclimation: The First 24 Hours (Where the Magic Happens)
- FAQ: Quick Answers Betta Keepers Actually Need
- Conclusion
- Real-World Acclimation Experiences (The “Stuff Nobody Mentions” Edition)
- SEO Tags
Bringing home a betta is a little like picking up a friend from the airport: they’re tired, grumpy, and absolutely not in the mood
for sudden changes. The difference is your betta can’t text you “I’m U OK?”it just quietly stresses out, and stress is the fast lane
to illness, refusal to eat, or the classic “I’m going to sulk behind the heater for three days” routine.
Acclimation is how you help your new betta fish transition into its new home without temperature shock, pH shock, or “why does this water
taste like betrayal?” vibes. Below are three proven betta fish acclimation methods (from quick-and-easy to extra-gentle), plus a simple
way to choose the right one based on how your fish arrived.
Before You Acclimate Your Betta: A 60-Second Prep Checklist
Do this first, and you’ll avoid 80% of the problems people blame on “bad luck.”
- Make sure the tank is ready: heated, filtered, dechlorinated, and ideally fully cycled.
- Target temperature: most bettas do best around the upper-70s °F (stable matters more than “perfect”).
- Dim the lights: bright light + new environment = extra stress.
- Have tools ready: clean cup or container, a net, thermometer, and (for drip) airline tubing.
- Plan to discard transport water: it can carry contaminants and it may be chemically unstable after shipping.
One more thing: acclimation isn’t just about temperature. Bettas can react to sudden shifts in pH, hardness, and dissolved waste
compounds (like ammonia). A slow, controlled transition is often the difference between a confident fish and a tiny aquatic diva
writing sad poetry in the corner.
Why Acclimation Matters for Betta Fish
Bettas are tough in the “survived a thunderstorm in a rice paddy” sense, but they’re not immune to rapid change. When a fish goes from
one set of water conditions to another too quickly, three kinds of stress can stack up:
- Temperature shock: sudden swings can stress organs and immune function.
- Osmotic/pH shock: abrupt changes in pH or hardness can irritate gills and throw off internal balance.
- Stress overload: stressed fish are more prone to common issues like fin rot or ich and may stop eating.
The goal is simple: match temperature first, then gradually introduce your betta to your tank’s water chemistryunless the
fish was shipped for many hours, in which case you’ll want a “clean water ASAP” approach (we’ll cover that).
Method 1: The Float-and-Add Method (Best “All-Around” Choice)
This is the classic acclimation method for a betta that came from a local fish store or short drive home. It gently equalizes temperature
and slowly mixes your tank water into the transport water.
Best for
- New bettas from a local store
- Short travel time (generally under a couple hours)
- When your tank parameters are reasonably close to the store’s water
Step-by-step
- Dim lights in the tank and the room.
- Float the sealed bag or cup in your tank for 15–20 minutes to equalize temperature.
- Open the bag (or loosen the lid) and secure it so it stays upright. If it’s a bag, roll the edge down to create a floating rim.
- Add small amounts of tank water (a few tablespoons to 1/4 cup, depending on container size) every 5–10 minutes.
- Continue for 30–60 minutes. You want the water volume to roughly double, and you want the fish to look calm (not frantic breathing or frantic darting).
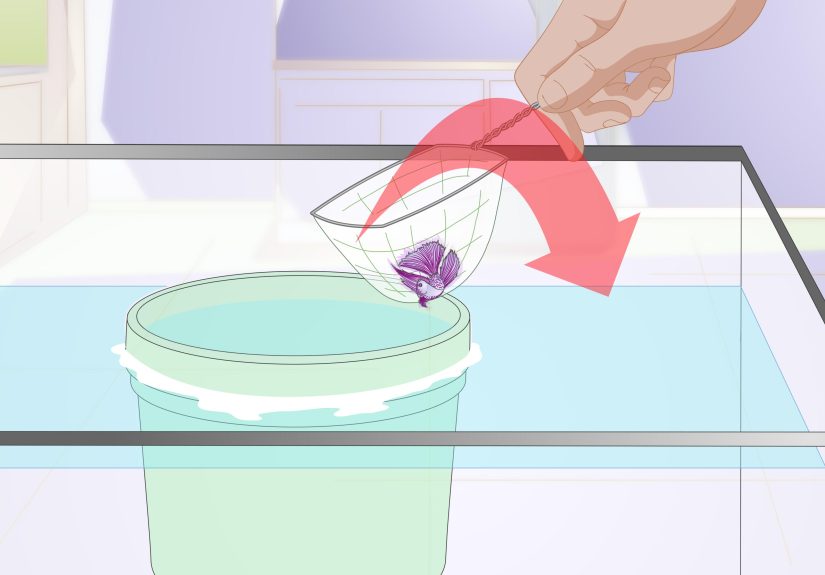
- Net the betta into the tank (or gently guide it into a clean cup and release). Discard the transport water.
Common mistakes to avoid
- Dumping bag water into your tank: it may contain pathogens or elevated waste.
- Taking too long with an opened bag: once opened, water chemistry can change quickly.
- Feeding immediately: give your betta time to settle first.
If this method were a movie genre, it’s the reliable rom-com: predictable, low drama, and it usually ends with your betta exploring its new tank
like it just bought property.
Method 2: Drip Acclimation (For Big Water-Parameter Differences)
Drip acclimation is the slow-and-steady option. It’s popular because it can reduce the risk of pH shock and hardness shock by letting the fish
adjust gradually to new water chemistry. For bettas, this is most useful when you know the store’s water and your tank water are quite different,
or when the betta is already stressed and you want the gentlest transition possible.
Best for
- When your tank pH/hardness differs noticeably from the source water
- Extra-sensitive fish (or a betta that seems already stressed)
- Quarantine tank introductions where you want maximum control
What you need
- Clean bucket or container (dedicated for aquarium use)
- Airline tubing
- A valve, clamp, or even a simple knot to control drip rate
- Optional: thermometer and water tests (pH, ammonia)
Step-by-step
- Temperature match first: float the sealed bag 15–20 minutes, or place the container near the tank with stable warmth.
- Pour fish + transport water into a clean bucket/container (enough depth so the betta stays fully submerged).
-
Start a siphon from the tank to the bucket using airline tubing.
Aim for a slow drip: about 1–4 drips per second. - Let the volume double over 30–45 minutes. If your parameter difference is large, go longer.
- Remove (and discard) about half of the water in the bucket, then continue dripping until it doubles again.
- Net the betta into the tank (or quarantine tank). Discard bucket water.
Two important “drip” warnings
-
Don’t drip-acclimate a fish that’s been sealed in a shipping bag for a long time without thinking:
once you open a long-shipped bag, pH can rise and make ammonia more toxic. In that case, Method 3 is often safer. - Don’t chase perfection: your goal isn’t to create identical water in the bucket. Your goal is to reduce shock and get the fish into stable, clean water.
Drip acclimation is the slow dance of fishkeeping: elegant, controlled, and slightly overkill for some situationsbut absolutely clutch when water chemistry differences are big.
Method 3: The Quick-Transfer “Clean Water ASAP” Method (Best for Shipped Bettas)
This method is for bettas that arrived via overnight shipping or spent many hours sealed in a bag. It sounds counterintuitive, but in long shipping situations,
the transport water can become a chemistry trap. When the bag is sealed, carbon dioxide can build up and lower pH; ammonia may be present but less toxic
at lower pH. Once you open the bag, CO2 can escape, pH can rise, and ammonia can shift into a more toxic formfast.
Translation: sometimes the kindest thing you can do is match temperature quickly, then move the betta into clean, stable water without slowly mixing transport water.
Best for
- Overnight shipped bettas
- Any fish that’s been bagged for many hours
- When the bag water smells strongly “fishy” or you suspect high waste
Step-by-step
- Prepare a quarantine tank if possible: heated, filtered, cycled (or at least stable and conditioned). Quarantine is ideal for new fish.
- Dim lights to reduce stress.
- Temperature acclimate only: float the sealed bag for 15–20 minutes.
-
Open the bag and transfer immediately: pour the bag through a net over a bucket/sink so the fish is caught in the net,
then gently move the fish into the tank. Discard bag water. - Observe closely for the next few hours: breathing rate, clamped fins, and willingness to explore.
Optional “upgrade” for nervous bettas
If your betta seems extremely stressed, you can use an acclimation box/breeder box inside the tank for 15–30 minutes. This lets the fish settle
while your tank water circulates around itwithout dumping transport water into your aquarium.
Think of Method 3 as the “get them out of the airport and into a warm bed” strategy. It’s not about slowly mixing water forever; it’s about reducing exposure to
unstable transport conditions.
Which Betta Acclimation Method Should You Use?
Here’s a simple decision guide that won’t make you do math (you’re welcome).
- Local store, short drive home? Use Method 1 (Float-and-Add).
- Your tank water is very different (pH/hardness) or the betta is super stressed? Use Method 2 (Drip), especially in quarantine.
- Overnight shipping or many hours bagged? Use Method 3 (Quick-Transfer) after temperature matching.
After Acclimation: The First 24 Hours (Where the Magic Happens)
Acclimation doesn’t end when the fish touches your tank water. The first day is when your betta decides whether this place is a peaceful spa… or a war zone.
Do this
- Keep lights low for a few hours.
- Offer a tiny meal later (after the fish has explored a bit). Remove uneaten food quickly.
- Watch respiration and posture: rapid gill movement, clamped fins, or scraping can signal stress.
- Test water (especially ammonia) if the tank is new or recently changed.
A note on quarantine
If you can quarantine new fish for a few weeks, do it. It protects your main aquarium and gives your betta a calmer, controlled place to recover from travel stress.
Even a small, heated, filtered quarantine setup can be a game-changer.
FAQ: Quick Answers Betta Keepers Actually Need
Should I pour the store water into my tank?
Generally, no. Net or cup the fish into your aquarium and discard transport water. It’s one of the simplest ways to reduce contamination risk.
How long should acclimation take?
For a short trip home, 30–60 minutes is common (Method 1). Drip acclimation can take 45–90 minutes depending on differences (Method 2).
For shipped fish, temperature-match and transfer promptly (Method 3).
What if my betta looks stressed during acclimation?
Slow down, dim lights, and reduce handling. If the fish is gasping or the water smells strongly of ammonia, prioritize getting it into clean, stable water (Method 3).
Conclusion
Acclimating your betta is less about “doing a ritual correctly” and more about preventing shock: temperature first, chemistry second, stress always.
Use the Float-and-Add method for most local purchases, Drip acclimation when water differences are big, and the Quick-Transfer method for shipped bettas where
transport water can turn chemically nasty once opened.
Do it right, and your betta’s first day in its new tank will look less like a disaster movie and more like a grand tour of its new kingdomcomplete with
suspicious inspection of every leaf, pebble, and corner.
Real-World Acclimation Experiences (The “Stuff Nobody Mentions” Edition)
Fishkeeping advice online can feel like it was written by either (1) a lab technician with a stopwatch and a clipboard, or (2) someone who thinks
“acclimation” means “yeet the fish and pray.” Real life is somewhere in the middle, and bettastiny beings powered by attitudetend to amplify whatever
chaos is happening in your living room.
Scenario #1: The Winter Commute Betta. A classic: you buy a betta, it’s 45°F outside, and your car heater is doing its best impression of a
gentle breeze. By the time you get home, the water in the cup/bag is noticeably cooler than your tank. This is where temperature acclimation earns its keep.
Floating the sealed container isn’t just traditionit’s the difference between a smooth transition and a fish that looks offended by physics. In practice,
people who rush this step often report a betta that clamps its fins, hides, and acts like the tank is haunted. When they slow down and match temperature first,
the fish tends to recover faster and explore sooner.
Scenario #2: The “My Tap Water Is… Unique” Betta. Some households have soft, slightly acidic water. Others have liquid limestone.
A betta coming from store water that’s much softer/harder (or different pH) can react to sudden change in ways that look dramatic: rapid breathing, glass surfing,
or the fish going statue-still like it’s playing an aquatic version of “Freeze Tag.” This is where Method 2 (drip acclimation) shinesespecially if you’re
introducing the fish into a quarantine tank first. What experienced keepers often do is treat the first day like a “calm landing”: slow chemistry changes,
low light, and minimal feeding. The betta usually perks up once it realizes the new water isn’t trying to ruin its life.
Scenario #3: The Overnight Shipped Betta With the Suspicious Bag Water. Shipped fish can arrive looking okay… until you open the bag and
the smell hits you like a cartoon stink cloud. Many keepers learn (sometimes the hard way) that slowly mixing that water for hours isn’t always a kindness.
The transport water has been collecting waste while the fish had limited oxygen exchange and no filtration. Once opened, chemistry can shift quickly.
In real-world practice, the “temperature acclimate, then net-and-transfer” approach often produces better outcomes for long-shipped fish: the betta gets into
clean, oxygenated water faster, and stress drops once it can breathe comfortably and stop marinating in yesterday’s decisions.
Scenario #4: The Overeager Welcome Party. Sometimes acclimation is perfect… and the tankmates are not. Bettas can be territorial, and even a
“community betta” may need time to adjust. A surprisingly effective move here is using an acclimation box inside the aquarium for a short period. It’s like
letting everyone meet through a window before sharing the same living room. Keepers who do this often report fewer immediate flare-ups and less frantic pacing.
The betta can observe the tank, learn the layout, and decide which corner is going to be “its corner” without being chased or startled.
Scenario #5: The “I Did Everything Right… Why Is It Still Weird?” Moment. Even with ideal acclimation, a betta may hide for a day or two.
Travel stress is real. A smart play is to keep the environment predictable: stable heat, gentle filtration, plenty of cover, and no sudden redecorating
like you’re auditioning for an aquarium makeover show. People often see improvement simply by doing less: fewer disturbances, fewer bright lights,
and fewer “let me tap the glass to see if you’re alive” check-ins (the betta is alive; it’s just judging you).
The takeaway from these real-life patterns is reassuring: you don’t need magical fishkeeping powers. You need a stable tank, a calm introduction,
and the right acclimation method for the situation. When in doubt, prioritize temperature stability, avoid pouring transport water into your aquarium,
keep lights low, and get your betta into clean, consistent conditions as smoothly as you can.