Table of Contents >> Show >> Hide
- Why This Cherry Pie Works
- Ingredients
- Step-by-Step: Cherry Pie with a Lattice Crust
- Ingredient Notes & Smart Substitutions
- Pro Tips for a Showpiece Lattice
- Variations You’ll Love
- Storage, Serving & Make-Ahead
- FAQ
- Chef’s Notes (Nerd Corner)
- Printable Recipe Card
- Conclusion
- of Real-World Cherry Pie Experience
TL;DR: This is your no-soggy-bottom, ruby-red, sweet–tart homemade cherry pie with a buttery double crust and a classic lattice top. We’ll talk cherry types (tart vs. sweet), smart thickeners (cornstarch, tapioca), and the little pro moveslike preheating a baking sheet and letting the pie cool completelythat turn a good pie into an “are-you-kidding-me” pie.
Why This Cherry Pie Works
- Flavor balance: Tart cherries plus a touch of almond extract create that nostalgic, jammy cherry-pie flavor without being cloying.
- Clean slices: A precise amount of starch and a full cool-down give you tidy wedges instead of cherry soup.
- Flaky, crisp crust: All-butter dough, lots of chill time, and baking on a preheated sheet help deliver a deeply golden, crisp bottom crust.
- Lattice top for function and looks: Weaving lets steam vent so the filling thickens just rightno blowouts, no tunnel of cherry lava.
Ingredients
Buttery Double-Crust Dough (for one 9-inch pie)
- 2 1/2 cups (300 g) all-purpose flour
- 1 tablespoon granulated sugar
- 1 teaspoon fine sea salt
- 1 cup (226 g) cold unsalted butter, cut into 1/2-inch cubes
- 1/2 cup (120 ml) ice water, plus 1–3 tablespoons more as needed
- 1 teaspoon lemon juice or apple cider vinegar (optional, for tenderness)
Cherry Filling
- 5 cups pitted tart cherries (about 2 1/2 pounds; frozen is fine, thaw and drain)
- 3/4 to 1 cup granulated sugar (use 3/4 cup for sour cherries; up to 1 cup for very tart fruit)
- 1/4 cup + 1 tablespoon cornstarch or 1/3 cup tapioca starch
- 2 tablespoons fresh lemon juice
- 1/2 teaspoon almond extract (optional but delightful)
- 1/4 teaspoon fine sea salt
To Finish
- 1 egg + 1 tablespoon milk or water (egg wash)
- 1–2 tablespoons coarse sugar (for sparkle)
Step-by-Step: Cherry Pie with a Lattice Crust
1) Make the Dough
- Mix the dry: Whisk flour, sugar, and salt in a large bowl.
- Cut in butter: Toss butter in the flour and pinch/flake until you have pea- to almond-size bits. You want visible pieces for maximum flake.
- Hydrate: Sprinkle in ice water and lemon juice (if using). Toss with a fork until the dough clumps when squeezed. If dry, add water 1 tablespoon at a time.
- Divide & chill: Press into two disks, wrap, and chill at least 2 hours (or overnight). Resting improves texture and makes rolling easier.
2) Make the Filling
- Stir the dry: In a bowl, combine sugar, cornstarch (or tapioca), and salt.
- Combine: Fold cherries with lemon juice and almond extract, then sprinkle in the sugar–starch mixture. Toss until every cherry is coated and glossy. Let sit 10 minutes while you roll the doughthis starts hydrating the starch and draws out just enough juice.
3) Roll the Bottom Crust
- On a lightly floured surface, roll one dough disk into a 12-inch circle, about 1/8 inch thick. Fit into a 9-inch pie plate, leaving a 1-inch overhang. Chill while you make the lattice strips.
4) Cut Lattice Strips
- Roll the second dough disk to a 12-inch circle. With a sharp knife, pizza wheel, or fluted pastry cutter, slice into 10–12 strips, 3/4 to 1 inch wide. Keep the strips chilled (pop the sheet into the fridge for 5 minutes) so they’re easy to weave.
5) Assemble
- Heat oven to 425°F (218°C) with a rimmed baking sheet or pizza steel on the center rack.
- Scrape the cherry filling into the chilled bottom crust, mounding slightly in the center.
- Lay 5–6 strips evenly across the pie. Fold back every other strip halfway, lay one strip perpendicular across the center, then flip the folded strips back. Alternate and repeat, weaving a tidy lattice. Trim ends to the rim.
- Fold the bottom crust overhang up and over the lattice ends, then crimp all around.
- Brush lattice and edges with egg wash; sprinkle with coarse sugar.
6) Bake
- Set the pie on the preheated baking sheet/steel. Bake 20 minutes at 425°F.
- Reduce oven to 375°F (190°C); continue baking 35–45 minutes, until the crust is a deep golden brown and the filling bubbles vigorously through the lattice in the center. If edges brown too fast, shield with foil.
- Cool on a rack until room temperatureat least 3 hours. This is when the filling sets. If you cut early, the pie will run. Worth the wait, promise.
Ingredient Notes & Smart Substitutions
- Tart vs. sweet cherries: Montmorency and other tart cherries make the most “classic” cherry pie. If using sweet cherries (Bing, Rainier), reduce sugar to 1/2–2/3 cup and keep the lemon juice for brightness. Frozen tart cherries (thawed and well-drained) work beautifully.
- Thickeners: Cornstarch and tapioca starch both produce a clear, glossy set. Flour works in a pinch but yields a more opaque filling and you’ll need more of it. Don’t skip the rest time after mixing; it helps the starch hydrate.
- Almond extract: Optional, but that tiny 1/2 teaspoon creates the bakery-style cherry aroma people swoon over. Vanilla works too, but almond is classic.
- Butter-only crust: For the best flavor and flake, keep the butter cold and the dough relaxed (chilled) until it hits the oven.
Pro Tips for a Showpiece Lattice
- Stay cool: Warm dough stretches and tears. If the strips soften, chill them for 5–10 minutes and continue.
- Use longer strips in the middle: They look neat and are easier to weave without gaps.
- Even strips, even spacing: 3/4–1 inch width is forgiving and bakes up attractively.
- Shiny top, real crunch: Egg wash with a sprinkle of coarse sugar makes the lattice gleam and crackle.
- Fight soggy bottoms: Bake the pie on a preheated metal sheet or steel to “sear” the bottom crust. The difference is real.
Variations You’ll Love
- Sweet Cherry–Almond: Use sweet cherries; add 1 tablespoon kirsch or amaretto and a handful of sliced almonds to the filling.
- Cherry–Berry: Swap 1 cup cherries for blueberries or raspberries; keep total fruit to 5 cups. Increase starch by 1 teaspoon if using very juicy berries.
- Brown Sugar Vanilla: Replace 1/3 cup white sugar with light brown sugar for a deeper, toffee-like note.
- Spiced Cherry: Add 1/4 teaspoon cinnamon and a pinch of allspice for cozy fall vibes.
Storage, Serving & Make-Ahead
- Room temp: Fruit pies keep safely at room temperature for 1–2 days if covered.
- Refrigerate: Up to 1 week, covered. The crust softens slightly but stays lovely.
- Freeze slices: Wrap tightly; freeze up to 3 months. Re-crisp at 350°F for 10–15 minutes.
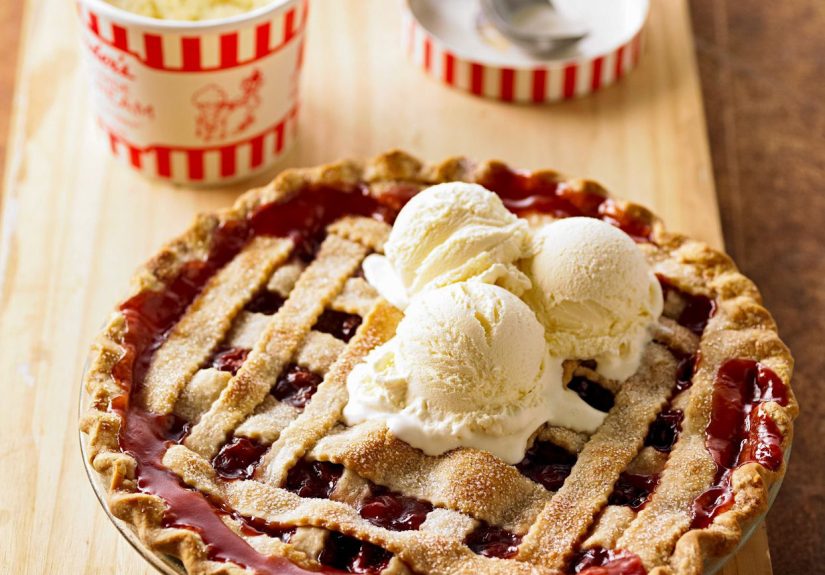
- Serve: Slightly warm or room temp with vanilla ice cream or lightly sweetened whipped cream. (If you want truly clean slices, chill the pie 30 minutes before cutting, then let slices stand 10 minutes.)
FAQ
Can I use canned cherries?
You can, but opt for unsweetened or “in water” and build the filling yourself. Cherry pie filling from a can is convenient but sweeter and less customizable.
Do I have to blind-bake the crust?
No. Fruit pies with a lattice or vented top bake long enough to cook the bottom crust fullyespecially when started on a hot sheet. Blind baking is for cream/custard pies or unbaked fillings.
How do I know the pie is done?
Visual cues are king: look for big, slow bubbles erupting through the lattice near the center and a deep golden brown crust. Pale crust and shy bubbles mean keep baking.
Chef’s Notes (Nerd Corner)
- Hydration & chill: Resting dough lets flour absorb water and gluten relax, so the dough rolls easily without shrinking.
- Mixing method: Keep some larger butter pieces in the doughthose pockets steam in the oven and create flaky layers.
- Starch science: Cornstarch and tapioca gel at different temps, but both need enough heat and a post-bake cool to set. That’s why the full cool-down is non-negotiable.
Printable Recipe Card
Yield: One 9-inch pie (8 servings) | Active: 40 minutes | Total: About 4 hours (includes cooling)
- Make and chill dough (2 hours). Roll bottom crust; chill.
- Mix filling; rest 10 minutes.
- Cut lattice strips; assemble; egg wash and sugar.
- Bake 20 minutes at 425°F on a preheated sheet; then 35–45 minutes at 375°F, until bubbling and deeply golden.
- Cool at least 3 hours before slicing. Store covered.
Conclusion
If you’ve made it this far, congratulationsyou’ve just unlocked the gateway dessert to summer cookouts, cozy holidays, and random Tuesdays that simply deserve pie. With a flaky all-butter crust, a bright cherry filling, and that showy lattice top, this Cherry Pie with a Lattice Crust earns front-and-center status on any table.
SEO Goodies
sapo: Bake a bakery-level cherry pie at homeflaky all-butter double crust, sparkling lattice, and a luscious, sliceable cherry filling. This in-depth guide covers the best cherries to use (fresh, frozen, or canned), which thickener makes clean slices, how to avoid a soggy bottom, and pro-level lattice tips. Simple steps, real science, and a few chef tricks mean you get a gorgeous, old-fashioned cherry pie with modern reliability.
of Real-World Cherry Pie Experience
My first cherry pie was a humble disaster. I used sweet cherries, forgot the lemon, and thickened with “a little” flour (translation: not enough). It tasted fine but looked like a crime scenegorgeous color, zero structure. That night I learned two things: fruit pies are about moisture management and patience, whichfun factI did not have yet.
Fast forward. I’m pitting tart cherries over a bowl (wear an apron; the splash radius is impressive) and I’ve switched to cornstarch or tapioca starch. I like to quarter about a third of the cherries so the filling has a mix of textures: jammy sauce plus plump cherry bites. If cherries are super juicy, I’ll simmer a cup of the fruit and its juice on the stovetop for 5 minutes to reduceconcentrates flavor and buys insurance against a runny slice. That small move changed everything for me.
Another turning point: the preheated sheet/steel. Instead of pleading with the oven gods, I stack the deckpie plate goes straight onto a ripping-hot metal surface. You can hear the sizzle when it lands, and the bottom crust sets quickly. If your oven runs cool, don’t be shy about giving the pie extra time at 375°F; you’re looking for deep color and bold bubbles, not a timer’s approval.
About the lattice: I used to overthink it, measuring strips like I was drafting blueprints. Now I keep it relaxed: 10–12 strips, about an inch wide, longer ones in the center. If a strip tears, I patch it and call it rustic (which, by the way, photographs beautifully). Egg wash and a shower of coarse sugar are the difference between “homemade” and “showstopper.”
Cherries vary wildly. Early-season sour cherries can be tart enough to make your eyebrows salute; late-season or frozen lots can be sweeter. Taste and tweak: add lemon for brightness, bump the sugar a tablespoon at a time, and don’t be afraid of a pinch of saltit sharpens the fruit. Almond extract? I’m a believer. It’s your shortcut to that bakery aroma people can’t quite place but always love.
Finally, the hardest step: waiting. You really do need the full cool-down. I once cut a pie at the 90-minute mark because friends were “starving.” We ate cherry cobbler in a crust bowl, which was…not the brief. Now I set the pie on a rack, go do literally anything else, and when I return hours later, the slices come out clean and confident. Breathing room is a pie’s best friend (and a baker’s, too).
In short, cherry pie rewards process. Keep the dough cold, the oven hot, the thickener measured, and your curiosity intact. The lattice is your victory lap; the first silent bite at the table is your applause.