
Table of Contents >> Show >> Hide
- Why “Coral Reef” Works Shockingly Well in an Entryway
- Picking the Right Table for the Project
- Materials Checklist (So You Don’t Mid-Project Spiral)
- Paint Choice: What Actually Holds Up on an Entry Table?
- Step-by-Step: Painting Your Coral Reef Entry Table Like You Know What You’re Doing
- Step 1: Clear the area and label hardware
- Step 2: Clean like paint depends on it (because it does)
- Step 3: Repair and smooth
- Step 4: Sand (but don’t punish yourself)
- Step 5: Remove dustthoroughly
- Step 6: Prime for bonding and color payoff
- Step 7: Paint in thin coats (two to three is normal)
- Step 8: Respect cure time (this is where most “my paint is sticky” stories begin)
- Styling a Coral Reef Console Table Without Making It Look Like a Party Store
- Common Mistakes (and How to Avoid Them)
- Keeping Your Coral Reef Entry Table Looking Fresh
- FAQ: Quick Answers Before You Start
- Experience Section: Living With a Sherwin-Williams Coral Reef Entry Table (The Real Story)
Some furniture pieces exist to be helpful. They hold your keys, catch your mail, and quietly judge your life choices (why do we own seventeen reusable tote bags?). An entry table is that piece. And when you paint it Sherwin-Williams Coral Reef (SW 6606), it stops being “just a table” and becomes a full-on mood: cheerful, confident, and slightly flirtatious in a “yes, I light candles on weekdays” kind of way.
This article walks you through the why and how of creating a Coral Reef entry tablefrom paint selection to prep, from styling tricks to keeping the finish looking fresh in a high-traffic zone. We’ll keep it practical, a little funny, and very focused on results that look intentional (not “I panic-painted this at 11 p.m.”).
Why “Coral Reef” Works Shockingly Well in an Entryway
Coral is one of those colors that sounds loud on paper and then behaves beautifully in real lifeespecially when you keep it on a smaller surface like a console/entry table. Sherwin-Williams describes Coral Reef as an uplifting blend with pink, orange, and red notes, and it absolutely reads that way: warm, alive, and welcoming without feeling aggressive.
It sets the tone instantly
Your entry is the first impression. A Coral Reef table signals “this house has personality” before anyone even gets to your living room. It’s a design shortcut: one punchy, curated moment that makes everything around it feel more considered.
It plays well with neutrals (and saves beige from itself)
If your walls are white, warm greige, or soft gray, Coral Reef becomes the accent that keeps the space from looking like a rental listing photo. It adds warmth and depthespecially helpful in narrow foyers or dim hallways where you need visual energy.
It’s a “small dose” color that still feels bold
Painting an entire room coral can be… a commitment. Painting one hardworking piece of furniture coral is a design decision with a safety net. If you ever change your mind, it’s a weekend repaintnot a full identity crisis.
Picking the Right Table for the Project
You can paint almost any entry table, but some are easier to transform than others. Here’s what tends to work best for a Coral Reef makeover:
Best candidates
- Solid wood or wood veneer (sturdy, sands well, holds paint nicely)
- Previously painted tables (often just need cleaning + scuff sanding + bonding primer)
- Simple silhouettes (slim legs, minimal carvingfaster prep and smoother finish)
Trickier (but still doable)
- Glossy factory finishes (need serious deglossing/scuff sanding and a good primer)
- Laminate (requires the right primer and extra cure time)
- Heavily detailed pieces (beautiful, but sanding every nook becomes your new hobby)
Pro tip: If the table wobbles now, it will wobble after paintingonly then it’ll be a colorful wobble. Tighten hardware and address loose joints first so your finish doesn’t crack later.
Materials Checklist (So You Don’t Mid-Project Spiral)
Before you start, gather supplies. The goal is smooth, durable, and wipeablebecause entry tables live a hard life.
Tools & prep
- Cleaner/degreaser (a musthand oils and residue ruin adhesion)
- Sandpaper: 120–150 grit (if needed), plus 220 grit for scuff sanding and smoothing
- Tack cloth or microfiber cloth
- Painter’s tape
- Drop cloth
- Wood filler (optional, for dents and dings)
Priming & painting
- Bonding primer (especially for glossy finishes or stained wood)
- Sherwin-Williams Coral Reef (SW 6606) tinted in a durable enamel suitable for furniture/trim
- High-quality angled brush + small foam roller (for a smoother “sprayed” look)
Optional but worth it
- Liquid deglosser (helpful for tight corners where sanding is annoying)
- Topcoat (only if your paint system recommends itmany enamels don’t need one)
- Felt pads for decor items (prevents scratching the new finish)
Paint Choice: What Actually Holds Up on an Entry Table?
An entry table gets touched constantlykeys tossed, bags dropped, shoes kicked under it “temporarily” (forever). That means you want a paint made for surfaces that get handled and cleaned. In plain English: don’t use basic wall paint.
Go-to option: water-based urethane/trim enamel
Many DIYers use premium cabinet-and-trim style enamels for furniture because they level nicely and cure into a harder, more scrub-friendly finish than standard latex wall paint. Sherwin-Williams’ Emerald Urethane Trim Enamel is a common pick in this category for projects like cabinets, trim, and high-touch surfacesaka the same abuse your entry table is about to endure.
Sheen: satin or semi-gloss?
Higher sheen typically equals higher durability and easier cleaning, but it also highlights surface flaws. For an entry table:
- Satin: a favorite for furnituredurable, still forgiving, softly polished.
- Semi-gloss: tougher and wipeable, but will spotlight every bump, brushmark, and “oops.”
If your table is older or has visible grain/imperfections, satin is the sweet spot. If it’s super smooth and you want a crisp, modern pop, semi-gloss can look sharp.
Step-by-Step: Painting Your Coral Reef Entry Table Like You Know What You’re Doing
Step 1: Clear the area and label hardware
Remove drawers, knobs, and any removable shelves. Put hardware in a bag so you don’t end up crawling around later whispering, “Where did the tiny screw go?”
Step 2: Clean like paint depends on it (because it does)
Wipe down the whole piece to remove oils, dust, and mystery residue. Pay extra attention to edges and drawer frontsthose are high-touch zones.
Step 3: Repair and smooth
Fill dents, chips, and deep scratches. Let filler dry completely, then sand smooth. Coral Reef is vibrant; it doesn’t hide chaos. It celebrates it. Loudly.
Step 4: Sand (but don’t punish yourself)
You’re not trying to sand to bare wood unless the finish is failing. You’re aiming to scuff-sand so primer and paint can grip. A light sanding with 220-grit across the surface is a classic approach for better adhesion and smoother results.
Step 5: Remove dustthoroughly
Vacuum, then wipe with a tack cloth or damp microfiber. Dust left behind becomes texture trapped under paint forever. Like a fossil. But less charming.
Step 6: Prime for bonding and color payoff
Primer helps prevent tannin bleed (on stained wood), improves adhesion (on glossy finishes), and gives Coral Reef a consistent base so it reads true and even. Apply a thin, even coat. Let it dry fully. Lightly sand again with 220-grit if needed for a smoother finish.
Step 7: Paint in thin coats (two to three is normal)
Coral Reef is punchy, and punchy pigments love to show lap marks if you rush. Use thin coats. A foam roller can help minimize brush strokes on flat surfaces; use a quality brush for edges and corners. Let each coat dry as directed before recoating.
Step 8: Respect cure time (this is where most “my paint is sticky” stories begin)
Dry is not the same as cured. Your table may feel dry to the touch quickly, but it needs time to harden. During cure, avoid stacking objects, dragging decor, or placing rubbery items directly on the surface. If you want the finish to feel professional, give it the patience you’d give a sourdough starterminus the constant feeding.
Styling a Coral Reef Console Table Without Making It Look Like a Party Store
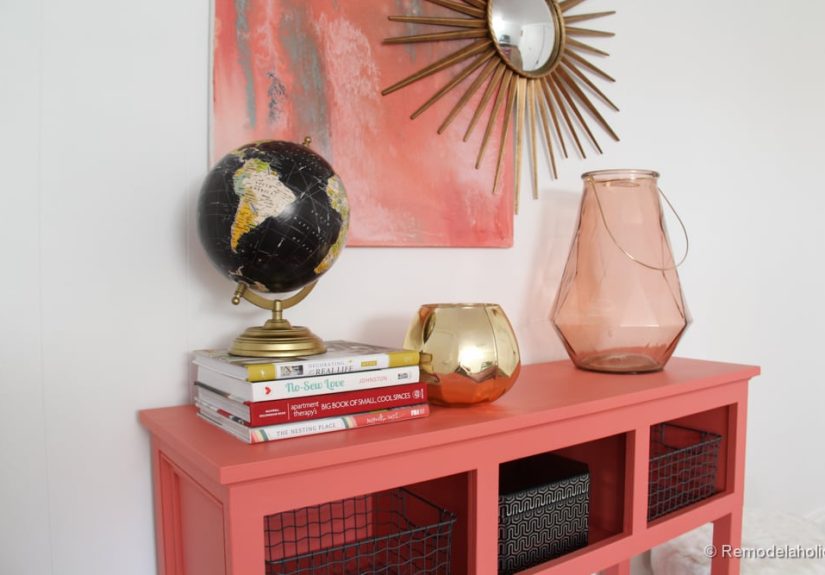
Coral Reef is the star. Styling is the supporting cast. Keep the scene balanced: a few functional items, a few sculptural items, and some breathing room.
The “always works” entry table formula
- Anchor: a mirror or artwork above (adds height and makes the table feel intentional)
- Light: a table lamp (warm, welcoming, and practical)
- Catchall: a tray or dish for keys/sunglasses (so your table stays cute, not chaotic)
- Life: greenery or fresh stems (instantly softens and elevates)
- Storage: baskets or bins underneath (hides the real-life stuff)
Materials that look amazing with Coral Reef
- Brass or warm gold (hello, glow)
- Natural wood (grounds the color and keeps it sophisticated)
- White ceramic (clean contrast)
- Navy accents (classic complementary tension)
- Woven textures (rattan, cane, seagrassadds “relaxed but styled” energy)
Color pairing ideas for the surrounding space
If you want the Coral Reef table to feel integrated (not randomly fabulous), echo the color subtly: a coral-toned book spine, a patterned runner with warm undertones, or a small art print with coral highlights. Keep the walls and large rugs calmwhite, warm cream, soft greige, or pale sand tonesto let the table shine.
Common Mistakes (and How to Avoid Them)
Skipping cleaning
If paint peels near knobs or drawer edges, it’s often because skin oils and residue were painted over. Clean first. Always.
Painting thick coats
Thick paint takes longer to cure, shows brush marks, and dents easier. Thin coats win. They always do.
Not priming stained wood
Stains and tannins can bleed into lighter or brighter paints, shifting your gorgeous coral into a slightly muddy “why is this… beige?” moment. Prime properly and save your sanity.
Rushing the cure
That sticky feel, the scuffs, the imprint from a decorative bowl? Most of it is impatience. Let the paint system cure before heavy use.
Keeping Your Coral Reef Entry Table Looking Fresh
- Use felt pads under lamps, trays, and ceramics.
- Wipe spills quickly (especially coffeeentry tables attract chaos).
- Clean gently with a soft cloth; avoid harsh abrasives.
- Rotate decor occasionally so one spot isn’t constantly rubbed or scratched.
FAQ: Quick Answers Before You Start
Do I need a topcoat?
Often, noespecially if you use a durable enamel designed for trim/cabinets/furniture. Some systems recommend a topcoat for extra protection, but others don’t. Follow your specific paint product guidance so you don’t create adhesion issues.
Can I do this without sanding?
In some cases, you can rely on cleaning + deglossing + bonding primer, especially for tricky finishes. But a light scuff sanding is still one of the most reliable ways to improve adhesion and smoothness.
Is Coral Reef too bright for a small entry?
Not when it’s on the table, not the walls. In a compact space, a single vibrant piece can actually make the entry feel more designedlike you meant to do that. (You did. Obviously.)
Experience Section: Living With a Sherwin-Williams Coral Reef Entry Table (The Real Story)
The first time you see Coral Reef on a piece of furniture, you might have a brief moment of doubt. Not because it’s uglybecause it’s confident. It’s the kind of color that shows up, shakes hands, and remembers everyone’s name. When I tested it on a small patch, I thought, “Is this going to feel like a tropical smoothie bar?” Two coats later, I realized the secret: Coral Reef reads polished when the finish is smooth and the styling around it is calm.
The biggest surprise was how much the undertone shifts with lighting. In morning light, it leans brighter and fresherpink-orange, almost like a warm sunrise. At night under a lamp, it deepens into a richer coral-red that feels cozier and more sophisticated. That means your entry table doesn’t look identical all day, which sounds dramatic but actually keeps it interesting. It’s like the table has a day job and an evening personality.
Practically speaking, an entry table is the testing ground for durability. Keys and sunglasses are the obvious hazards, but the real villains are the sneaky ones: the metal zipper edge of a bag, the corner of a parcel, the gritty bottom of a “temporary” decorative bowl that you slide an inch every day. The trick that made the biggest difference was giving the paint time to cure before loading the surface. Once cured, the finish felt noticeably tougher and less “grabby,” and wiping down fingerprints became easy instead of nerve-wracking.
Styling was the other learning curve. Coral Reef doesn’t need a lot of competition. When I piled on colorful accessories, the table looked busylike it was trying to audition for a lifestyle catalog. When I edited down to a warm lamp, a shallow tray, a simple vase, and one stack of books, the coral became the statement it wanted to be. Bonus: it made the entry easier to maintain, because there was less stuff to move just to find the keys you swore you put in the tray.
One of my favorite “why didn’t I do this sooner” moments was swapping standard hardware for warmer metal. Coral Reef with a brass knob or a warm gold pull looks intentional and slightly elevatedlike you paid someone who owns a label maker and a calm nervous system. And if you want to tone the color down, you don’t even have to repaint: pair it with natural textures underneath (baskets, woven bins) and keep the wall décor neutral. The table stays vibrant, but the overall entry still feels balanced.
Would I do it again? Absolutelyespecially because an entry table is the perfect place for a color that makes you happy. You see it multiple times a day, and it turns a purely functional moment (“I need my keys right now”) into something a little more pleasant (“wow, my house has vibes”). If you’re on the fence, start with a small piece like this. Coral Reef is bold, but on a hardworking entry table, it feels less like a risk and more like a daily boost.





