
Table of Contents >> Show >> Hide
- What Is a Cupcake Cone?
- Ingredients You Need
- How to Make a Cupcake Cone Step by Step
- Best Frosting for Cupcake Cones
- Flavor Ideas for Cupcake Cones
- Common Mistakes and How to Avoid Them
- How to Store Cupcake Cones
- Can You Make Cupcake Cones Ahead of Time?
- How to Serve Cupcake Cones at a Party
- Experience Tips: What I Learned Making Cupcake Cones
- Conclusion
There are desserts that politely sit on a plate, and then there are desserts that arrive wearing a party hat. A cupcake cone is definitely the second kind. It looks like ice cream, eats like cake, travels better than a frosted cupcake, and somehow makes adults say, “Oh my gosh, I remember these!” before children have even reached for the sprinkles.
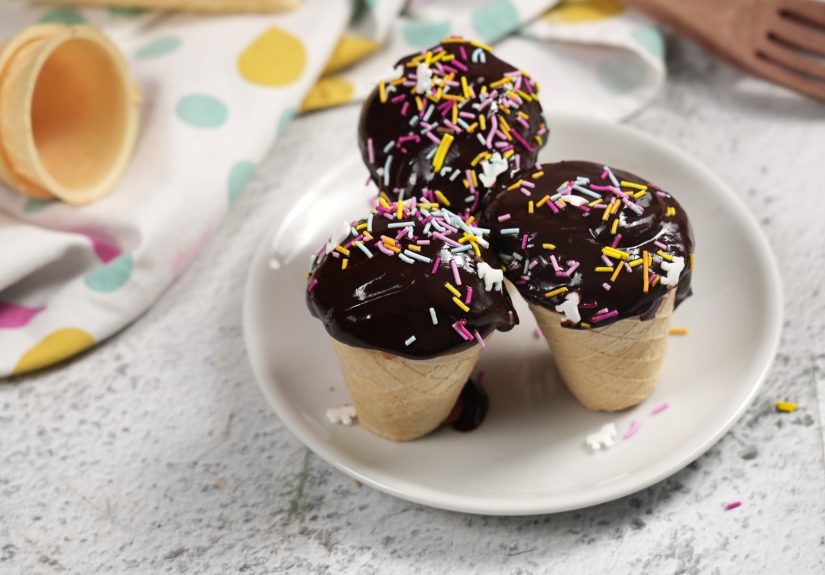
If you have ever wondered how to make a cupcake cone that bakes evenly, stands upright, avoids the dreaded batter volcano, and still looks cute enough for a birthday table, this guide is for you. Cupcake cones, also called ice cream cone cupcakes or cake cones, are made by baking cupcake batter directly inside flat-bottom ice cream cones. Once cooled, they are topped with frosting to resemble a scoop or swirl of ice cream.
The best part? You do not need professional bakery equipment. A muffin tin, a box of cake mix or homemade batter, frosting, and a little patience will do most of the heavy lifting. The cones provide crunch, the cake brings softness, and the frosting says, “Yes, we are absolutely adding sprinkles.”
What Is a Cupcake Cone?
A cupcake cone is exactly what it sounds like: cupcake batter baked inside an ice cream cone. The result is a handheld dessert that looks playful but tastes familiar. Instead of peeling away a paper liner, guests hold the cone and bite straight in. It is part cupcake, part ice cream parlor nostalgia, and part edible magic trick.
Most recipes use flat-bottom wafer cones because they stand upright more easily than pointed sugar cones. The cones are placed in a muffin pan, cake pan, foil support, or cone baking rack, filled with batter, baked until the cake is done, cooled completely, and decorated with buttercream, ganache, whipped frosting, sprinkles, cherries, or candy.
Cupcake cones are especially popular for birthday parties, classroom celebrations, bake sales, summer cookouts, baby showers, and any event where you want dessert to look adorable without requiring forks, plates, or a committee meeting.
Ingredients You Need
You can make cupcake cones with boxed cake mix or homemade cupcake batter. Boxed cake mix is quick, reliable, and wonderfully practical when you are baking for a crowd. Homemade batter gives you more control over flavor and texture. Both work well as long as the batter is not too runny and the cones are not overfilled.
Basic Cupcake Cone Ingredients
- 24 flat-bottom ice cream cones
- 1 box vanilla, chocolate, yellow, or funfetti cake mix, plus ingredients listed on the box
- Or 1 batch homemade cupcake batter
- 2 to 3 cups buttercream frosting or your favorite frosting
- Rainbow sprinkles, mini chocolate chips, chopped nuts, or candy toppings
- Maraschino cherries, optional
Helpful Tools
- Standard 12-cup muffin tin
- Large mixing bowl
- Hand mixer or whisk
- Cookie scoop, measuring cup, or piping bag
- Toothpicks for checking doneness
- Wire cooling rack
- Piping bag and large star tip, optional but very fun
- Aluminum foil, optional for stabilizing cones
How to Make a Cupcake Cone Step by Step
The method is simple, but the small details matter. The biggest mistakes are overfilling the cones, moving them too aggressively while hot, or frosting them before they are fully cool. Cupcake cones may be cheerful, but they are not immune to gravity.
Step 1: Preheat the Oven
Preheat your oven to 350°F. Most cupcake cone recipes use this temperature because it bakes the cake through without browning the cones too aggressively. If your oven runs hot, use an oven thermometer. Cupcake cones are tall and narrow, so even baking is important.
Step 2: Set Up the Cones
Place one flat-bottom ice cream cone in each cup of a muffin tin. If the cones feel wobbly, wrap small pieces of aluminum foil around the base of each cone to help them stand straight. Another clever method is to cover a 9-by-13-inch baking pan tightly with foil, poke small holes in the foil, and press the cones into the openings. This creates a homemade cone holder.
Flat-bottom cones are the easiest choice for beginners. Pointed cones can be used for special designs, but they need stronger support and are more likely to tip over. Save those for when you are feeling bold, caffeinated, and emotionally prepared.
Step 3: Prepare the Batter
Prepare your cake batter according to the package directions or your homemade cupcake recipe. Vanilla, yellow cake, chocolate, and funfetti are all excellent options. For a birthday-party look, funfetti batter is almost unfairly charming. For a sundae-style dessert, chocolate cake with vanilla buttercream is a classic.
Mix the batter only until combined. Overmixing can make cupcakes dense or tough because it develops too much gluten in the flour. A few tiny lumps are not a baking emergency. They are just the batter’s way of saying, “Please stop stirring me.”
Step 4: Fill the Cones Correctly
Spoon or pipe batter into each cone until it is about half to two-thirds full. This is the most important step in making cupcake cones. Batter rises as it bakes, and overfilled cones can overflow like tiny cake volcanoes. Delicious? Yes. Neat? Not even a little.
A scant 3 tablespoons of batter is usually enough for a standard flat-bottom cone. If your cones are larger or smaller, use the inner ridge of the cone as a guide and avoid filling past it. A cookie scoop or piping bag makes this step cleaner and helps keep each cone evenly filled.
Step 5: Bake Until Done
Carefully place the muffin tin or pan in the oven. Bake for 18 to 26 minutes, depending on the batter, cone size, and recipe. Start checking around 18 minutes. Insert a toothpick into the center of the cake portion. If it comes out clean or with a few moist crumbs, the cupcake cones are done.
If the toothpick comes out with wet batter, bake for a few more minutes and check again. Avoid opening the oven door every two minutes, though. Cupcakes enjoy warmth, not suspense.
Step 6: Cool Completely
Let the cupcake cones cool in the pan for about 10 minutes, then carefully transfer them to a wire rack. Allow them to cool completely before frosting. This may take 45 to 60 minutes.
Do not frost warm cupcake cones unless you enjoy watching buttercream slowly slide down the side like a dessert-themed landslide. Warm cake melts frosting, softens cones faster, and makes decorating much harder.
Step 7: Frost and Decorate
Once the cupcake cones are completely cool, pipe frosting on top to look like soft-serve ice cream. Use a large star tip for a bakery-style swirl, or spread frosting with a butter knife for a casual homemade look. Add sprinkles immediately so they stick before the frosting crusts over.
For the full ice cream shop effect, drizzle with melted chocolate or caramel sauce, add chopped nuts, and finish with a cherry. Suddenly, you are not just serving cupcakes. You are operating a tiny dessert carnival.
Best Frosting for Cupcake Cones
Buttercream is the best all-around frosting for cupcake cones because it holds its shape, pipes beautifully, and tastes like celebration. American buttercream made with butter, powdered sugar, vanilla, milk, and a pinch of salt is easy and sturdy.
Cream cheese frosting is delicious but softer, so it works best if the cones will be served soon after decorating. Whipped frosting is light and pretty but less stable at room temperature. For outdoor parties, choose a firmer buttercream and keep the cones in a cool place until serving.
Easy Vanilla Buttercream
- 1 cup unsalted butter, softened
- 4 cups powdered sugar
- 2 teaspoons vanilla extract
- 2 to 4 tablespoons milk or heavy cream
- Pinch of salt
Beat the butter until creamy. Add powdered sugar gradually, then mix in vanilla, salt, and enough milk or cream to reach a pipeable consistency. Beat for 2 to 3 minutes until fluffy. If the frosting is too thick, add a teaspoon of milk at a time. If it is too thin, add more powdered sugar.
Flavor Ideas for Cupcake Cones
One reason cupcake cones are so lovable is that they are endlessly customizable. You can match the colors to a party theme, use different cake flavors, or create a “build your own cone” decorating station.
Birthday Cake Cupcake Cones
Use funfetti cake batter, vanilla buttercream, rainbow sprinkles, and a cherry on top. This is the classic party version and the one most likely to disappear before you finish singing “Happy Birthday.”
Chocolate Sundae Cupcake Cones
Use chocolate cake batter, vanilla frosting, chocolate syrup drizzle, chopped peanuts, and mini chocolate chips. Add a cherry if you want the full sundae look.
Strawberry Shortcake Cupcake Cones
Use vanilla cake batter and top with strawberry buttercream. Add finely diced fresh strawberries right before serving. Avoid adding too much fresh fruit early because moisture can soften the cones.
Cookies and Cream Cupcake Cones
Use chocolate or vanilla cake batter and fold crushed chocolate sandwich cookies into the frosting. Top with cookie crumbs and a mini cookie. This one tends to win over teenagers, adults, and anyone who claims they are “just having one bite.”
Holiday Cupcake Cones
Use colored frosting and themed sprinkles. Red, white, and blue work well for summer holidays. Orange and black make a cute Halloween dessert. Green frosting can turn cupcake cones into Christmas tree treats.
Common Mistakes and How to Avoid Them
Overfilling the Cones
The number one mistake is adding too much batter. Fill each cone only half to two-thirds full. If the batter rises above the cone, it can spill over and create a mushroom top. A small dome is fine; a cupcake landslide is less ideal.
Using Unstable Cones
Some cones have uneven bottoms. Check them before filling. If a cone wobbles when empty, it will become a tiny leaning tower once full of batter. Use foil to stabilize it or choose another cone.
Frosting Too Early
Warm cupcake cones melt frosting. Always cool completely before decorating. If you are short on time, place the cooled cones in the refrigerator for a few minutes before frosting, but do not leave them there uncovered for too long because the cones can absorb moisture.
Storing Them Too Long
Cupcake cones are best enjoyed the day they are made. The cake releases moisture over time, and the cones gradually lose their crispness. They are still tasty the next day, but the texture is best when fresh.
How to Store Cupcake Cones
Store unfrosted cupcake cones loosely covered at room temperature for up to one day. Once frosted, place them in a tall airtight container if possible, being careful not to crush the frosting. If your kitchen is warm or the frosting contains cream cheese, refrigerate them.
For best texture, serve cupcake cones within 24 hours. If you need to bake ahead, make the cones the night before and frost them on the day of the event. This keeps the cone crisp and the frosting fresh.
Transporting cupcake cones can be tricky because they are top-heavy after frosting. A cupcake carrier with deep wells helps. You can also place them back into a muffin tin and wrap foil around the bases for support. Drive carefully. These are desserts, not stunt performers.
Can You Make Cupcake Cones Ahead of Time?
Yes, but timing matters. Bake the cupcake cones up to one day ahead, cool them completely, and store them loosely covered. Frost them as close to serving time as practical. If you frost them too far in advance, the cones may soften, especially in humid weather.
If you are preparing for a party, the smoothest schedule is simple: bake the cones the evening before, make the frosting the same day or the night before, then decorate a few hours before serving. This gives you fresh flavor without turning party day into a flour-covered obstacle course.
How to Serve Cupcake Cones at a Party
Cupcake cones are naturally party-friendly because guests can grab one and go. Arrange them on a cake stand, place them in a cone holder, or stand them in a decorated box with holes cut into the top. For children’s parties, consider adding names to small flags or toppers so everyone gets their own cone.
If you want an interactive dessert table, set out plain frosted cupcake cones with bowls of sprinkles, mini candies, cookie crumbs, and chocolate chips. Kids can decorate their own, and adults will pretend they are helping while secretly adding extra toppings to theirs.
Experience Tips: What I Learned Making Cupcake Cones
After making cupcake cones for birthdays, school-style celebrations, casual weekends, and one memorable afternoon when the kitchen looked like a sprinkle factory exploded, I can confidently say this dessert is easybut it rewards planning. The first lesson is to test your cones before party day. Not all flat-bottom cones are equally flat. Some stand proudly like little soldiers. Others wobble like they have just heard bad news. Set them in the muffin tin before mixing the batter so you can replace any unstable cones early.
The second lesson is that filling matters more than confidence. It is tempting to add “just a little more” batter because the cone looks empty. Resist. Cake batter rises with enthusiasm. A cone filled too high can overflow, stick to the pan, and make the finished treat harder to frost. Half full gives a smaller cake top; two-thirds full gives a nice dome. More than that is a gamble, and dessert gambling is only fun when chocolate is the prize.
I also learned that a piping bag is not just for frosting. It is one of the easiest ways to fill cones neatly. Pour the batter into a large piping bag or zip-top bag, snip the corner, and squeeze the batter into each cone. This keeps the outside of the cone cleaner, which matters if you want them to look polished. A cookie scoop works well too, but a piping bag gives better control.
For decorating, cold patience is your friend. Cupcake cones need to cool completely. Not mostly. Not “I touched one and it seems fine.” Completely. Warm cake makes frosting droop, and once the frosting starts sliding, there is no graceful recovery. If you are in a hurry, move the cooled cones to the refrigerator for a short chill before piping. Just avoid long refrigeration without a cover because cones can become chewy.
Another practical tip is to keep decorations lightweight. A tall mountain of frosting, heavy candy, and a cherry may look amazing, but it can make the cone top-heavy. If children will carry them around, use a moderate frosting swirl and small sprinkles. For a dessert table where the cones stay upright until serving, go ahead and create the full sundae effect.
Finally, cupcake cones are best when they feel fun, not perfect. A slightly tilted swirl still tastes wonderful. A few extra sprinkles never ruined a birthday. And if one cone tips over during decorating, that is the baker’s sample. Quality control is serious work, and someone has to do it.
Conclusion
Learning how to make a cupcake cone is one of those baking skills that delivers maximum charm with minimum stress. You bake cupcake batter inside flat-bottom ice cream cones, cool them completely, and decorate them with frosting so they look like cheerful little ice cream treats. The key is simple: stabilize the cones, avoid overfilling, bake until a toothpick comes out clean, and frost only after the cakes have cooled.
Cupcake cones are perfect for birthdays, bake sales, summer parties, classroom treats, and family baking days. They are easy to customize, fun to serve, and almost guaranteed to make people smile. Best of all, they prove that dessert does not have to be complicated to feel special. Sometimes all you need is cake batter, cones, frosting, and a heroic amount of sprinkles.






