
Table of Contents >> Show >> Hide
- Why Do Christmas Lights Twinkle in the First Place?
- Safety First: Read This Before You Touch Anything
- How to Tell What Type of Christmas Lights You Have
- Method 1: Remove the Red-Tipped Flasher Bulb
- Method 2: Use the Controller’s Steady-On Mode
- Method 3: Replace the Controller Only If It Is Designed for Replacement
- What Not to Do
- Troubleshooting: Why Are My Lights Still Twinkling?
- Best Replacement Options for a Steady Glow
- When You Should Replace Instead of Repair
- Real-Life Experience: Lessons from Removing Twinkle Lights
- Conclusion
Christmas lights are supposed to make your home feel warm, merry, and charmingnot like your living room has been taken over by a tiny festive disco. If your lights keep blinking, flashing, chasing, or doing that dramatic “look at me!” twinkle when all you wanted was a calm, steady glow, you are not alone. Many light sets are designed with a twinkle feature, and depending on the type of lights you own, removing it can be wonderfully simple or, frankly, a sign that it is time to buy a calmer strand.
The good news: in many older incandescent Christmas lights, the twinkle effect is caused by one small flasher bulb, often marked with a red tip. Remove that bulb and replace it with the correct steady replacement bulb, and your lights may behave like polite holiday guests again. The slightly more complicated news: many modern LED Christmas lights use a built-in controller, function box, remote, or memory chip to create flashing modes. In that case, you usually cannot “remove” the twinkle feature safely without replacing the controller or the entire strand.
This guide explains how to remove the twinkle feature from Christmas lights, how to identify whether your lights are incandescent or LED, when a simple bulb swap will work, when it will not, and how to avoid turning a cute decorating project into an electrical mystery novel.
Why Do Christmas Lights Twinkle in the First Place?
Before fixing the problem, it helps to know what is causing it. Christmas lights usually twinkle for one of three reasons: a flasher bulb, a built-in controller, or a programmed lighting mode. The correct solution depends entirely on which one you have.
1. A Red-Tipped Flasher Bulb
Many traditional incandescent mini Christmas lights come with a small red-tipped bulb in the package. This is not a bonus “spicy bulb.” It is a flasher bulb. When installed in the strand, it heats up, breaks the circuit, cools down, reconnects, and repeats the process. That creates the blinking or twinkling effect.
On some strands, one flasher bulb can cause the entire section to blink. On others, it may affect only a portion of the lights. If your lights are older incandescent mini lights and they started blinking after someone replaced a bulb, there is a very good chance a red-tipped flasher bulb is the culprit.
2. A Built-In Mode Controller
Many LED Christmas lights include a small plastic controller box near the plug or along the cord. It may have a button labeled “mode,” “function,” “timer,” “steady,” or “8 modes.” Pressing the button cycles through effects such as combination, waves, sequential, slow glow, chasing, flash, twinkle, and steady on.
If your lights have a controller box, the twinkle is probably electronic rather than bulb-based. You may simply need to press the button until you reach “steady on.” If the lights reset every time they are unplugged, they may lack memory, which means they return to the first mode automatically. Yes, that is annoying. No, yelling “remember your training” at the controller usually does not help.
3. A Pre-Programmed LED Strand
Some modern decorative lights are sold as twinkle lights, fairy lights, curtain lights, icicle lights, net lights, or app-controlled lights. In these products, the blinking effect may be built into the wiring, controller, LEDs, or power supply. These are not designed to be converted into steady lights by casual home repair.
Safety First: Read This Before You Touch Anything
Christmas lights may look harmless, but they still involve electricity, heat, cords, plugs, fuses, and sometimes outdoor weather. Always unplug the strand before removing bulbs, replacing fuses, checking sockets, or handling the controller. Never cut, splice, bypass, or rewire a plug-in light set unless you are properly trained and the product is designed for that kind of modification.
Also inspect the strand before you start. If you see cracked sockets, exposed wires, melted plastic, scorch marks, loose plugs, missing bulbs, or a cord that looks like it lost a fight with a lawn chair, do not repair the twinkle feature. Retire the strand. A steady glow is nice; avoiding a fire hazard is nicer.
How to Tell What Type of Christmas Lights You Have
To remove the twinkle feature correctly, first identify your light type. Look at the bulbs, the plug, and the cord.
Incandescent Christmas Lights
Incandescent Christmas lights usually have tiny glass bulbs with visible filaments. They get warmer during use and often come with replacement bulbs in a small plastic packet. Older mini lights are frequently incandescent. Larger C7 and C9 bulbs may also be incandescent, although LED versions are now common.
If your incandescent strand is twinkling, look for a red-tipped, clear, or specially marked flasher bulb. It may be installed anywhere in the strand.
LED Christmas Lights
LED Christmas lights usually stay cooler, use less electricity, and may have molded plastic lenses rather than removable glass bulbs. Some have replaceable bulbs, but many do not. If there is a small controller box with a button, dial, remote receiver, or USB-style power supply, the twinkle is probably controlled electronically.
Battery-Operated or USB Lights
Battery-operated fairy lights and USB-powered strings often include a tiny control module with several modes. For these, removing twinkle usually means selecting steady mode, replacing the controller with a compatible steady-power unit, or buying a steady-on version.
Method 1: Remove the Red-Tipped Flasher Bulb
This is the easiest and most common fix for older incandescent mini lights.
Step 1: Unplug the Lights
Do not skip this. Unplug the strand from the wall, extension cord, power strip, or tree outlet. If the lights are on a pre-lit tree, disconnect the relevant section before working on it.
Step 2: Find the Flasher Bulb
Search the strand for a bulb with a red-painted tip or a bulb that looks different from the others. Sometimes the flasher bulb is clear with a colored tip. Sometimes it may be tucked deep inside the branches, because Christmas trees enjoy hiding tiny objects like mischievous forest goblins.
Step 3: Remove the Bulb Carefully
Grip the plastic base of the bulb, not the glass. Pull it straight out or wiggle gently, depending on the socket style. If you have a bulb puller, use it. Avoid crushing the bulb or bending the socket contacts.
Step 4: Replace It with a Matching Steady Bulb
Use a regular replacement bulb that matches the strand’s voltage, wattage, bulb shape, and base style. Do not grab a random bulb from another strand unless it is truly compatible. Mini light replacement bulbs are not one-size-fits-all. A 2.5-volt bulb and a 3.5-volt bulb may look like twins, but electrically they are not the same.
Step 5: Plug the Strand Back In
After replacing the flasher bulb, plug the lights back in and wait a minute. If the strand glows steadily, congratulations: you have successfully removed the twinkle feature. Your tree has been returned from nightclub mode to cozy postcard mode.
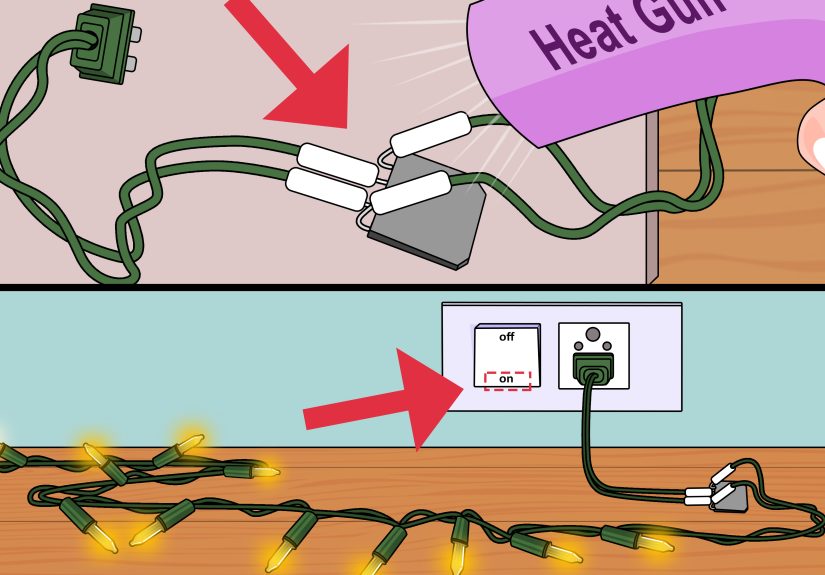
Method 2: Use the Controller’s Steady-On Mode
If your Christmas lights have a mode controller, removing the twinkle feature may be as simple as pressing a button.
Step 1: Locate the Control Box
Look near the plug, battery pack, transformer, or along the first few feet of cord. The controller is usually a small plastic box with one button. It may be green, black, white, or clear.
Step 2: Cycle Through the Modes
Press the button slowly. Give each setting a few seconds to show itself. Many light sets cycle through patterns in this order: combination, waves, sequential, slow glow, chasing, flash, twinkle, and steady on. Your set may differ.
Step 3: Stop at Steady On
When the lights remain continuously lit without flashing, leave the controller alone. Some controllers remember the last setting after being turned off. Others reset when unplugged. If yours resets every time, consider using a timer that cuts power only after the controller has been set, or look for a replacement set with a memory function.
Method 3: Replace the Controller Only If It Is Designed for Replacement
Some low-voltage LED light sets use detachable power adapters or plug-in controllers. If the manufacturer sells a compatible steady-on adapter or replacement controller, that may solve the problem. The key word is compatible.
Match the voltage, current rating, connector type, polarity, indoor/outdoor rating, and total wattage. If that sentence made your brain quietly leave the room, choose the safer option: buy a new steady-on light strand. It is cheaper than damaging the lights, tripping a breaker, or creating a shock hazard.
What Not to Do
Do not cut out the controller box on a 120-volt plug-in LED strand. Do not tape wires together. Do not bypass fuses. Do not remove a bulb and leave the socket empty unless the product instructions specifically allow it. Do not use indoor-only lights outdoors. Do not connect more strands end-to-end than the label permits. And please, do not “test it real quick” while standing in wet grass. The holidays already have enough drama.
Troubleshooting: Why Are My Lights Still Twinkling?
You Replaced the Wrong Bulb
Some strands have more than one circuit or more than one flasher bulb. Inspect the full strand carefully. If only half the lights blink, the flasher may be in that section.
The Replacement Bulb Is Not Compatible
If the strand goes dark or behaves strangely after a bulb swap, unplug it and check that the replacement bulb matches the original specifications. Wrong bulbs can cause poor performance and shorten the life of the strand.
The Twinkle Is Built Into the LEDs
Some LED bulbs have internal flashing chips. If each bulb twinkles independently and there is no controller button, you may not be able to remove the effect. Replace the strand with steady-on LEDs.
The Controller Resets Automatically
Many budget LED sets default to the first mode after power loss. If the first mode is “combination” or “twinkle,” you will have to press the button every time or upgrade to lights with mode memory.
Best Replacement Options for a Steady Glow
If your current lights cannot be converted, shop for Christmas lights labeled “steady on,” “constant,” “warm white steady,” “commercial grade,” or “single function.” For LED lights, check whether the product has a memory controller. If you love a calm traditional look, warm white LEDs can mimic the soft glow of incandescent bulbs while staying cooler and using less energy.
For outdoor decorating, choose lights rated for outdoor use. For trees, garlands, and mantels, indoor lights are fine if the label allows it. For large displays, consider the amp rating and manufacturer limits for connecting multiple strands. More lights are festive; overloaded circuits are not.
When You Should Replace Instead of Repair
Replace the strand if the cord is cracked, the plug is loose, the sockets are damaged, the lights smell hot, the controller gets unusually warm, the fuse blows repeatedly, or the manufacturer instructions warn against bulb replacement. A new light set is usually inexpensive compared with the risk of using damaged electrical decorations.
Also replace the strand if it simply refuses to behave. Some twinkle lights are born to twinkle. Trying to force them into a steady glow is like asking a marching band to become a library. Possible? Maybe. Worth it? Usually not.
Real-Life Experience: Lessons from Removing Twinkle Lights
The first time I tried to remove the twinkle feature from Christmas lights, I assumed the strand was broken. Half the tree was blinking like it had received urgent news, while the other half glowed peacefully. I checked the plug, wiggled the cord, blamed the outlet, blamed the cat, and briefly considered blaming the entire month of December. Eventually, I found one tiny red-tipped bulb hiding in the middle of the strand. It looked innocent. It was not innocent.
Once I replaced that red-tipped bulb with a regular clear replacement bulb from the original package, the entire section became steady again. The fix took less than five minutes after I knew what to look for. The search, however, took much longer because the bulb was buried behind ornaments, ribbon, and one extremely judgmental snowman decoration.
Another experience involved LED lights with eight functions. They looked beautiful in the store, where “twinkle sparkle waterfall fairy dream mode” seemed charming for about eleven seconds. At home, wrapped around a banister, the same effect became visual chaos. There was a controller button near the plug, so I pressed it through the settings until I found steady on. Problem solveduntil the next evening, when the timer turned the lights back on and the strand returned to flashing mode. That set did not have memory, which meant it forgot the chosen setting every single day. I eventually moved those lights to a window display where blinking was less annoying and bought steady-on lights for the banister.
The biggest lesson is to test Christmas lights before decorating. Plug them in on the floor, cycle through the modes, check for a steady setting, and inspect for flasher bulbs before wrapping them around a seven-foot tree. Removing lights after decorating is nobody’s idea of holiday cheer. It is more like festive spaghetti wrestling.
Another helpful habit is saving the little packet of replacement bulbs and fuses that comes with the lights. Tape it to the storage reel or place it in a labeled holiday repair bag. When you need a matching bulb, that packet is gold. Random replacement bulbs from another set may fit physically but still be electrically wrong. Matching matters.
Finally, I have learned to read product labels carefully. “Twinkle,” “sparkle,” “random shimmer,” “chasing,” and “multi-function” all sound magical, but they do not always mean “can be steady.” If you want calm lights, buy lights that clearly say “steady on” or “constant light.” Your future self, standing on a step ladder with pine needles in your socks, will be grateful.
Conclusion
Removing the twinkle feature from Christmas lights is easy when the blinking comes from a red-tipped incandescent flasher bulb: unplug the strand, remove the flasher, and replace it with a matching steady bulb. If your lights use an LED controller, press the mode button until you find steady on. If the controller has no memory or the lights are permanently programmed to twinkle, the safest and simplest solution is to replace them with steady-on Christmas lights.
The golden rule is simple: change bulbs when the product is designed for bulb replacement, use controller settings when available, and avoid cutting, bypassing, or rewiring plug-in light sets. A peaceful holiday glow should not require electrical bravery. With the right fix, your Christmas lights can stop performing and start relaxingjust like everyone hopes to do after wrapping the last gift.





